Description of this recipe
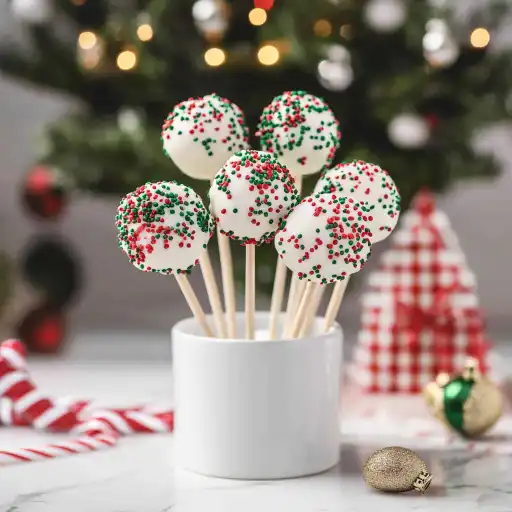
These Easy Christmas Cake Pops are the perfect holiday treat, offering a delightful combination of moist cake, creamy frosting, and a crisp chocolate coating, all adorned with festive sprinkles. Made with a simple cake mix, these cake pops are incredibly easy to make and are sure to be a hit at any Christmas gathering. Whether you’re looking for a fun activity to do with kids or a sweet treat to share with friends and family, these cake pops are a festive and delicious choice.
Why you will love this recipe
You will love these Christmas Cake Pops for several reasons. First, they are incredibly easy to make, thanks to the use of a cake mix. This shortcut saves time and effort without compromising on taste. Second, they are highly customizable. You can use different cake mix flavors, frosting types, and sprinkle combinations to create unique variations. Third, these cake pops are visually appealing, making them a perfect addition to any holiday dessert table. Fourth, they are a great way to get kids involved in the kitchen, as the decorating process is fun and engaging. Finally, these cake pops are incredibly delicious, combining the comforting flavors of cake and frosting with the satisfying crunch of a chocolate coating.
Ingredients:
- 1 13.25 oz box super moist yellow cake mix (such as Betty Crocker): This forms the base of the cake pops, providing a moist and flavorful foundation.
- 3 large eggs at room temperature: These bind the cake batter together, adding richness and structure to the cake.
- ⅓ cup unflavored oil (such as vegetable oil): This adds moisture to the cake, ensuring it remains tender and delicious.
- 1 cup water: This hydrates the cake batter, helping to create a smooth and consistent texture.
- ½ cup cream cheese frosting (such as Betty Crocker Rich and Creamy): This adds a creamy and tangy element to the cake pops, complementing the sweetness of the cake and chocolate.
- 12 oz vanilla almond bark (or substitute white chocolate or candy melts): This provides a smooth and crisp coating for the cake pops, adding a touch of sweetness and enhancing their visual appeal.
- 15 Cake pop sticks: These provide a handle for the cake pops, making them easy to hold and enjoy.
- Holiday sprinkles for decorating: These add a festive touch to the cake pops, making them perfect for Christmas celebrations.
Preparation:
Step 1: Preheat your oven to 350°F (175°C). Grease a 9×13-inch baking sheet pan with cooking spray or line it with parchment paper. This ensures the cake doesn’t stick to the pan and makes for easy removal. Setting the oven temperature correctly is crucial for even baking.
Step 2: In a large bowl, combine the yellow cake mix, eggs, oil, and water. Use a hand mixer or whisk to blend everything together until the cake batter is smooth and well-combined, about 2 minutes. This ensures that all the ingredients are properly incorporated, resulting in a uniformly textured cake. Mixing for the right duration is key to preventing lumps.
Step 3: Transfer the cake batter to the prepared pan and spread it out evenly. Bake for 25-28 minutes, or until a toothpick inserted into the center of the cake comes out clean. Evenly spreading the batter ensures uniform baking. The toothpick test is the most reliable way to determine if the cake is fully baked.
Step 4: Once baked, allow the cake to cool completely. After cooling, trim off the brown edges of the cake to create a clean surface. Then, break the cake into 4-5 large pieces and crumble them into fine crumbs in a bowl. Cooling the cake completely prevents the frosting from melting when mixed in. Trimming the edges improves the overall appearance and texture of the cake pops.
Step 5: Add the cream cheese frosting to the crumbled cake in the bowl. Mix it well until the frosting is evenly distributed, and the mixture becomes dough-like. Ensure the frosting is thoroughly mixed into the cake crumbs to create a cohesive mixture that can be easily shaped into balls.
Step 6: Using an ice cream scoop, take a portion of the cake mixture about the size of a golf ball and roll it into a smooth ball. Place the formed cake balls on a plate. Refrigerate them for about 10 minutes to help them firm up. Using an ice cream scoop ensures uniform sizing. Chilling the cake balls helps them hold their shape and makes them easier to dip in chocolate.
Step 7: Meanwhile, in a microwave-safe bowl, melt the white chocolate or almond bark in short intervals (20-30 seconds), stirring after each interval until smooth and fully melted. Melting the chocolate in short intervals prevents it from burning or seizing. Stirring ensures even melting.
Step 8: Dip the tip of each cake pop stick into the melted chocolate, then insert it halfway into each cake pop to help it stay in place. Return the cake pops to the plate and refrigerate again for 10 minutes to set the sticks. Dipping the stick in chocolate acts as a glue, securing it to the cake pop. Chilling the cake pops again ensures the sticks are firmly in place before dipping.
Step 9: After the cake pops have chilled, dip each one into the melted white chocolate or almond bark until completely coated. Gently tap the stick to remove any excess chocolate and ensure an even coating. Dipping the cake pops quickly and tapping off excess chocolate results in a smooth and even coating.
Step 10: Decorate the cake pops with festive holiday sprinkles immediately after coating. Once decorated, place the cake pops vertically, sticking the end of the stick into a foam block or a similar surface to keep them upright. Decorating immediately after dipping ensures the sprinkles adhere to the chocolate. Placing the cake pops upright prevents the chocolate from pooling and creating an uneven finish.
Step 11: Allow the cake pops to come to room temperature and let the chocolate coating fully set. Once set, enjoy these delicious and festive holiday treats! Letting the chocolate set completely ensures a firm and crisp coating.
COOKING Rating:
Easy
Serving Suggestions:
These cake pops are perfect for serving at Christmas parties, holiday gatherings, or as a sweet treat for family and friends. They can be displayed on a cake pop stand, arranged on a platter, or individually wrapped as party favors. Pair them with a glass of milk, hot chocolate, or coffee for a complete holiday experience.
Tips:
- Use room temperature ingredients: This ensures that the cake batter mixes together smoothly and evenly.
- Don’t overbake the cake: Overbaking can result in a dry cake, which will make the cake pops less moist and enjoyable.
- Chill the cake balls: Chilling the cake balls before dipping them in chocolate helps them hold their shape and prevents them from falling off the sticks.
- Melt the chocolate slowly: Melting the chocolate in short intervals prevents it from burning or seizing.
- Work quickly: Once the cake pops are dipped in chocolate, decorate them immediately to ensure the sprinkles adhere properly.
- Use a double boiler: If you don’t have a microwave, you can melt the chocolate in a double boiler over low heat.
- Add a flavor extract: You can add a teaspoon of vanilla extract, almond extract, or peppermint extract to the cake batter or frosting for added flavor.
- Decorate with different toppings: In addition to sprinkles, you can decorate the cake pops with crushed candy canes, chopped nuts, or edible glitter.
- Store the cake pops properly: Store the cake pops in an airtight container at room temperature for up to 3 days.
Prep Time:
20 minutes
Cook Time:
25-28 minutes
Total Time:
1 hour (including cooling and chilling time)
Nutritional Information:
(Note: Nutritional information is approximate and may vary depending on specific ingredients used.)
Calories:
Approximately 250-300 per cake pop
Protein:
Approximately 3-4 grams per cake pop
Sodium:
Approximately 100-150 mg per cake pop
Conclusion
These Easy Christmas Cake Pops are a delightful and festive treat that is sure to bring joy to any holiday celebration. With their moist cake center, creamy frosting, and crisp chocolate coating, these cake pops are a perfect combination of flavors and textures. Whether you’re baking with kids, hosting a Christmas party, or simply looking for a sweet treat to enjoy, these cake pops are an easy and delicious choice. Get creative with your decorations and customize them to suit your own holiday theme. Enjoy the process of making and sharing these adorable and tasty Christmas Cake Pops!
Q&A
Q1: Can I use a different flavor of cake mix for these cake pops?
A: Absolutely! Feel free to experiment with different cake mix flavors such as chocolate, red velvet, or spice cake. Each flavor will add a unique twist to the cake pops. Just ensure the cake mix is of similar size (around 13-16 oz) to maintain the correct ratio of ingredients.
Q2: What if I don’t have cream cheese frosting? Can I use a different type of frosting?
A: Yes, you can substitute cream cheese frosting with other types of frosting, such as vanilla, chocolate, or buttercream. Cream cheese frosting adds a tangy flavor, so keep in mind that the overall taste will be different. Adjust the amount of frosting to ensure the mixture is moist and pliable enough to form balls.
Q3: How do I prevent the chocolate from cracking on the cake pops?
A: To prevent the chocolate from cracking, ensure that the cake pops are not too cold when you dip them. Allowing them to come to room temperature slightly before dipping can help. Also, avoid moving the cake pops from extreme temperature changes quickly.
Q4: Can I make these cake pops ahead of time?
A: Yes, you can make these cake pops 1-2 days in advance. Store them in an airtight container at room temperature to maintain their texture and flavor. Avoid refrigerating them, as this can cause the chocolate to sweat or the cake to dry out.
Q5: What are some alternative decorations I can use if I don’t have holiday sprinkles?
A: There are plenty of alternative decorations you can use! Consider crushed candy canes, chopped nuts, edible glitter, mini chocolate chips, or even a drizzle of contrasting colored chocolate. Get creative and use what you have on hand to make your cake pops unique and festive.


