Description: This Easy Pineapple Cherry Dump Cake is the ultimate in effortless baking. It’s a delightful combination of juicy pineapple, sweet cherry pie filling, and a buttery cake topping that bakes to golden perfection. This recipe requires minimal effort and delivers maximum flavor, making it perfect for busy weeknights, potlucks, or any occasion when you need a quick and satisfying dessert.
Why You Will Love This Recipe:
- Simplicity: This recipe lives up to its name! It requires just a handful of ingredients and minimal preparation.
- Flavor Explosion: The combination of tangy pineapple, sweet cherries, and buttery cake creates a symphony of flavors that will tantalize your taste buds.
- Versatility: You can easily customize this dump cake by adding different fruits, nuts, or spices to suit your preferences.
- Crowd-Pleaser: This dessert is always a hit, whether you’re serving it to family or friends.
- Quick & Easy Clean-Up: Because you’re simply layering ingredients in a dish, clean-up is a breeze!
Introduction
In the realm of desserts, there exists a special category of recipes that prioritize ease of preparation without sacrificing flavor. Enter the Dump Cake – a magical creation where you literally “dump” ingredients into a baking dish and let the oven do its work. The Pineapple Cherry Dump Cake is a quintessential example of this genre, a testament to the fact that delicious desserts don’t have to be complicated.
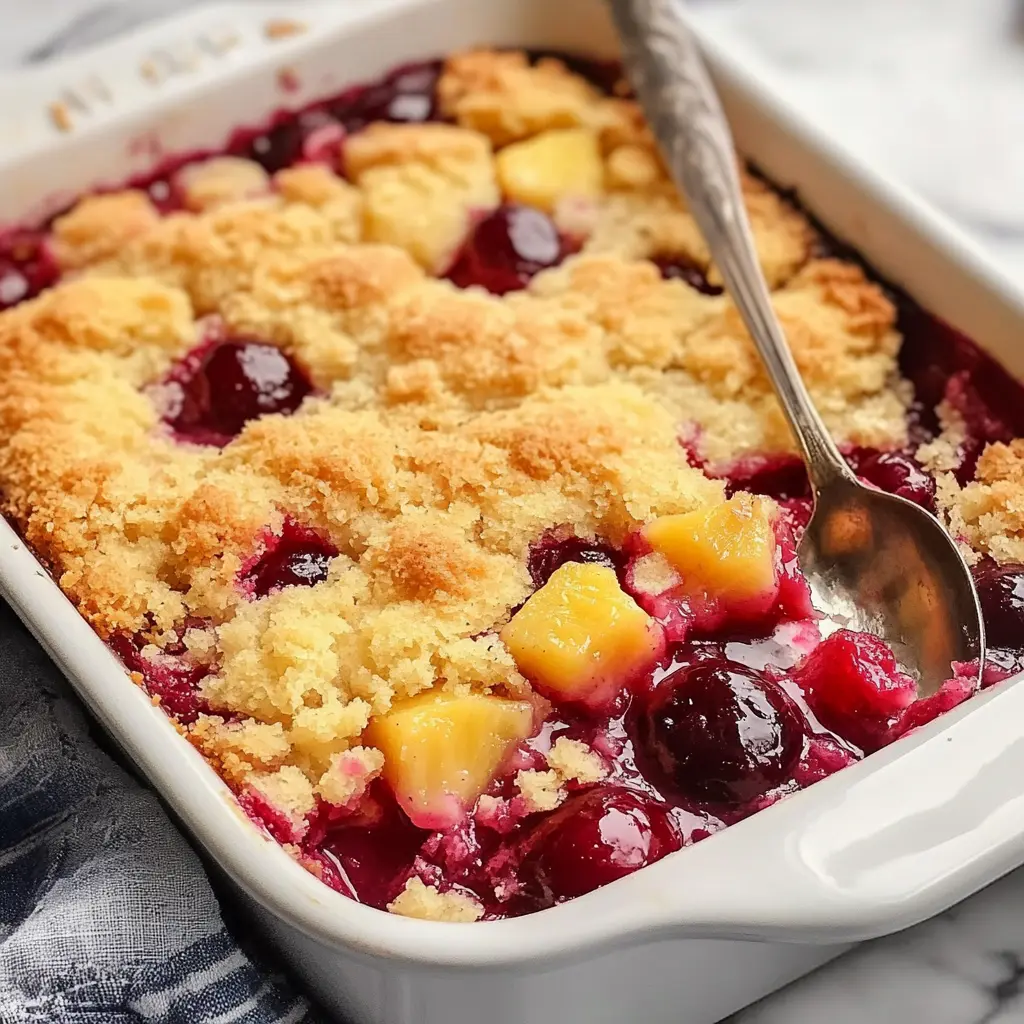
This particular rendition blends the tropical sweetness of crushed pineapple with the comforting, familiar taste of cherry pie filling. The canvas for these vibrant flavors is a simple yellow cake mix, which transforms into a golden, buttery crust during baking. The addition of melted butter adds richness and ensures a moist, tender crumb, while a sprinkle of chopped walnuts provides a delightful textural contrast.
What makes this Pineapple Cherry Dump Cake truly special is its adaptability. While this recipe uses crushed pineapple and cherry pie filling, you can easily substitute other fruits and flavor combinations. Experiment with peach pie filling and sliced almonds, blueberry pie filling and pecans, or even apple pie filling with a dash of cinnamon. The possibilities are endless!
This recipe is a lifesaver for those moments when you need a quick and impressive dessert without spending hours in the kitchen. It’s perfect for last-minute gatherings, potlucks, or simply satisfying a sweet craving. So, gather your ingredients, preheat your oven, and prepare to be amazed by the simplicity and deliciousness of this Pineapple Cherry Dump Cake!
Ingredients:
- 1 can (20 oz) crushed pineapple, undrained
- 1 can (21 oz) cherry pie filling
- 1 box yellow cake mix
- 1/2 cup unsalted butter, melted
- 1/2 cup chopped walnuts (optional)
Preparation:
Step 1: Preheat and Prepare
Begin by preheating your oven to 350°F (175°C). This ensures that the cake bakes evenly and reaches its golden, bubbly perfection. While the oven is preheating, grease a 9×13-inch baking dish with butter or cooking spray. This prevents the cake from sticking and makes it easy to remove once it’s baked.
Step 2: Pineapple Layer
Open the can of crushed pineapple and, without draining, spread the pineapple and its juice evenly across the bottom of the prepared baking dish. The pineapple provides a moist, flavorful base for the cake and infuses the cherry layer with a hint of tropical sweetness. The undrained juice is crucial as it adds moisture and helps to meld the ingredients together during baking.
Step 3: Cherry Pie Filling Layer
Next, spoon the cherry pie filling evenly over the pineapple layer. Distribute the cherries and sauce as uniformly as possible to ensure that each bite is bursting with cherry flavor. The cherry pie filling not only adds a burst of sweetness but also contributes a beautiful visual contrast to the yellow cake topping.
Step 4: Cake Mix Topping
Sprinkle the dry yellow cake mix evenly on top of the fruit layers, ensuring that you completely cover the pineapple and cherries. The dry cake mix acts as a blank canvas that soaks up the juices from the fruit and the melted butter, transforming into a soft, golden crust during baking. Be sure to break up any large clumps of cake mix to ensure an even distribution.
Step 5: Butter Drizzle and Nutty Addition (Optional)
Drizzle the melted butter evenly over the cake mix. The melted butter is essential for creating a moist and tender cake. It also helps to bind the cake mix together and create a golden, crispy crust. Aim for even distribution to ensure that no part of the cake remains dry. If desired, sprinkle the chopped walnuts on top of the melted butter. The walnuts add a delightful textural contrast and a nutty flavor that complements the sweetness of the fruit and cake.
Step 6: Baking Time
Place the baking dish in the preheated oven and bake for 45-50 minutes, or until the top is golden brown and bubbly. The baking time may vary depending on your oven, so keep a close eye on the cake and test for doneness by inserting a toothpick into the center. If the toothpick comes out clean or with a few moist crumbs, the cake is ready.
Step 7: Cooling and Serving
Once the cake is baked, remove it from the oven and let it cool slightly before serving. Allowing the cake to cool for a few minutes helps it to set and prevents it from being too crumbly. This cake is delicious served warm, especially with a scoop of vanilla ice cream. The contrast between the warm, sweet cake and the cold, creamy ice cream is simply irresistible.
COOKING Rating:
Easy – This recipe is incredibly straightforward and requires minimal cooking experience.
Serving Suggestions:
- Serve warm with a scoop of vanilla ice cream or whipped cream.
- Drizzle with caramel sauce or chocolate syrup for an extra touch of indulgence.
- Serve with a dollop of Greek yogurt for a healthier twist.
- Enjoy as a dessert with coffee or tea.
Tips:
- Use a high-quality yellow cake mix for the best results.
- If you don’t have walnuts on hand, you can substitute pecans, almonds, or other nuts.
- For a richer flavor, use brown butter instead of melted butter.
- If the top of the cake starts to brown too quickly, cover it loosely with foil.
- Store leftovers in an airtight container at room temperature for up to 3 days.
Prep Time:
10 minutes
Cook Time:
45-50 minutes
Total Time:
55-60 minutes
Nutritional Information:
(Note: Nutritional information is an estimate and may vary based on specific ingredients and portion sizes.)
- Calories: Approximately 350-400 per serving
- Protein: Approximately 3-5 grams per serving
- Sodium: Approximately 200-300 mg per serving
Conclusion
The Easy Pineapple Cherry Dump Cake is a testament to the fact that incredible desserts don’t require hours of slaving away in the kitchen. Its simplicity, coupled with its irresistible flavor and versatility, makes it a go-to recipe for any occasion. Whether you’re a seasoned baker or a novice cook, this dump cake is guaranteed to impress. So, go ahead and give it a try – you won’t be disappointed!
Q&A:
Q1: Can I use a different type of fruit in this dump cake?
A: Absolutely! One of the best things about dump cakes is their versatility. You can easily substitute the pineapple and cherry pie filling with other fruits to create your own unique flavor combinations. Peach pie filling, blueberry pie filling, apple pie filling, or even fresh berries would all work wonderfully. Just be sure to adjust the baking time if necessary, as some fruits may release more moisture than others.
Q2: I don’t have yellow cake mix. Can I use another type of cake mix?
A: Yes, you can certainly use another type of cake mix. White cake mix, vanilla cake mix, or even a butter pecan cake mix would all be delicious alternatives. Just keep in mind that the flavor of the cake mix will impact the overall flavor of the dump cake, so choose one that complements the other ingredients. Chocolate cake mix can also be used, but it will dramatically change the flavor profile into a chocolate cherry cake version.
Q3: Is it necessary to use melted butter, or can I use oil instead?
A: While you can technically use oil instead of melted butter, the butter adds a richness and flavor that is hard to replicate with oil. The butter also helps to create a golden, crispy crust that is characteristic of a good dump cake. If you must use oil, choose a neutral-flavored oil like canola or vegetable oil. But really, the butter makes a BIG difference!
Q4: How do I prevent the cake from sticking to the baking dish?
A: To prevent the cake from sticking, be sure to grease the baking dish thoroughly with butter or cooking spray before adding the ingredients. You can also line the bottom of the dish with parchment paper for extra insurance. Avoid using a non-stick spray that is old or hasn’t been cleaned thoroughly because the ingredients can stick even more!
Q5: Can I add a crumb topping to this dump cake?
A: Absolutely! A crumb topping would add a delightful textural element to the dump cake. To make a simple crumb topping, combine 1/2 cup all-purpose flour, 1/4 cup packed brown sugar, and 1/4 cup cold butter, cut into small pieces. Use a pastry blender or your fingers to rub the butter into the flour and sugar until the mixture resembles coarse crumbs. Sprinkle the crumb topping over the cake mix before drizzling with melted butter. It adds another buttery layer.