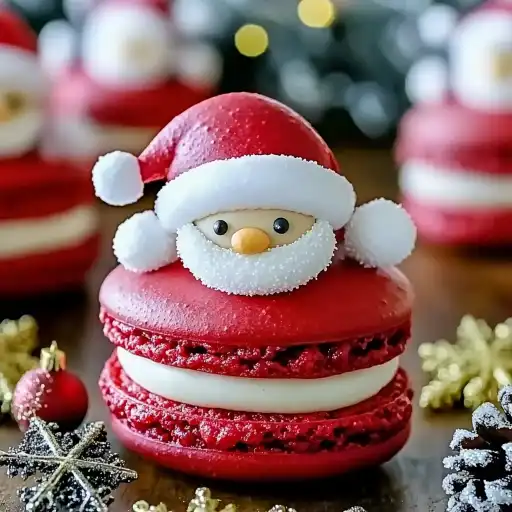
Description of this recipe: These Santa Claus Macarons are a delightful and festive treat perfect for the Christmas season. Combining the delicate texture of classic macarons with the whimsical appearance of Santa Claus, these cookies are as fun to make as they are to eat. Each macaron features a crisp shell, a creamy buttercream filling, and charming decorations that bring the holiday spirit to life. Whether you’re looking to impress at a holiday party or simply want to add a touch of magic to your Christmas baking, these Santa macarons are sure to be a hit.
Why you will love this recipe: You will love this recipe because it transforms the traditional macaron into an adorable and festive holiday treat. The Santa Claus design adds a playful and joyful element, making these macarons perfect for sharing with family and friends during the Christmas season. The combination of a crisp almond shell and a smooth, creamy buttercream filling provides a delightful textural contrast and rich flavor. Plus, the decorating process is incredibly fun and allows for creative expression, making each macaron unique. These Santa macarons are not only delicious but also a memorable and heartwarming addition to any holiday celebration. They are guaranteed to bring smiles and festive cheer to everyone who tries them! The recipe is also flexible, allowing you to adjust the colors and decorations to suit your personal preferences and available ingredients.
Ingredients: For the Macaron Shells:
- 1 cup powdered sugar (120 g)
- ¾ cup almond flour (70 g)
- 2 large egg whites, room temperature
- ¼ cup granulated sugar (50 g)
- Red gel food coloring (for Santa’s hat)
- White gel food coloring (optional, for beard details)
For the Buttercream Filling:
- ½ cup unsalted butter, softened
- 1 ½ cups powdered sugar
- 1 teaspoon vanilla extract
- 1 tablespoon heavy cream or milk
- Pinch of salt
For Decorating:
- White royal icing or melted white chocolate (for beard and trim)
- Mini chocolate chips or edible pearls (for eyes and buttons)
- Red sprinkles or sanding sugar (optional for hat texture)
Preparation:
Step 1: Prepare the Almond Flour Mixture Begin by sifting together the powdered sugar and almond flour into a large bowl. This step is crucial to ensure a smooth macaron shell. Sifting removes any lumps and creates a fine mixture, which is essential for the macaron’s delicate texture. If you don’t have a sifter, you can use a fine-mesh sieve. After sifting, set the mixture aside.
Step 2: Whip the Meringue In a separate, clean, and grease-free bowl, start whipping the egg whites using an electric mixer. Beat the egg whites until they become foamy. Gradually add the granulated sugar while continuing to whip. Continue beating until the egg whites form stiff, glossy peaks. This meringue is the foundation of your macaron shells, providing structure and lightness. The stiff peaks should hold their shape when the whisk is lifted.
Step 3: Combine Wet and Dry Gently fold the sifted almond flour and powdered sugar mixture into the meringue. Use a spatula and fold in one direction, being careful not to overmix. The goal is to deflate the meringue slightly while incorporating the dry ingredients evenly. This process, known as “macaronage,” is critical for achieving the right consistency. The batter should be smooth and flow like lava.
Step 4: Divide and Color the Batter Divide the macaron batter into two equal portions. In one bowl, add red gel food coloring and mix until you achieve a vibrant red color. This red batter will be used for Santa’s hats. In the other bowl, you can add a tiny amount of white gel food coloring if desired, to make the faces of Santa extra white.
Step 5: Pipe the Macarons Transfer the red batter to a piping bag fitted with a small round tip. Pipe small triangles onto a baking sheet lined with parchment paper or a silicone mat. These will be the hats. Then, transfer the white batter to another piping bag fitted with a small round tip. Pipe small circles next to the red triangles, leaving some space between each shape. These will be Santa’s faces.
Step 6: Rest the Macarons Once the macarons are piped, tap the baking sheet firmly on the counter several times. This helps to release any trapped air bubbles and ensures a smooth surface. Let the piped macarons rest at room temperature for 30-45 minutes. This allows a skin to form on the surface, which is essential for creating the signature “feet” of the macarons during baking. The tops should be dry to the touch before baking.
Step 7: Bake the Macarons Preheat your oven to 300°F (150°C). Place the baking sheet with the macarons in the oven and bake for 14-16 minutes. The baking time may vary slightly depending on your oven, so keep a close eye on them. The macarons are done when they have developed feet and are firm to the touch.
Step 8: Cool the Macarons Once baked, remove the macarons from the oven and let them cool completely on the baking sheet before attempting to peel them off. Cooling them completely prevents them from sticking and breaking.
Step 9: Prepare the Buttercream While the macarons are cooling, prepare the buttercream filling. In a mixing bowl, beat the softened butter with an electric mixer until it is light and fluffy. Gradually add the powdered sugar, mixing on low speed until it is fully incorporated. Add the vanilla extract, heavy cream (or milk), and a pinch of salt. Beat on high speed until the buttercream is smooth and creamy.
Step 10: Assemble and Decorate Once the macarons are cooled and the buttercream is ready, it’s time to assemble and decorate. Transfer the buttercream to a piping bag fitted with a round tip. Pipe a generous amount of buttercream onto the flat side of one macaron shell (Santa’s face). Gently sandwich it with another macaron shell (another Santa’s face).
Step 11: Decorate Santa’s Features Using white royal icing or melted white chocolate, pipe a beard onto the bottom of each Santa face. Add a strip of white icing along the bottom of the red hat for the hat trim. Attach two mini chocolate chips or edible pearls to each face for the eyes. Optionally, sprinkle red sprinkles or sanding sugar on the red hats for added texture and sparkle.
Step 12: Chill and Serve Place the assembled and decorated Santa Claus macarons in the refrigerator for at least 30 minutes to allow the buttercream to set and the flavors to meld together. This chilling period helps to improve the texture and stability of the macarons. Serve chilled and enjoy the festive treats!
COOKING Rating: Intermediate
Serving Suggestions: Serve these Santa Claus Macarons as a delightful addition to your Christmas dessert table, as festive party favors, or as a charming homemade gift for friends and family. They pair perfectly with a cup of hot cocoa or coffee, making them an ideal treat for cozy winter evenings. Arrange them on a decorative platter to showcase their adorable design, and watch as they bring smiles to everyone’s faces.
Tips:
- Use room temperature egg whites for the best meringue.
- Sift the almond flour and powdered sugar thoroughly for a smooth macaron shell.
- Don’t overmix the batter; it should flow like lava.
- Let the piped macarons rest until a skin forms on top.
- Bake at a consistent temperature to avoid cracking.
- Cool the macarons completely before filling and decorating.
- Store assembled macarons in an airtight container in the refrigerator.
Prep Time: 45 minutes
Cook Time: 14-16 minutes
Total Time: 2-3 hours (including cooling and chilling time)
Nutritional Information: (Note: Nutritional information is an estimate and can vary based on specific ingredients and portion sizes.) Calories: Approximately 150-200 per macaron Protein: 2-3 grams Sodium: 10-20 milligrams
Conclusion: These Easy Santa Claus Macarons are a delightful way to add a touch of holiday magic to your baking repertoire. With their adorable design and delicious flavor, they are sure to be a hit with both kids and adults. While the process of making macarons can be a bit delicate, following these step-by-step instructions will guide you to success. Whether you’re an experienced baker or new to the world of macarons, this recipe offers a fun and rewarding baking experience that captures the spirit of Christmas. So gather your ingredients, put on your favorite holiday tunes, and get ready to create these charming Santa Claus Macarons that will spread joy and cheer throughout the season. Enjoy the process and the smiles these treats will bring!
5 Questions and Answers about this recipe:
Question 1: Can I use different food coloring for the Santa hats? Answer: Absolutely! While this recipe calls for red gel food coloring to create the classic Santa hat look, you can certainly use different colors to customize your macarons. Consider using green for a festive elf hat or blue for a winter wonderland theme. Just be sure to use gel food coloring, as it provides the most vibrant and concentrated color without altering the consistency of the batter.
Question 2: What can I use instead of almond flour? Answer: Almond flour is essential for achieving the signature texture of macarons, but if you have allergies or dietary restrictions, you can try substituting it with another finely ground nut flour, such as cashew flour or pistachio flour. Keep in mind that the flavor and texture may vary slightly. It’s also crucial to ensure that the nut flour is very finely ground to prevent a grainy macaron shell.
Question 3: How do I prevent my macarons from cracking? Answer: Cracking is a common issue when making macarons, but there are several steps you can take to prevent it. First, ensure that you are not overmixing the batter; it should flow like lava. Second, allow the piped macarons to rest for the recommended time (30-45 minutes) until a skin forms on the surface. This skin helps to create the signature “feet” and prevents the macarons from cracking during baking. Finally, bake at a consistent temperature and avoid opening the oven door frequently, as temperature fluctuations can cause cracking.
Question 4: Can I make the buttercream filling ahead of time? Answer: Yes, you can definitely make the buttercream filling ahead of time. Prepare the buttercream according to the recipe instructions and store it in an airtight container in the refrigerator. When you’re ready to assemble the macarons, take the buttercream out of the refrigerator and let it come to room temperature. You may need to re-whip it briefly to restore its smooth and creamy consistency.
Question 5: How long do these Santa Claus Macarons stay fresh? Answer: These Santa Claus Macarons are best enjoyed within 2-3 days of making them. Store them in an airtight container in the refrigerator to maintain their freshness and prevent the shells from becoming soggy. The buttercream filling will help keep the macarons moist, but it’s important to consume them within a few days for the best flavor and texture. If you want to make them further in advance, you can freeze the unfilled macaron shells for up to a month. Thaw them completely before filling and decorating.