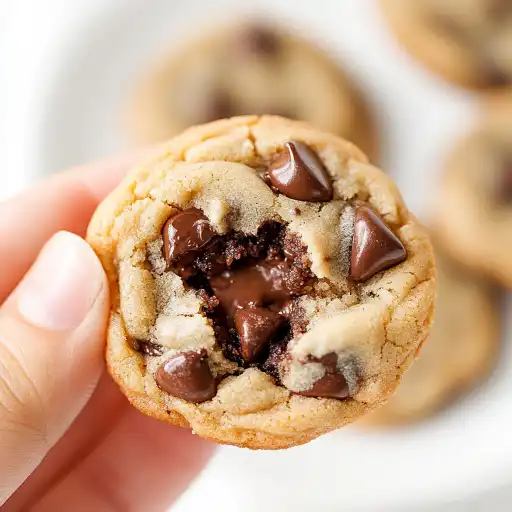
Description of this recipe: These aren’t just your average chocolate chip cookies. They’re an experience. Designed for maximum chewiness, these cookies boast a soft, almost melt-in-your-mouth interior with slightly crisp edges. The combination of browned butter, perfectly balanced sugars, and a generous amount of chocolate chips creates a symphony of flavors that will leave you craving more. This recipe takes the classic chocolate chip cookie and elevates it to new heights of deliciousness.
Why you will love this recipe:
- Unmatched Texture: The secret to these cookies lies in the ratio of ingredients and the technique. Using cold butter and a specific mixing method ensures a perfectly chewy texture that’s far from dry or crumbly.
- Incredible Flavor: The deep, rich flavor from the browned butter complements the sweetness of the brown sugar and the bitterness of the semi-sweet chocolate chips. It’s a complex and satisfying flavor profile.
- Easy to Make: Despite the gourmet results, this recipe is surprisingly easy to follow. No fancy equipment or complicated techniques are required.
- Crowd-Pleaser: These cookies are guaranteed to be a hit with everyone, from kids to adults. They’re perfect for bake sales, holiday gatherings, or simply a sweet treat after dinner.
- Customizable: While the recipe is delicious as is, you can easily customize it to your liking. Add nuts, different types of chocolate chips, or even a sprinkle of sea salt for a unique twist.
Ingredients:
- 1 ½ cups all-purpose flour
- ¾ teaspoon baking soda
- ¼ teaspoon table salt
- ½ cup (1 stick) salted butter, cold and sliced
- ⅔ cup light brown sugar, very tightly packed
- ½ cup granulated sugar
- 1 large whole egg
- 1 large egg yolk
- 1 teaspoon pure vanilla extract
- 1 ¼ cup semi-sweet chocolate chips, plus extra for topping
Preparation:
Step 1: Preheat and Prep: Preheat your oven to 350°F (175°C) with the rack positioned in the lower middle. This placement ensures even baking and prevents the bottoms from burning. Line baking sheets with parchment paper or silicone baking mats. Parchment paper prevents sticking and makes cleanup a breeze, while silicone mats provide extra insulation for even baking.
Step 2: Whisk Dry Ingredients: In a medium-sized bowl, whisk together the all-purpose flour, baking soda, and table salt. Whisking incorporates air and ensures that the baking soda and salt are evenly distributed throughout the flour, leading to a more consistent bake. Set aside this mixture for later.
Step 3: Cream Butter and Sugars: In the bowl of a stand mixer fitted with the paddle attachment, beat the cold, sliced butter on medium speed for 2 minutes. Using cold butter is crucial for achieving a chewy texture. The cold butter will melt slowly in the oven, creating pockets of air that result in a soft, chewy interior. Scrape down the sides of the bowl as needed to ensure that all the butter is evenly creamed.
Add the tightly packed light brown sugar and granulated sugar to the creamed butter. Continue beating on medium speed until the mixture is smooth and well combined, about 1 minute. The brown sugar adds moisture and chewiness, while the granulated sugar contributes to the crisp edges. Scraping down the sides of the bowl ensures that all the ingredients are incorporated.
Step 4: Add Eggs and Vanilla: Add the whole egg, egg yolk, and pure vanilla extract to the butter and sugar mixture. Beat on low speed until just fully incorporated, scraping down the sides of the bowl as needed. The extra egg yolk adds richness and chewiness to the cookies. Use pure vanilla extract for the best flavor; imitation vanilla extract won’t provide the same depth.
Step 5: Incorporate Dry Ingredients: Gently add the flour mixture to the wet ingredients. Mix on low speed just until no flour streaks remain and the mixture is combined. Be careful not to overmix, as this can develop the gluten in the flour and result in tough cookies.
Step 6: Add Chocolate Chips: Add the semi-sweet chocolate chips to the dough. Mix on low speed just to incorporate; again, do not overmix. Overmixing can cause the chocolate chips to melt and streak throughout the dough. Use a rubber spatula to fully scrape down the sides of the bowl and paddle to ensure that the chocolate chips are evenly distributed.
Step 7: Form Dough Balls: Form the dough into a large ball with your hands. If the dough is too sticky to handle, cover it and chill it in the refrigerator for 15-30 minutes until it becomes more manageable.
Step 8: Shape and Arrange: Form the dough into 1 1/4-inch dough balls. Place the dough balls 2 inches apart on the prepared baking sheets. Keeping the remaining dough chilled while you’re working in batches prevents the cookies from spreading too much during baking.
Step 9: Bake: Bake for 8-9 minutes, or until the edges are turning golden brown and the cookies are somewhat puffy. The cookies will still seem underbaked, but they will set nicely upon cooling. Don’t overbake the cookies, as this will result in dry, crumbly cookies.
Step 10: Add Extra Chocolate Chips (Optional): If desired, gently press a few extra chocolate chips onto the tops of the hot cookies. This adds a beautiful visual appeal and ensures that every bite is packed with chocolate.
Step 11: Cool and Enjoy: Let the cookies cool on the baking pan for 10 minutes before transferring them to a wire rack to finish cooling completely. Cooling the cookies on the baking pan allows them to set properly and prevents them from breaking apart.
COOKING Rating: 5/5
Serving Suggestions:
- Serve warm with a glass of cold milk.
- Enjoy them as an after-dinner dessert.
- Pack them in lunchboxes for a sweet treat.
- Crumble them over ice cream.
- Serve them with coffee or tea.
Tips:
- Use Cold Butter: Using cold butter is crucial for achieving a chewy texture.
- Don’t Overmix: Overmixing can develop the gluten in the flour and result in tough cookies.
- Underbake Slightly: Underbaking the cookies slightly will result in a softer, chewier texture.
- Chill the Dough: Chilling the dough prevents the cookies from spreading too much during baking.
- Use High-Quality Chocolate Chips: Use high-quality chocolate chips for the best flavor.
Prep Time: 20 minutes
Cook Time: 8-9 minutes
Total Time: 30 minutes
Nutritional Information: (per cookie, approximate)
Calories: 220
Protein: 3g
Sodium: 80mg
Conclusion:
These Forever Chewy Chocolate Chip Cookies are more than just a recipe; they’re a testament to the power of simple ingredients and careful technique. The combination of a chewy texture, rich flavor, and easy-to-follow instructions makes this recipe a winner. Whether you’re a seasoned baker or a novice in the kitchen, you’ll be able to create these delicious cookies with ease. So, gather your ingredients, preheat your oven, and prepare to indulge in the ultimate chocolate chip cookie experience. These cookies are perfect for any occasion and are guaranteed to bring a smile to anyone’s face. Enjoy!
Questions and Answers About This Recipe:
Q1: Can I use unsalted butter instead of salted butter?
A: Yes, you can use unsalted butter. If you do, add an extra ¼ teaspoon of salt to the dry ingredients to compensate for the lack of salt in the butter. Using salted butter adds a slight tang that complements the sweetness of the cookies, but unsalted butter will work just fine.
Q2: Can I substitute the brown sugar with granulated sugar?
A: While you can substitute some of the brown sugar with granulated sugar, it will affect the texture of the cookies. Brown sugar contains molasses, which adds moisture and chewiness. If you substitute all of the brown sugar with granulated sugar, the cookies will be crisper and less chewy. For the best results, stick to the recipe’s specified amount of brown sugar.
Q3: Can I freeze the cookie dough?
A: Absolutely! Cookie dough freezes beautifully. Simply form the dough into balls, place them on a baking sheet lined with parchment paper, and freeze until solid. Once frozen, transfer the dough balls to a freezer-safe bag or container. When you’re ready to bake, simply bake the frozen dough balls for a few extra minutes, adding 2-3 minutes to the baking time.
Q4: What if my cookies are spreading too much?
A: There are a few reasons why your cookies might be spreading too much. First, make sure you’re using cold butter. Soft butter will cause the cookies to spread. Second, make sure you’re not overmixing the dough. Overmixing develops the gluten in the flour, which can cause the cookies to spread. Third, try chilling the dough for a longer period of time. Chilling the dough helps to firm up the butter and prevent the cookies from spreading.
Q5: Can I add nuts to this recipe?
A: Yes, you can definitely add nuts to this recipe! Chopped walnuts, pecans, or macadamia nuts would all be delicious additions. Add about 1/2 to 1 cup of chopped nuts to the dough along with the chocolate chips. Be sure to chop the nuts into small pieces so that they are evenly distributed throughout the cookies. You can also toast the nuts before adding them to the dough for a more intense flavor.