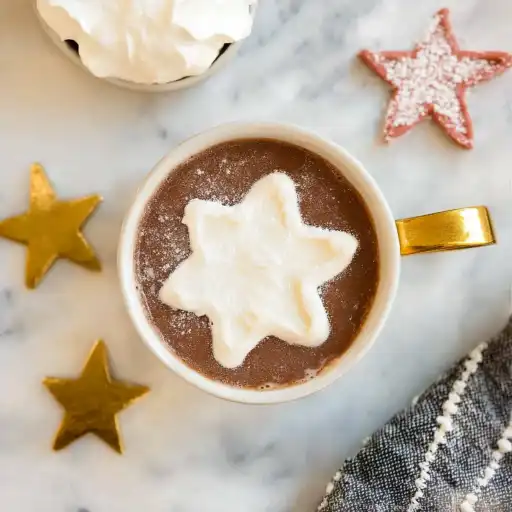
Description of this recipe: These frozen whipped cream cut-out shapes are a delightful and whimsical treat perfect for kids (and adults who are kids at heart!). They transform ordinary whipped cream into fun, edible art. Imagine bite-sized stars, hearts, or even dinosaurs made entirely of creamy, frozen goodness! This recipe is not only incredibly simple but also offers a fantastic way to get children involved in the kitchen. It’s a guaranteed crowd-pleaser for parties, a unique topping for desserts, or just a special something to brighten up a regular day. Forget boring ice cubes; these frozen whipped cream shapes are the new, cool way to add a touch of magic to any occasion.
Why you will love this recipe: Oh, where do I even begin? This recipe is pure joy and simplicity rolled into one frosty package! First and foremost, it’s FUN. Kids adore helping to make these shapes, choosing their favorite cookie cutters, and then, of course, eating their creations. Secondly, it’s incredibly EASY. Seriously, if you can whip cream and operate a freezer, you’re practically a pro already. The ingredient list is minimal (we’re talking one essential ingredient if you’re in a pinch), and the steps are straightforward. It’s also a fantastic way to elevate the simplest of desserts. Imagine adding these frozen stars to a bowl of berries, or floating a few heart-shaped cut-outs in a mug of hot cocoa – instant upgrade! This recipe also offers a wonderful alternative to sugary sweets. While it is still a treat, using homemade whipped cream allows you to control the ingredients and sweetness levels, making it a slightly healthier option. Finally, the versatility is unmatched. You can customize the shapes for any holiday, birthday, or special event. Frozen whipped cream dinosaurs for a prehistoric party? Absolutely! Christmas trees for the holidays? Of course! The possibilities are endless, making this recipe a keeper for years to come.
Ingredients:
- 1 cup heavy whipping cream (cold)
- 1 teaspoon vanilla extract (optional)
- 1 tablespoon maple syrup (optional, or use powdered sugar to taste)
(Note: If using Cool Whip, simply use one standard container.)
Preparation:
Step 1: Prepare the Whipped Cream (Homemade): If you’re making homemade whipped cream, ensure your heavy whipping cream is thoroughly chilled. This is crucial for achieving the perfect fluffy texture. Pour the cold heavy whipping cream into a mixing bowl (a metal bowl works best, especially if you chill it beforehand). Using an electric mixer (either a stand mixer or a hand mixer), begin whipping the cream on medium speed. As the cream whips, it will start to thicken. Once it begins to form soft peaks (meaning the peaks droop slightly when the beaters are lifted), add the vanilla extract (if using) and maple syrup (or powdered sugar, if using). Continue whipping until stiff peaks form. Stiff peaks mean the peaks stand straight up when the beaters are lifted. Be careful not to overwhip, as this can turn the cream into butter!
Step 2: Prepare the Baking Sheet: Line a baking sheet or baking pan with parchment paper or a silicone baking mat. This will prevent the whipped cream from sticking and make it easy to remove the frozen shapes later. The size of the baking sheet doesn’t matter too much, as long as it fits inside your freezer and provides enough surface area to spread the whipped cream.
Step 3: Spread the Whipped Cream: Evenly spread the whipped cream onto the prepared baking sheet. Aim for a layer that is about 1/4 to 1/2 inch thick. This thickness will allow for easy cutting with cookie cutters and prevent the shapes from being too fragile once frozen. Use a spatula or the back of a spoon to smooth the surface, ensuring a uniform thickness across the entire baking sheet.
Step 4: Freeze: Carefully place the baking sheet into the freezer. Ensure it is placed on a flat surface to prevent the whipped cream from sliding or becoming uneven. Freeze for at least 4-6 hours, or preferably overnight. The longer the whipped cream freezes, the firmer the shapes will be and the easier they will be to cut.
Step 5: Cut Out Shapes: Once the whipped cream is completely frozen, remove the baking sheet from the freezer. Using cookie cutters of your desired shapes, firmly press down into the frozen whipped cream to create clean cut-outs. If the whipped cream is too hard to cut easily, let it sit at room temperature for a minute or two to soften slightly.
Step 6: Store: Carefully remove the cut-out shapes from the baking sheet using a small spatula or knife. Place the shapes in an airtight container, layering them between sheets of parchment paper or wax paper to prevent them from sticking together. Store the container in the freezer until ready to use.
COOKING Rating: Easy
Serving Suggestions: These frozen whipped cream cut-out shapes are incredibly versatile! Here are a few serving suggestions to spark your creativity:
- Dessert Topping: Use them to top ice cream sundaes, cakes, pies, or brownies.
- Hot Beverage Enhancer: Float them in hot chocolate, coffee, or tea for a creamy and whimsical addition.
- Fruit Accompaniment: Serve them alongside a bowl of fresh berries or fruit salad.
- Party Snack: Offer them as a fun and refreshing snack at parties or gatherings.
- Kid-Friendly Treat: Simply serve them on a plate for a delightful and healthy(ish) treat that kids will adore.
- Cocktail Garnish: Add a touch of elegance to cocktails by using them as a garnish.
Tips:
- For best results, use very cold heavy whipping cream.
- Chill your mixing bowl and beaters before whipping the cream.
- Don’t overwhip the cream, or it will turn into butter.
- If you don’t have cookie cutters, you can use a knife to cut the frozen whipped cream into squares or triangles.
- For added flavor, try adding a few drops of peppermint extract or almond extract to the whipped cream before freezing.
- If you’re using Cool Whip, you can skip the whipping step and simply spread it onto the baking sheet.
- Get creative with your shapes! Use holiday-themed cookie cutters or shapes that match the theme of your party.
- If the shapes start to melt while you’re cutting them, simply pop them back into the freezer for a few minutes to firm up.
Prep Time: 5 minutes Cook Time: 0 minutes Total Time: 4-6 hours (freezing time)
Nutritional Information: (Estimates will vary based on specific ingredients and serving size) Calories: 50-100 per serving (depending on serving size and added sugar) Protein: Less than 1 gram per serving Sodium: Minimal
Conclusion: Frozen Whipped Cream Cut-Out Shapes are a simple, fun, and delicious way to add a touch of whimsy to any occasion. With minimal ingredients and easy steps, this recipe is perfect for getting kids involved in the kitchen and creating unforgettable treats. Whether you’re topping desserts, enhancing beverages, or simply enjoying them as a snack, these frozen shapes are guaranteed to bring a smile to your face. So, grab your cookie cutters, whip up some cream, and get ready to create some edible magic!
5 Questions and Answers about this recipe:
Q1: Can I use a different type of milk or cream instead of heavy whipping cream? A: While heavy whipping cream is essential for achieving the right texture and stability for these frozen shapes, you could technically experiment with other options. However, keep in mind that the results may vary. Lower-fat milk or cream alternatives will likely result in a less stable and more icy texture. For the best outcome, stick with heavy whipping cream.
Q2: How long can I store the frozen whipped cream shapes in the freezer? A: When stored properly in an airtight container with parchment paper separating the layers, frozen whipped cream shapes can last for up to 2-3 months in the freezer. After that, the texture may start to degrade slightly, and they may become more prone to freezer burn.
Q3: Can I add food coloring to the whipped cream to make different colored shapes? A: Absolutely! Adding food coloring is a fantastic way to customize these frozen shapes and make them even more visually appealing. Gel food coloring is generally recommended over liquid food coloring, as it is more concentrated and less likely to affect the consistency of the whipped cream. Just add a few drops at a time until you achieve your desired color.
Q4: What if I don’t have cookie cutters? Can I still make these? A: Of course! While cookie cutters are ideal for creating fun and intricate shapes, you can definitely make these frozen treats without them. Simply use a sharp knife to cut the frozen whipped cream into squares, triangles, or any other geometric shapes you desire. You could even get creative and use stencils as a guide for cutting out more complex designs.
Q5: Can I use this recipe to make a frozen whipped cream pie crust? A: While this recipe is designed for creating individual shapes, you could potentially adapt it to make a frozen whipped cream pie crust. After spreading the whipped cream onto the baking sheet, use your fingers or a spoon to mold it into the shape of a pie crust. Freeze it until solid, and then fill it with your favorite pie filling. However, keep in mind that the crust will be quite delicate and may not be as sturdy as a traditional pie crust.