Description of this recipe
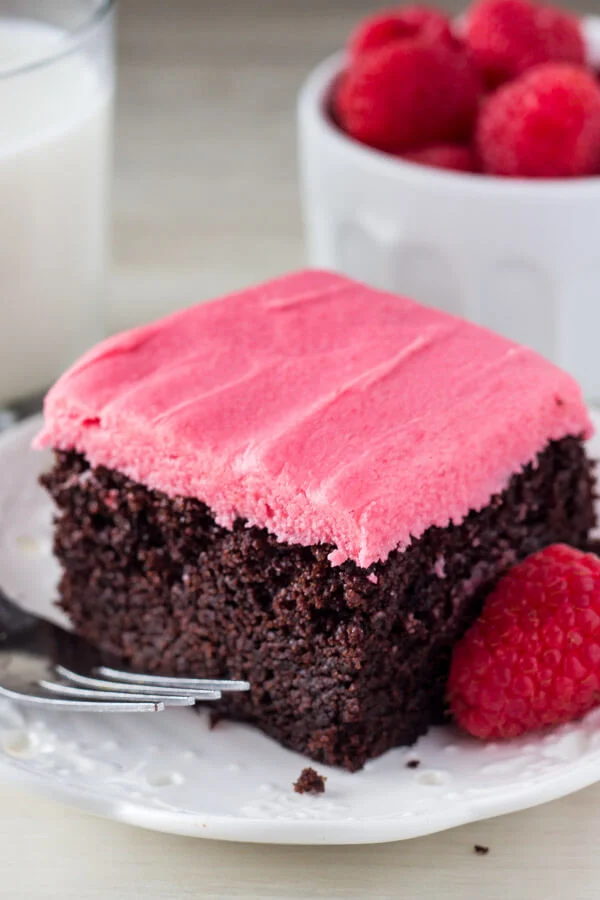
This Fudgy Chocolate Cake with Raspberry Frosting is the ultimate dessert for chocolate and raspberry lovers. The cake is incredibly moist and rich, with a deep chocolate flavor that is perfectly complemented by the tart and sweet raspberry buttercream. This cake is perfect for birthdays, celebrations, or any occasion where you want to impress. It’s a showstopper that tastes as good as it looks!
Why you will love this recipe
You’ll absolutely adore this recipe for its perfect balance of flavors and textures. The cake itself is intensely chocolatey and wonderfully fudgy, providing a melt-in-your-mouth experience. The raspberry frosting adds a burst of freshness and tanginess that cuts through the richness of the chocolate, preventing it from being overly heavy. The frosting is smooth, creamy, and bursting with natural raspberry flavor. This combination is simply irresistible. Plus, the cake is surprisingly easy to make, using common pantry ingredients and straightforward instructions. Get ready to impress your friends and family with this delightful dessert!
Ingredients:
For the Chocolate Cake
- 1 and 3/4 cups all-purpose flour
- 3/4 cup cocoa powder, Dutch process preferred
- 1 and 1/2 teaspoon baking powder
- 1 teaspoon baking soda
- 1/2 teaspoon salt
- 1/2 cup vegetable oil
- 2 cup granulated sugar
- 2 large eggs
- 2 teaspoons vanilla extract
- 1 cup buttermilk, room temperature
- 1 cup very hot coffee, or boiling water
For the Raspberry Buttercream
- 2 cups fresh raspberries
- 1 cup unsalted butter, softened to room temperature
- 3 and 1/2 to 4 cups powdered sugar
- 2-3 tablespoons whipping cream
Preparation:
Step 1: Preheat the oven to 350°F (175°C). Grease and flour a 9×13 inch baking pan and set aside. This ensures the cake doesn’t stick and releases easily after baking. To grease, you can use butter, shortening, or cooking spray. To flour, lightly dust the greased pan with flour and tap out the excess.
Step 2: In a large bowl, whisk together the flour, cocoa powder, baking powder, baking soda, and salt. Whisking ensures that all the dry ingredients are evenly distributed, which is crucial for a consistent cake texture. The cocoa powder should be of high quality, preferably Dutch-process, for a deeper chocolate flavor. Baking powder and baking soda provide the leavening, while salt enhances the flavors.
Step 3: In a separate large bowl, using a stand or hand-held electric mixer, beat together the oil, sugar, eggs, and vanilla on medium speed until combined. This step creams together the wet ingredients, creating a smooth and emulsified mixture. Beating the mixture until it is well combined helps to incorporate air, resulting in a lighter and fluffier cake. The vanilla extract adds a touch of warmth and enhances the other flavors.
Step 4: Turn the mixer down to low speed and beat in the buttermilk, followed by the flour mixture. Turn off the mixer and scrape down the sides of the bowl as necessary. Then, with the mixer on low speed, carefully beat in the hot coffee (or boiling water). Buttermilk adds moisture and tanginess to the cake, creating a tender crumb. Incorporating the flour mixture in stages prevents overmixing, which can lead to a tough cake. The hot coffee intensifies the chocolate flavor and adds moisture to the cake. It’s important to add it slowly and carefully to prevent splattering.
Step 5: Pour the batter into the prepared pan, and bake for about 30-35 minutes or until an inserted toothpick comes out clean. Baking time may vary depending on your oven, so it’s important to check the cake with a toothpick. Insert the toothpick into the center of the cake; if it comes out with moist crumbs or clean, the cake is done. If the toothpick comes out with wet batter, continue baking for a few more minutes and check again. Allow the cake to cool fully before frosting. Cooling the cake completely prevents the frosting from melting and ensures a neater presentation.
Step 6: Make the Raspberry Frosting. Put the raspberries in a blender or food processor and process. This step creates a smooth raspberry puree as a base for the frosting. Using fresh raspberries provides the best flavor, but frozen raspberries can be used if fresh ones are not available. Make sure to thaw the frozen raspberries completely before blending.
Step 7: Put the mixture through a strainer, using a spoon to push through the juice and discard the seeds. Doing this about 1/4 of the raspberries at a time will make the process easier. Removing the seeds is crucial for a smooth and creamy frosting. The seeds can be quite noticeable and detract from the overall texture. Strain the puree thoroughly to remove as many seeds as possible.
Step 8: Pour the raspberry puree (without the seeds) into a small saucepan. Heat over medium heat stirring frequently. Allow the mixture to boil and reduce in volume. You want to boil off as much of the water as possible so that you’re left with a thick mixture. I boiled mine for about 10 minutes, at the end you’ll know you’re done when you have about 1/4 cup to 1/3 cup in thick raspberry puree. Reducing the raspberry puree intensifies the flavor and removes excess moisture, preventing the frosting from being too runny. Stir the puree frequently to prevent it from sticking to the bottom of the saucepan and burning.
Step 9: Allow the raspberry puree to cool fully. It must be cold before moving on with the raspberry frosting. Cooling the puree is essential to prevent the frosting from melting or separating. Place the puree in the refrigerator to speed up the cooling process.
Step 10: To make the raspberry frosting, in a large bowl using a stand or hand-held electric mixer, beat the butter on medium speed until softened and fluffy. Softening the butter to room temperature is crucial for a smooth and creamy frosting. The butter should be soft enough to easily beat but not melted. Beating the butter until it is light and fluffy incorporates air, creating a light and airy frosting.
Step 11: Then turn the mixer down to low speed and carefully beat in 3 and 1/2 cups of powdered sugar. Once fully combined add in 1/4 cup of the cold raspberry puree. It must be cold before adding it to the frosting, otherwise your frosting will separate. Adding the powdered sugar gradually prevents it from flying everywhere and ensures that it is evenly incorporated. Make sure that the raspberry puree is cold before adding it to the butter and sugar mixture.
Step 12: Then beat in the raspberry puree, followed by the whipping cream 1 tablespoon at a time. Add in an additional 1/2 cup powdered sugar if the frosting is too thin. Whipping cream adds moisture and helps to create a light and fluffy frosting. Add it gradually, one tablespoon at a time, to prevent the frosting from becoming too thin. If the frosting is still too thin, add additional powdered sugar until it reaches the desired consistency.
Step 13: To frost the cake, I like to first put it in the freezer for 20 minutes. This helps to reduce cake crumbs from lifting into the icing. Chilling the cake makes it easier to frost and prevents crumbs from mixing into the frosting. Freezing the cake for a short period of time firms up the surface, making it less likely to crumble. Then frost the cake using a flat edge knife. Use a flat edge knife or offset spatula to spread the frosting evenly over the cake. A smooth and even layer of frosting enhances the presentation of the cake. Cut and serve.
COOKING Rating:
Intermediate
Serving Suggestions:
- Serve chilled for best flavor and texture.
- Pair with a scoop of vanilla ice cream or a dollop of whipped cream.
- Garnish with fresh raspberries or chocolate shavings.
- Enjoy with a cup of coffee or tea.
Tips:
- Use high-quality cocoa powder for the best chocolate flavor.
- Don’t overbake the cake, as it will become dry.
- Make sure the raspberry puree is completely cooled before adding it to the frosting.
- Adjust the amount of powdered sugar in the frosting to achieve your desired consistency.
- Store the cake in the refrigerator for up to 3 days.
Prep Time:
30 minutes
Cook Time:
45 minutes
Total Time:
1 hour 15 minutes
Nutritional Information:
(Note: Nutritional information is approximate and may vary based on specific ingredients and portion sizes.)
Calories:
Approximately 450 per serving
Protein:
Approximately 5g per serving
Sodium:
Approximately 200mg per serving
Conclusion
This Fudgy Chocolate Cake with Raspberry Frosting is a delightful treat that is sure to impress. The combination of rich chocolate and tangy raspberry is a match made in heaven. Whether you’re celebrating a special occasion or simply craving a decadent dessert, this cake is the perfect choice. The recipe is straightforward and easy to follow, making it accessible for bakers of all skill levels. So, gather your ingredients, preheat your oven, and get ready to create a masterpiece!
Questions and Answers About This Recipe
Q1: Can I use frozen raspberries instead of fresh raspberries for the frosting?
A: Yes, you can use frozen raspberries. Make sure to thaw them completely and drain any excess liquid before blending. This will help to prevent the frosting from becoming too watery.
Q2: Can I make the cake ahead of time?
A: Absolutely! The cake can be made a day ahead of time and stored, well-wrapped, at room temperature. Frost it just before serving for the best results.
Q3: What can I substitute for buttermilk if I don’t have any?
A: If you don’t have buttermilk, you can make a substitute by adding 1 tablespoon of white vinegar or lemon juice to a measuring cup, then filling the cup with milk to reach 1 cup. Let it sit for 5 minutes before using.
Q4: Can I use a different type of frosting?
A: Yes, you can use any frosting you like. A classic chocolate buttercream or a vanilla buttercream would also be delicious with this cake. You could even try a cream cheese frosting for a tangy twist.
Q5: How do I store leftover cake?
A: Store leftover cake in an airtight container in the refrigerator for up to 3 days. Allow the cake to come to room temperature before serving for the best flavor and texture.