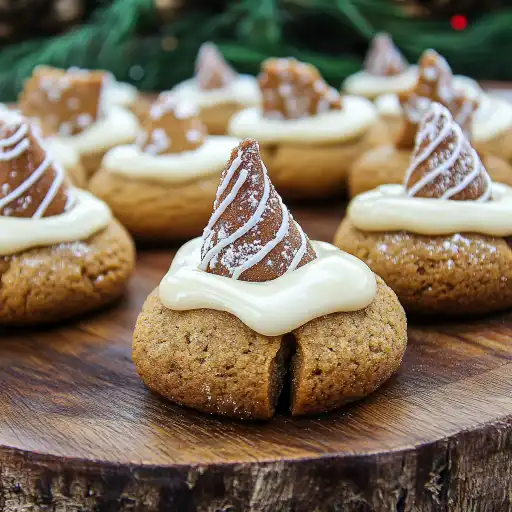
Description of this recipe: Gingerbread Blossoms are a delightful twist on classic gingerbread cookies, elevated by the addition of a Hershey’s Hug in the center. These cookies are soft, chewy, and bursting with warm spices, making them perfect for the holiday season or any time you crave a cozy, comforting treat. The combination of spicy gingerbread and sweet chocolate is simply irresistible!
Why you will love this recipe:
- Festive Flavors: The blend of ginger, cinnamon, nutmeg, cloves, and black pepper creates an authentic gingerbread flavor that evokes feelings of warmth and nostalgia.
- Soft and Chewy Texture: These cookies have a wonderfully soft and chewy texture that melts in your mouth, making them incredibly satisfying to eat.
- Easy to Make: Despite their impressive flavor profile, Gingerbread Blossoms are surprisingly easy to make, requiring only basic baking skills and readily available ingredients.
- Perfect for Sharing: These cookies are ideal for sharing with family and friends during the holidays or any special occasion. Their festive appearance and delicious taste are sure to be a hit with everyone.
- Customizable: You can easily customize these cookies to your liking by using different types of chocolate candies in the center or adding other mix-ins to the dough.
Ingredients:
- 3 cups (360g) all-purpose flour
- 2 1/2 tsp ground ginger
- 1 1/2 tsp ground cinnamon
- 1/2 tsp ground nutmeg
- 3/4 tsp ground cloves
- 1/8 tsp ground black pepper
- 1 tsp baking soda
- 1/2 tsp salt
- 3/4 cup (171g) unsalted butter, room temperature
- 2/3 cup (120g) dark brown sugar, packed
- 1/2 cup (130g) molasses
- 1 large egg
- 1 tsp vanilla extract
- 1/3 cup (65g) granulated sugar or white sanding sugar
- 42 Hershey’s Hugs (or any kind), unwrapped
Preparation:
- Step 1: Preheat the oven to 350°F (175°C). Line a baking sheet with parchment paper or spray it with non-stick cooking spray. This will prevent the cookies from sticking and make cleanup easier.
- Step 2: In a medium mixing bowl, whisk together the flour, ginger, cinnamon, nutmeg, cloves, black pepper, baking soda, and salt. This ensures that the spices are evenly distributed throughout the dough, resulting in a consistent flavor in every cookie. Set the bowl aside.
- Step 3: In the bowl of a stand mixer fitted with the paddle attachment (or in a large mixing bowl if using a hand mixer), cream together the softened butter and brown sugar on medium speed for 3 minutes. This step is crucial for creating a light and airy dough. The mixture should be pale and fluffy.
- Step 4: Add the molasses and mix until combined. Molasses adds moisture, sweetness, and a distinctive gingerbread flavor to the cookies. Then, add the egg and vanilla extract and mix until well combined. The egg helps to bind the ingredients together, while the vanilla extract enhances the overall flavor of the cookies.
- Step 5: Gradually add the dry ingredients to the wet ingredients, mixing on low speed until just combined. Be careful not to overmix the dough, as this can result in tough cookies. The dough should be soft and slightly sticky.
- Step 6: Pour granulated or sanding sugar into a bowl. Scoop heaping tablespoons of dough and gently roll into balls. Then, thoroughly coat in sugar. Place on the prepared baking sheet, leaving some space between cookies.
- Step 7: Bake for 8-10 minutes, or until the edges are just starting to feel firm. Be careful not to overbake the cookies, as they will continue to set as they cool.
- Step 8: Allow the cookies to cool on the baking sheet for 5 minutes before pressing a Hershey’s Hug into the center of each cookie. The residual heat from the cookies will gently melt the chocolate, creating a soft and gooey center.
- Step 9: Transfer the cookies to a wire rack and allow them to cool completely before storing in an airtight container for up to 4 days. This will prevent the cookies from becoming soggy.
COOKING Rating: 4.5/5 (Easy to make with delicious results)
Serving Suggestions:
- Serve Gingerbread Blossoms with a glass of cold milk, hot cocoa, or a cup of tea.
- These cookies make a great addition to a holiday dessert platter or cookie exchange.
- Enjoy them as a sweet treat after dinner or as a mid-afternoon snack.
- Crumbled Gingerbread Blossoms can be used as a topping for ice cream or yogurt.
- Pack them in a festive tin and give them as a homemade gift.
Tips:
- Make sure your butter is at room temperature for easier creaming.
- Use dark brown sugar for a richer, more molasses-like flavor.
- Don’t overmix the dough, as this can result in tough cookies.
- Bake the cookies until the edges are just starting to feel firm to prevent them from becoming dry.
- Allow the cookies to cool completely before storing them to prevent them from becoming soggy.
- For a festive touch, use sanding sugar to coat the cookies.
- Experiment with different types of chocolate candies in the center of the cookies.
- Store in airtight containers or Ziploc bags
Prep Time: 20 minutes
Cook Time: 8-10 minutes
Total Time: 30 minutes
Nutritional Information (per cookie, approximate):
- Calories: 150
- Protein: 2g
- Sodium: 75mg
Conclusion
Gingerbread Blossoms are more than just cookies; they are a symbol of warmth, comfort, and holiday cheer. Their irresistible combination of spicy gingerbread and sweet chocolate makes them a perfect treat for any occasion. Whether you’re baking them for a holiday gathering, a cookie exchange, or simply to enjoy with your family, these cookies are sure to bring a smile to everyone’s face. So gather your ingredients, preheat your oven, and get ready to create a batch of these delightful Gingerbread Blossoms. They are easy to make, fun to share, and guaranteed to be a hit with everyone who tries them.
Questions and Answers about this recipe:
Q1: Can I use a different type of chocolate candy in the center of the cookies?
A: Absolutely! While Hershey’s Hugs are a classic choice, you can use any type of chocolate candy you like. Kisses, Rolos, or even small squares of chocolate would work well. Just make sure the candies are unwrapped and ready to be pressed into the cookies as soon as they come out of the oven.
Q2: Can I make the dough ahead of time?
A: Yes, you can make the dough ahead of time and store it in the refrigerator for up to 2 days. Wrap the dough tightly in plastic wrap to prevent it from drying out. When you’re ready to bake the cookies, let the dough sit at room temperature for about 30 minutes to soften slightly before scooping and baking.
Q3: Can I freeze the baked cookies?
A: Yes, you can freeze the baked cookies for up to 2 months. Allow the cookies to cool completely before freezing. Place them in a single layer on a baking sheet and freeze for about 30 minutes, or until they are solid. Then, transfer the cookies to a freezer-safe container or bag. When you’re ready to eat them, thaw the cookies at room temperature for about 30 minutes.
Q4: Can I add nuts or other mix-ins to the dough?
A: Yes, you can add nuts or other mix-ins to the dough to customize the flavor and texture of the cookies. Chopped pecans, walnuts, or almonds would be a great addition. You can also add dried cranberries, raisins, or chocolate chips. Add about 1/2 cup of mix-ins to the dough after you’ve added the dry ingredients.
Q5: My cookies are spreading too much in the oven. What am I doing wrong?
A: There are a few reasons why your cookies might be spreading too much in the oven. First, make sure your butter is at room temperature, but not too soft or melted. If the butter is too soft, it will cause the cookies to spread. Second, don’t overmix the dough, as this can develop the gluten and cause the cookies to spread. Finally, make sure your oven is properly preheated and that you’re using the correct baking temperature. If your oven is too hot, the cookies will spread before they have a chance to set. Chilling the dough for 30 minutes before baking can also help prevent spreading.


