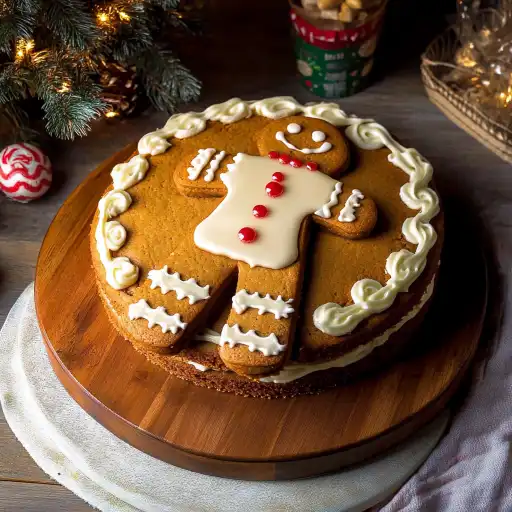
This Gingerbread Dream Cake is not just a dessert; it’s an experience. Imagine layers of warmly spiced gingerbread cake, each bite infused with the comforting flavors of cinnamon, ginger, and clove, all held together by a luscious, creamy frosting. This cake is a testament to the magic of gingerbread, elevated to a new level of deliciousness. Forget those dry, crumbly gingerbread cookies – this cake is moist, tender, and bursting with flavor.
Why You Will Love This Recipe
- Unforgettable Flavor: The perfect balance of spices creates a symphony of warmth in every bite. It’s like a cozy hug in cake form!
- Moist and Tender Texture: The secret to this cake’s success lies in the careful balance of ingredients and the chilling of the dough. The result is a cake that melts in your mouth.
- Surprisingly Simple: Despite its impressive appearance, this cake is surprisingly easy to make. The step-by-step instructions and clear tips ensure a flawless result every time.
- Perfect for Any Occasion: Whether it’s a festive holiday gathering, a cozy winter evening, or simply a craving for something special, this cake is guaranteed to impress.
- Customizable: Get creative with the decorations! Add candied ginger, chocolate shavings, or a dusting of powdered sugar for a personal touch.
Ingredients:
For the Cake Layers:
- 225g (about 1 1/4 cups) all-purpose flour
- ½ teaspoon salt
- 1 teaspoon ground cinnamon
- ½ teaspoon ground ginger
- ¼ teaspoon ground clove
- 80g (about 1/3 cup + 2 tablespoons) white granulated sugar
- 50g (about 1/4 cup) honey
- 50g (about 1/4 cup or 4 tablespoons) unsalted butter, cold, cut into cubes
- ½ teaspoon baking soda
- 1 large egg, cold
For the Cream Cheese Frosting:
- 400g (about 1 3/4 cups) cream cheese, at room temperature
- 200g (about 1 cup or 16 tablespoons) unsalted butter, at room temperature
- 90g (about 3/4 cup) powdered sugar
- 1 teaspoon vanilla extract
Preparation:
Step 1: Prepare the Dry Ingredients
In a medium bowl, whisk together the flour, salt, cinnamon, ginger, and clove until well combined. This ensures that the spices are evenly distributed throughout the cake, creating a balanced and flavorful experience. Set the bowl aside.
Step 2: Melt the Butter, Honey, and Sugar
In a heavy-bottomed medium saucepan, combine the butter, honey, and granulated sugar. Place the saucepan over medium heat and cook, stirring constantly, until the butter is completely melted and the mixture begins to simmer gently. A heavy-bottomed saucepan is crucial to prevent the honey from burning and to ensure even heating.
Step 3: Activate the Baking Soda
Reduce the heat to low and carefully add the baking soda to the simmering mixture. Whisk vigorously to combine. The mixture will immediately bubble and expand significantly, then gradually subside. This reaction is essential for creating a light and airy texture in the cake layers. Continue to cook over low heat, stirring continuously to prevent the honey from scorching, until the mixture turns a light amber color. This caramelization process adds depth and complexity to the gingerbread flavor.
Step 4: Temper the Egg
Remove the saucepan from the heat and slowly pour the hot honey mixture into the bowl containing the cold egg, whisking vigorously and constantly. This step, known as tempering, prevents the egg from scrambling due to the heat. The rapid whisking ensures that the egg is evenly incorporated into the warm mixture, creating a smooth and emulsified base.
Step 5: Combine Wet and Dry Ingredients
Add the flour mixture to the bowl with the egg mixture and mix until just combined. Be careful not to overmix the batter, as this can develop the gluten in the flour and result in a tough cake. The dough will be sticky; resist the urge to add more flour. A slightly sticky dough is key to achieving a moist and tender crumb.
Step 6: Chill the Dough
Wrap the dough tightly in plastic wrap and place it in the freezer for 30-60 minutes, or until it is well-chilled but not frozen. Alternatively, you can refrigerate the dough overnight. Chilling the dough makes it easier to handle and roll out, preventing it from spreading too much during baking.
Step 7: Preheat the Oven and Prepare the Baking Sheets
Preheat your oven to 180°C (355°F). Line a baking sheet with parchment paper. Prepare three pieces of parchment paper for rolling out each cake layer. Parchment paper ensures that the cake layers don’t stick to the baking sheet and makes for easy removal.
Step 8: Roll Out the Cake Layers
Divide the chilled dough into three equal portions. Take one portion and place it on a piece of floured parchment paper. Lightly dust the top of the dough and your rolling pin with flour to prevent sticking. Roll the dough out to a thickness of approximately 2-3mm (about 1/8 inch).
Step 9: Cut Out the Gingerbread Figures
Use a gingerbread man cookie cutter or a stencil (you can easily create one yourself on a piece of paper) to cut out the gingerbread figures from the rolled-out dough. A stencil allows for more intricate shapes and personalized designs.
Step 10: Bake the Cake Layers
Carefully transfer the parchment paper with the cut-out gingerbread figure onto the prepared baking sheet. Bake for approximately 5 minutes, or until the edges are golden brown. Keep a close eye on the cake layers, as they can burn quickly.
Step 11: Cool the Cake Layers
Remove the baking sheet from the oven and let the cake layer cool for a minute or two on the sheet before transferring it to a wire rack to cool completely. This prevents the cake layer from sticking to the baking sheet and allows it to cool evenly. Don’t stack the baked cake layers on top of each other while they are still warm, as this can cause them to become soggy.
Step 12: Prepare the Cream Cheese Frosting
While the cake layers are cooling, prepare the cream cheese frosting. In a large mixing bowl, beat the softened cream cheese and butter together until smooth and creamy. Make sure that the cream cheese and butter are at room temperature for a lump-free frosting.
Step 13: Add Powdered Sugar and Vanilla Extract
Gradually add the powdered sugar to the cream cheese mixture, beating on low speed until fully incorporated. Then, add the vanilla extract and beat until smooth and fluffy. Beating on low speed prevents the powdered sugar from creating a cloud of dust.
Step 14: Assemble the Cake
Place one gingerbread cake layer on a serving plate or cake stand. Spread a generous layer of cream cheese frosting over the cake layer. Repeat with the remaining cake layers, stacking them on top of each other and frosting each layer.
Step 15: Decorate the Cake (Optional)
Decorate the cake with additional cream cheese frosting, sprinkles, candied ginger, chocolate shavings, or a dusting of powdered sugar. Get creative and let your imagination run wild!
COOKING Rating:
Intermediate
Serving Suggestions:
- Serve chilled or at room temperature.
- Pair with a warm cup of coffee, tea, or hot chocolate.
- Garnish with fresh berries or a sprig of rosemary.
- Serve as a centerpiece for a holiday dessert table.
Tips:
- Use high-quality spices for the best flavor.
- Don’t overmix the cake batter.
- Chill the dough thoroughly for easy handling.
- Bake the cake layers until just golden brown to prevent them from drying out.
- Make sure the cream cheese and butter are at room temperature for a smooth frosting.
- Store leftover cake in an airtight container in the refrigerator for up to 3 days.
- For a more intense gingerbread flavor, add a tablespoon of molasses to the batter.
- If you don’t have honey, you can substitute it with maple syrup or corn syrup.
Prep Time:
45 minutes
Cook Time:
15 minutes
Total Time:
1 hour
Nutritional Information (per serving, estimate):
Calories: 450 Protein: 5g Sodium: 200mg
Conclusion
The Gingerbread Dream Cake is more than just a recipe; it’s a tradition waiting to be made. This cake is an invitation to gather around the table, share stories, and create memories that will last a lifetime. So, preheat your oven, gather your ingredients, and prepare to be transported to a world of gingerbread magic. Enjoy!
Frequently Asked Questions (FAQ)
Q1: Can I make this cake ahead of time?
A: Absolutely! In fact, the Gingerbread Dream Cake tastes even better the next day after the flavors have had time to meld together. You can bake the cake layers and prepare the frosting a day in advance, then assemble the cake just before serving. Store the assembled cake in the refrigerator until ready to enjoy.
Q2: Can I freeze the cake layers?
A: Yes, you can freeze the baked cake layers for up to a month. Wrap them tightly in plastic wrap and then in aluminum foil to prevent freezer burn. Thaw the cake layers in the refrigerator overnight before frosting and assembling the cake.
Q3: I don’t have cream cheese. Can I use another type of frosting?
A: While the cream cheese frosting complements the gingerbread flavor perfectly, you can substitute it with other types of frosting, such as buttercream, Swiss meringue buttercream, or even a simple glaze. Adjust the sweetness and flavorings to your liking.
Q4: My gingerbread dough is too sticky to roll out. What should I do?
A: If your gingerbread dough is too sticky, try chilling it for a longer period of time. You can also add a tablespoon or two of flour to the dough, but be careful not to overmix it. Make sure to flour your work surface and rolling pin generously to prevent sticking.
Q5: Can I make this cake without the gingerbread man shapes?
A: Of course! You can use any cookie cutter shape you like, or simply cut the dough into circles or squares. The most important thing is to bake the cake layers until they are golden brown and cooked through. You can even bake the cake as a single layer in a round or square cake pan. Just adjust the baking time accordingly.