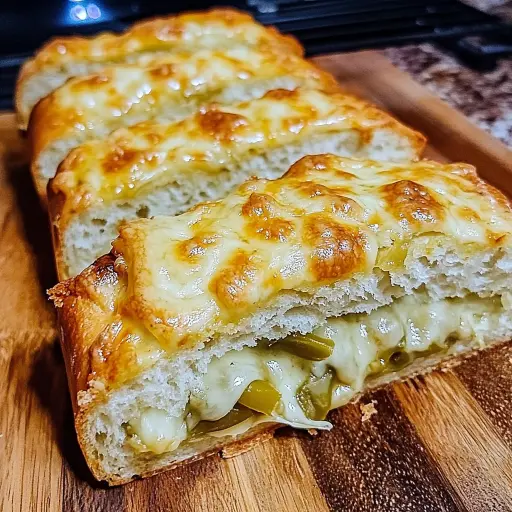
Description: A savory and flavorful bread, perfect for sandwiches, toast, or simply enjoying on its own. This Green Chile Cheese Bread combines the comforting warmth of homemade bread with the zesty kick of green chiles and the creamy, sharp flavors of cheddar and Monterey Jack cheese. The result is a delicious and satisfying loaf that’s sure to become a new favorite.
Ingredients:
- 3 cups all-purpose flour
- 1 tablespoon sugar
- 1 tablespoon instant yeast
- 1 teaspoon salt
- 1 cup warm water (110°F / 45°C)
- 2 tablespoons olive oil
- 1 cup shredded sharp cheddar cheese
- ½ cup shredded Monterey Jack cheese
- 1 (4 oz) can diced green chiles, drained
- 1 tablespoon chopped fresh parsley (optional)
Preparation:
Step 1: Mix Dry Ingredients: In a large bowl, whisk together the all-purpose flour, sugar, instant yeast, and salt. This ensures that the yeast and other ingredients are evenly distributed throughout the flour, which is essential for proper rising and a consistent flavor profile.
Step 2: Add Liquids and Form Dough: Pour in the warm water and olive oil. Mix until a rough dough forms. The water should be warm, not hot, to activate the yeast properly. If it’s too hot, it can kill the yeast; if it’s too cold, the yeast won’t activate. The olive oil adds moisture and a subtle richness to the bread.
Step 3: Knead the Dough: Knead the dough on a lightly floured surface for 8–10 minutes until smooth and elastic, or use a stand mixer with a dough hook. Kneading is crucial for developing the gluten in the flour, which gives the bread its structure and chewy texture. If kneading by hand, use a push-turn-fold motion. If using a stand mixer, knead on medium speed. The dough is ready when it’s smooth, elastic, and springs back when poked gently.
Step 4: Incorporate Cheese and Chiles: Flatten the dough slightly and add the shredded cheddar cheese, Monterey Jack cheese, and drained diced green chiles. Knead gently until evenly combined. Make sure the chiles are well-drained to prevent the dough from becoming too wet. Gently fold the cheese and chiles into the dough to distribute them evenly without overworking the dough.
Step 5: First Rise: Place the dough in a lightly oiled bowl, turn to coat, cover with a clean kitchen towel or plastic wrap, and let rise in a warm spot for about 1 hour, or until doubled in size. The oiled bowl prevents the dough from sticking and helps it rise evenly. Covering the bowl keeps the dough from drying out. The warm spot encourages the yeast to work its magic and make the dough rise.
Step 6: Shape and Second Rise: Punch down the dough gently to release the air. Shape the dough into a loaf or rustic oval. Place it on a parchment-lined baking sheet or into a greased loaf pan. If using a loaf pan, grease it well to prevent sticking. If using a baking sheet, parchment paper makes it easy to transfer the bread after baking. Cover the shaped loaf and let it rise for another 30–40 minutes. This second rise allows the dough to relax and gives the bread a lighter, airier texture.
Step 7: Bake: Preheat the oven to 375°F (190°C). Bake the loaf for 30–35 minutes, or until it’s golden brown and the loaf sounds hollow when tapped on the bottom. A hollow sound indicates that the bread is fully baked inside. If the top of the bread is browning too quickly, you can tent it loosely with foil during the last 10-15 minutes of baking.
Step 8: Cool and Serve: Transfer the baked bread to a wire rack to cool completely before slicing. Cooling allows the internal structure of the bread to set, which makes it easier to slice and prevents it from becoming gummy. Slice and serve warm or at room temperature.
Why you will love this recipe:
This Green Chile Cheese Bread is a delightful combination of textures and flavors. The soft, chewy bread is studded with pockets of melted cheddar and Monterey Jack cheese, and the subtle heat from the green chiles adds a unique and satisfying twist. It’s incredibly versatile – perfect for enjoying with soups, sandwiches, or simply as a snack. The recipe is also relatively straightforward, making it accessible for both beginner and experienced bakers. The aroma that fills your kitchen as it bakes is simply irresistible, and the taste is even better.
Serving Suggestions:
- Sandwiches: Use it to make delicious grilled cheese sandwiches or turkey and avocado sandwiches.
- Toast: Toast a slice and top it with a fried egg and some salsa for a Southwestern-inspired breakfast.
- Soup Accompaniment: Serve warm slices alongside a bowl of chili, tomato soup, or any creamy soup.
- Appetizer: Cut into cubes and serve with a cheese and charcuterie board.
- Snack: Enjoy a slice with a smear of cream cheese or a dollop of sour cream.
Tips:
- Cheese Variations: Feel free to experiment with different types of cheese. Pepper jack, Oaxaca, or even a smoked Gouda would all be delicious.
- Chile Heat: Adjust the amount of green chiles to your liking. If you prefer a spicier bread, use a hotter variety of chiles or add a pinch of red pepper flakes.
- Fresh Herbs: Add other fresh herbs such as cilantro, oregano, or thyme for an extra layer of flavor.
- Kneading: Don’t over-knead the dough, as this can result in a tough bread.
- Rising Time: The rising time may vary depending on the temperature of your kitchen.
- Storage: Store the cooled bread in an airtight container at room temperature for up to 3 days or in the freezer for longer storage. Slice before freezing for easy portioning. Reheat slices in the oven or toaster.
- Egg Wash: For an extra golden crust, brush the top of the loaf with an egg wash (1 egg beaten with 1 tablespoon of water) before baking.
- Scoring: For a professional look, score the top of the loaf with a sharp knife or bread lame before baking. This also helps control the expansion of the bread during baking.
Prep Time: 20 minutes
Cook Time: 30-35 minutes
Total Time: 2 hours (including rising time)
Nutritional Information: (Approximate per slice, based on 12 slices per loaf)
- Calories: 250
- Protein: 8g
- Sodium: 350mg
Conclusion:
This Green Chile Cheese Bread is a simple yet satisfying recipe that’s perfect for any occasion. The combination of savory cheese, mild heat from the chiles, and the comforting aroma of homemade bread make it an unforgettable culinary experience. Whether you’re serving it as a side dish, appetizer, or simply enjoying a slice on its own, this bread is sure to impress. With its easy-to-follow instructions and customizable ingredients, you can easily adapt this recipe to your own taste preferences. So, gather your ingredients, preheat your oven, and get ready to enjoy a warm, delicious loaf of Green Chile Cheese Bread. This recipe is a testament to how simple ingredients can come together to create something truly special.
Questions and Answers:
- Can I use a different type of flour?
- Yes, you can substitute some of the all-purpose flour with whole wheat flour for a nuttier flavor and added fiber. However, using 100% whole wheat flour may result in a denser bread. A good starting point is to replace 1 cup of all-purpose flour with whole wheat flour. You may also need to adjust the amount of water slightly, as whole wheat flour absorbs more liquid.
- What if I don’t have instant yeast?
- If you don’t have instant yeast, you can use active dry yeast. However, you’ll need to proof the active dry yeast first. To do this, dissolve the yeast in the warm water along with a teaspoon of sugar. Let it sit for 5-10 minutes until it becomes foamy. Then, proceed with the recipe as directed.
- Can I make this bread without a stand mixer?
- Absolutely! While a stand mixer can make kneading easier, it’s not necessary. You can easily knead the dough by hand on a lightly floured surface. Just remember to knead for 8-10 minutes until the dough is smooth and elastic.
- How do I know if the bread is done baking?
- The best way to tell if the bread is done is to check its internal temperature using a kitchen thermometer. It should reach 200-210°F (93-99°C). You can also tap the bottom of the loaf; if it sounds hollow, it’s likely done. Additionally, the bread should be golden brown on top.
- Can I freeze this bread?
- Yes, this bread freezes well. Allow the bread to cool completely before wrapping it tightly in plastic wrap and then in foil or placing it in a freezer bag. It can be stored in the freezer for up to 2-3 months. To thaw, remove the bread from the freezer and let it thaw at room temperature. You can also reheat slices in the oven or toaster.