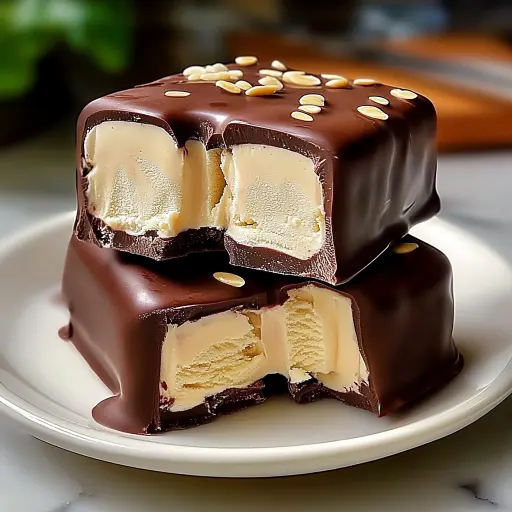
Description: A delightful treat that combines creamy ice cream with a rich chocolate coating, perfect for hot summer days or any time you crave a sweet indulgence. These homemade ice cream bars are far superior to store-bought versions, allowing you to customize every aspect, from the ice cream flavor to the toppings. They’re surprisingly easy to make and are a fantastic activity to do with kids. Imagine biting into a bar of your favorite ice cream, encased in a crisp, crackly chocolate shell – pure bliss! This recipe provides a base for endless creativity; feel free to experiment with different flavors and toppings to create your signature ice cream bar.
Ingredients:
- 1 quart (4 cups) Vanilla ice cream 🍨 (or any flavor you prefer, such as chocolate, strawberry, mint chocolate chip, or coffee)
- 12 ounces Melting chocolate 🍫 (milk, dark, or white chocolate chips or a chocolate bar, finely chopped)
- 1/2 cup Crushed nuts 🌰 (such as almonds, pecans, walnuts, or peanuts)
- 1/2 cup Crushed cookies 🍪 (such as Oreos, chocolate chip cookies, graham crackers, or shortbread)
- 1/4 cup Sprinkles 🌈✨ (various colors and shapes for a festive touch)
- 8 Popsicle sticks 🪵
- 1 tablespoon vegetable oil or coconut oil (optional, for thinning the chocolate)
- Pinch of sea salt (optional, to enhance the chocolate flavor)
Preparation:
Step 1: Prepare the Ice Cream: Soften the ice cream slightly by letting it sit at room temperature for about 10-15 minutes. This makes it easier to work with. Line a 9×13 inch baking dish with parchment paper, leaving an overhang on the sides. This will make it easy to lift the ice cream out later. Scoop the softened ice cream into the prepared dish and spread it into an even layer, about 1 inch thick. Cover the dish with plastic wrap and press down gently to remove any air pockets. Freeze for at least 4 hours, or preferably overnight, until the ice cream is solid.
Step 2: Insert the Popsicle Sticks: Once the ice cream is frozen solid, remove it from the freezer. Using the parchment paper overhang, lift the ice cream slab out of the dish and place it on a cutting board. Using a large, sharp knife, cut the ice cream into 8 equal bars. Insert a popsicle stick into the center of each bar. If the ice cream is too hard to insert the sticks easily, you can make a small slit with the knife first.
Step 3: Melt the Chocolate: Place the melting chocolate in a microwave-safe bowl. Microwave in 30-second intervals, stirring after each interval, until the chocolate is almost completely melted. Be careful not to overheat the chocolate, as it can burn. If the chocolate is still slightly lumpy, continue stirring until it is smooth and glossy. If desired, add 1 tablespoon of vegetable oil or coconut oil to the melted chocolate and stir to thin it out. This will make it easier to coat the ice cream bars. A pinch of sea salt can also be added to enhance the chocolate flavor.
Step 4: Prepare the Toppings: Place the crushed nuts, crushed cookies, and sprinkles in separate shallow bowls. This will make it easy to dip the chocolate-covered bars in the toppings. You can also use other toppings, such as shredded coconut, mini chocolate chips, or chopped candies.
Step 5: Coat the Ice Cream Bars: Working quickly, remove one ice cream bar from the freezer at a time. Hold the bar by the popsicle stick and dip it into the melted chocolate, ensuring that it is completely coated. Lift the bar out of the chocolate and let any excess chocolate drip off. You can gently tap the bar on the side of the bowl to help remove excess chocolate.
Step 6: Add the Toppings: Immediately dip the chocolate-covered bar into the crushed nuts, crushed cookies, or sprinkles, pressing gently to help the toppings adhere. You can also sprinkle the toppings over the bar if you prefer.
Step 7: Freeze Again: Place the coated bars on a parchment-lined baking sheet and return them to the freezer for at least 30 minutes, or until the chocolate is set. This will prevent the chocolate from melting and make the bars easier to handle.
Step 8: Serve and Enjoy: Once the chocolate has hardened, your homemade chocolate-covered ice cream bars are ready to enjoy! Serve them immediately or store them in an airtight container in the freezer for up to 2 weeks.
Why You Will Love This Recipe:
- Customizable: You can use any flavor of ice cream and any toppings you like, making these bars perfect for satisfying your cravings.
- Easy to Make: With just a few simple steps and ingredients, you can create a delicious and impressive dessert.
- Fun for Kids: This recipe is a great activity to do with kids, allowing them to get creative with the toppings and help with the dipping process.
- Better Than Store-Bought: Homemade ice cream bars are made with fresh ingredients and without any artificial flavors or preservatives.
- Perfect for Any Occasion: These bars are perfect for hot summer days, parties, or any time you want a sweet treat.
Serving Suggestions:
- Serve the ice cream bars as a refreshing dessert after a meal.
- Serve them at a summer barbecue or pool party.
- Wrap them individually and give them as gifts.
- Serve them with a dollop of whipped cream or a drizzle of chocolate sauce.
- Pair them with fresh fruit, such as berries or sliced bananas.
Tips:
- Use high-quality chocolate for the best flavor.
- Make sure the ice cream is frozen solid before dipping it in the chocolate.
- Work quickly when dipping the bars in the chocolate to prevent the ice cream from melting.
- If the chocolate starts to thicken, microwave it for a few seconds to melt it again.
- Store the ice cream bars in an airtight container in the freezer to prevent freezer burn.
- Experiment with different toppings to create your own unique flavor combinations.
- For a healthier option, use sugar-free ice cream and dark chocolate.
- You can also use a silicone mold to create different shapes for the ice cream bars.
- If you don’t have popsicle sticks, you can use wooden skewers.
Prep Time: 15 minutes
Cook Time: 5 minutes (for melting chocolate)
Total Time: 4 hours 20 minutes (includes freezing time)
Nutritional Information:
- Calories: Approximately 250-350 kcal per bar (depending on the ingredients used)
- Protein: 3-5 grams
- Sodium: 50-100 mg
(Note: Nutritional information is an estimate and may vary depending on the specific ingredients used.)
Conclusion:
Homemade chocolate-covered ice cream bars are a delightful and customizable treat that are perfect for any occasion. They are easy to make, fun for kids, and far superior to store-bought versions. With a little creativity, you can create a variety of unique and delicious flavor combinations that will impress your friends and family. So, grab your favorite ice cream and toppings, and get ready to enjoy a sweet and refreshing indulgence!
Questions and Answers About This Recipe:
- Can I use different types of chocolate?
- Absolutely! Feel free to experiment with milk chocolate, dark chocolate, white chocolate, or even flavored chocolate chips like peanut butter or mint. Each type will offer a unique taste experience. You can also use a combination of chocolates, such as dipping half the bar in milk chocolate and the other half in dark chocolate.
- What if I don’t have popsicle sticks?
- No problem! You can use wooden skewers or even sturdy plastic spoons as a substitute. Just make sure they are long enough to hold the ice cream bar securely. If you’re using spoons, you might want to cut the ice cream into smaller, more manageable squares.
- How do I prevent the chocolate from cracking when I bite into the ice cream bar?
- To prevent the chocolate from cracking, add a tablespoon of vegetable oil or coconut oil to the melted chocolate. This will make the chocolate more pliable and less likely to crack. Also, make sure the ice cream is frozen solid before dipping it in the chocolate.
- Can I make these ice cream bars ahead of time?
- Yes, you can! In fact, it’s recommended to make them ahead of time so the chocolate has plenty of time to set. Once the chocolate has hardened, wrap each bar individually in plastic wrap or parchment paper and store them in an airtight container in the freezer for up to 2 weeks.
- What are some other topping ideas?
- The possibilities are endless! Here are a few more topping ideas to get you started: shredded coconut, mini chocolate chips, chopped candies (like M&Ms or peanut butter cups), toffee bits, sea salt flakes, a drizzle of caramel sauce, or even a sprinkle of chili powder for a spicy kick. Let your imagination run wild and create your own signature ice cream bar!