Description: Indulge in the timeless delight of freshly made doughnuts, right in your own kitchen! This recipe delivers pillowy soft doughnuts coated in a luscious, sweet glaze that will satisfy your sweet tooth and impress your friends and family. Forget the store-bought variety – experience the joy of homemade goodness with this easy-to-follow recipe. These doughnuts are perfect for breakfast, brunch, or a special treat any time of day. They’re also surprisingly versatile and can be adapted to different flavors and toppings, making them a blank canvas for your culinary creativity. Get ready to create a batch of irresistible, melt-in-your-mouth doughnuts that will become a new family favorite! Ingredients:
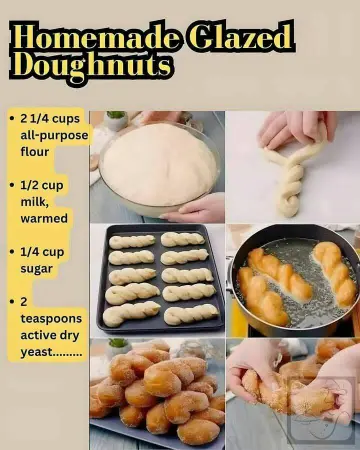
- 2 1/4 cups all-purpose flour, plus more for dusting
- 1/2 cup milk, warmed (about 110°F or 43°C)
- 1/4 cup granulated sugar
- 2 teaspoons active dry yeast
- 1 large egg, beaten
- 2 tablespoons unsalted butter, melted and cooled slightly
- 1 teaspoon vanilla extract
- Vegetable oil or canola oil, for frying (about 4-6 cups depending on your pot)
For the Glaze:
- 2 cups powdered sugar, sifted
- 3-4 tablespoons milk (start with 3 and add more to achieve desired consistency)
- 1/2 teaspoon vanilla extract
Preparation:
Step 1: Activate the Yeast. In a mixing bowl, combine the warmed milk, sugar, and active dry yeast. The milk should be warm to the touch, but not scalding, as too high a temperature will kill the yeast. Gently stir to dissolve the sugar and yeast. Let the mixture sit for about 5 minutes, or until it becomes frothy. This indicates that the yeast is active and ready to leaven the dough. If the mixture doesn’t foam after 5-10 minutes, your yeast may be old or inactive, and you will need to start again with fresh yeast. A proper activation is crucial for achieving light and airy doughnuts.
Step 2: Combine Wet and Dry Ingredients. To the frothy yeast mixture, add the beaten egg, melted (and slightly cooled) butter, and vanilla extract. Stir to combine these wet ingredients thoroughly. Now, gradually add the flour, mixing as you go. Start with about half the flour, then add the remaining flour little by little, mixing until a soft dough forms. Be careful not to add too much flour at once, as this can result in dry, tough doughnuts. The dough should be slightly sticky to the touch.
Step 3: Knead the Dough. Turn the dough out onto a lightly floured surface. Knead the dough for about 5-7 minutes, or until it becomes smooth and elastic. Kneading develops the gluten in the flour, which gives the doughnuts their structure and chewiness. If the dough is too sticky, add a little more flour, one tablespoon at a time, until it becomes manageable. To knead, push the dough away from you with the heel of your hand, then fold it back over itself and repeat. Rotate the dough as you knead to ensure even development.
Step 4: First Rise. Place the kneaded dough into a lightly greased bowl. Turn the dough to coat it in the oil, which will prevent it from drying out during the rising process. Cover the bowl with plastic wrap or a clean kitchen towel. Let the dough rise in a warm place for about 1 hour, or until it has doubled in size. A warm environment helps the yeast to ferment and produce carbon dioxide, which makes the dough rise. The ideal temperature for rising is around 75-80°F (24-27°C). You can place the bowl in a slightly warmed oven (turned off) or on top of the refrigerator to provide a consistent warm temperature.
Step 5: Roll and Cut. After the dough has doubled, gently punch it down to release the air. Turn the dough out onto a lightly floured surface. Roll the dough out to about 1/2 inch thickness. Use a doughnut cutter (or two different sized circular cookie cutters) to cut out the doughnuts. Place the cut doughnuts onto a baking sheet lined with parchment paper. Gather the scraps of dough, knead them together, roll them out again, and cut out more doughnuts until all the dough is used. Let the cut doughnuts rest for about 15-20 minutes before frying. This allows them to puff up slightly and helps to create a lighter texture.
Step 6: Heat the Oil. In a deep fryer or a large, heavy-bottomed pot, heat vegetable oil or canola oil to 375°F (190°C). Use a thermometer to ensure that the oil is at the correct temperature. If the oil is too hot, the doughnuts will brown too quickly on the outside and remain uncooked on the inside. If the oil is not hot enough, the doughnuts will absorb too much oil and become greasy.
Step 7: Fry the Doughnuts. Carefully lower the doughnuts into the hot oil, a few at a time, without overcrowding the pot. Fry them for about 1-2 minutes per side, or until they are golden brown. Use a slotted spoon or a spider strainer to remove the doughnuts from the oil and place them on a wire rack lined with paper towels to drain excess oil.
Step 8: Make the Glaze. While the doughnuts are cooling slightly, prepare the glaze. In a medium bowl, whisk together the sifted powdered sugar, milk, and vanilla extract until smooth. Start with 3 tablespoons of milk and add more, one tablespoon at a time, until you reach your desired consistency. The glaze should be thick enough to coat the doughnuts evenly, but not so thick that it is difficult to spread.
Step 9: Glaze the Doughnuts. Dip each doughnut into the glaze, coating both sides. Place the glazed doughnuts on a wire rack to allow the excess glaze to drip off and set. The glaze will harden slightly as it cools, creating a smooth and shiny finish.
Step 10: Serve and Enjoy. Serve the glazed doughnuts immediately for the best flavor and texture. They are delicious on their own or paired with a cup of coffee or tea. Leftover doughnuts can be stored in an airtight container at room temperature for up to 2 days.
Why you will love this recipe:
This homemade glazed doughnut recipe is a winner for several reasons:
- Superior Taste and Texture: Forget the mass-produced, often stale, doughnuts from the store. These homemade versions boast an incredibly soft, pillowy texture and a fresh, irresistible flavor that you just can’t get from a bakery. The slightly chewy interior and the delicate sweetness of the glaze create a perfect harmony of textures and tastes.
- Customization Potential: This recipe is a fantastic base for experimentation. You can easily adapt it to your liking by adding different extracts to the dough (almond, lemon, or orange would be delicious!), incorporating spices like cinnamon or nutmeg, or topping them with different glazes or sprinkles. The possibilities are endless!
- Sense of Accomplishment: There’s something truly rewarding about creating something delicious from scratch. Baking these doughnuts will give you a sense of accomplishment and pride that you can share with your family and friends.
- Family Fun: Baking doughnuts together can be a fun and engaging activity for the whole family. Kids will love helping with measuring, mixing, and decorating. It’s a great way to create lasting memories and teach them valuable skills in the kitchen.
- Control over Ingredients: When you make doughnuts at home, you have complete control over the ingredients that go into them. You can choose high-quality flour, use real butter, and avoid artificial flavors and preservatives. This is especially important for those with dietary restrictions or allergies.
COOKING Rating: Intermediate
Serving Suggestions:
- Classic Coffee Companion: The quintessential pairing! Serve these glazed doughnuts with a hot cup of coffee or a latte for a delightful breakfast or afternoon treat.
- Sweet Treat for Brunch: Include these doughnuts as part of a brunch spread alongside other breakfast staples like eggs, bacon, and fruit.
- Dessert with a Twist: Offer these doughnuts as a fun and unexpected dessert option after a meal.
- Party Favor or Gift: Package these doughnuts in a cute box or bag and give them as a thoughtful homemade gift for birthdays, holidays, or other special occasions.
- Ice Cream Topping: Crumble a doughnut over a scoop of vanilla ice cream for an indulgent dessert.
Tips:
- Yeast is Key: Ensure your yeast is fresh and active for a good rise. If your yeast doesn’t foam after 5-10 minutes, it’s likely dead and won’t work.
- Don’t Overwork the Dough: Over-kneading can result in tough doughnuts. Knead just until the dough is smooth and elastic.
- Temperature Matters: Maintain the oil temperature around 375°F (190°C) for even cooking and golden-brown color.
- Cool Before Glazing: Let the doughnuts cool slightly before glazing to prevent the glaze from melting and running off.
- Wire Rack is Essential: Use a wire rack to allow excess glaze to drip off and the doughnuts to cool properly.
- Add Sprinkles: After glazing, immediately add sprinkles for an extra touch of fun.
- Experiment with Flavors: Get creative with your glaze! Try adding lemon zest, chocolate, or a touch of cinnamon.
Prep Time: 1 hour 30 minutes
Cook Time: 20 minutes
Total Time: 1 hour 50 minutes
Nutritional Information (Approximate per Doughnut):
- Calories: 210 kcal
- Protein: 3g
- Sodium: 50mg (This can vary depending on the salt content of the butter used)
Conclusion:
These Homemade Glazed Doughnuts are a testament to the power of simple ingredients and careful preparation. The result is a batch of irresistibly soft, sweet, and satisfying doughnuts that are far superior to anything you can buy in a store. From the joy of watching the dough rise to the satisfaction of dipping the golden-brown rings into the shimmering glaze, this recipe is a culinary adventure that’s well worth the effort. So, gather your ingredients, put on your apron, and get ready to create a batch of homemade happiness that will bring smiles to the faces of everyone you share them with. This recipe is more than just a set of instructions; it’s an invitation to experience the joy of baking and the pleasure of sharing delicious food with loved ones. Enjoy!
Questions and Answers:
- Question: Can I use bread flour instead of all-purpose flour? Answer: While you can use bread flour, the texture of the doughnuts will be slightly different. Bread flour has a higher protein content, which will result in a chewier doughnut. For a softer, more delicate doughnut, all-purpose flour is recommended. If you do use bread flour, you may need to adjust the amount of liquid slightly, as bread flour absorbs more moisture. Start with the recipe amount and add more gradually if needed.
- Question: What if I don’t have a doughnut cutter? Answer: No problem! You can use two different-sized circular cookie cutters, a biscuit cutter, or even a sharp knife to cut out the doughnuts. If using a knife, simply cut out circles from the rolled-out dough and then use a smaller circular object (like a bottle cap) to cut out the center hole. The appearance might not be perfectly uniform, but they will taste just as delicious!
- Question: Can I bake these doughnuts instead of frying them? Answer: While frying yields the most authentic doughnut texture, you can bake them as an alternative. Preheat your oven to 375°F (190°C). Place the cut doughnuts on a baking sheet lined with parchment paper and bake for 12-15 minutes, or until golden brown. Baked doughnuts will be slightly denser and less airy than fried doughnuts, but they are still a tasty option. You may want to brush them with melted butter before baking to add moisture and richness.
- Question: How can I store leftover doughnuts? Answer: Leftover doughnuts are best stored in an airtight container at room temperature. They will stay fresh for up to 2 days. To prevent them from becoming soggy, avoid storing them in the refrigerator. If you want to reheat them, you can microwave them briefly (about 10-15 seconds) to restore some of their softness.
- Question: Can I freeze the doughnuts? Answer: Yes, you can freeze the doughnuts, but it’s best to freeze them before glazing. Place the cooled, unglazed doughnuts in a single layer on a baking sheet and freeze for about an hour, or until solid. Then, transfer them to a freezer-safe bag or container. They can be stored in the freezer for up to 2 months. When ready to eat, thaw them at room temperature and then glaze them as directed in the recipe. Freezing can slightly alter the texture, but they will still be enjoyable.