Description of this recipe This recipe brings the taste of a tropical paradise straight to your home. It’s a quick, easy, and healthy dessert option that captures the essence of fresh pineapple in a creamy, dreamy soft serve. Perfect for hot summer days or any time you crave a refreshing treat, this homemade version is free from artificial flavors and preservatives, making it a guilt-free indulgence.
Why you will love this recipe You will absolutely adore this Homemade Pineapple Soft Serve Ice Cream because it’s incredibly simple to make, requiring only a handful of ingredients and minimal effort. The bright, tangy flavor of pineapple shines through, offering a refreshing contrast to the creamy texture. It’s a fantastic alternative to traditional ice cream, especially if you’re looking for a lighter, dairy-free, or vegan-friendly option. Plus, it’s customizable; you can adjust the sweetness to your liking and even add extra ingredients to create your own unique flavor combinations. Kids and adults alike will love this delightful dessert, making it a perfect addition to any gathering or a simple weeknight treat.
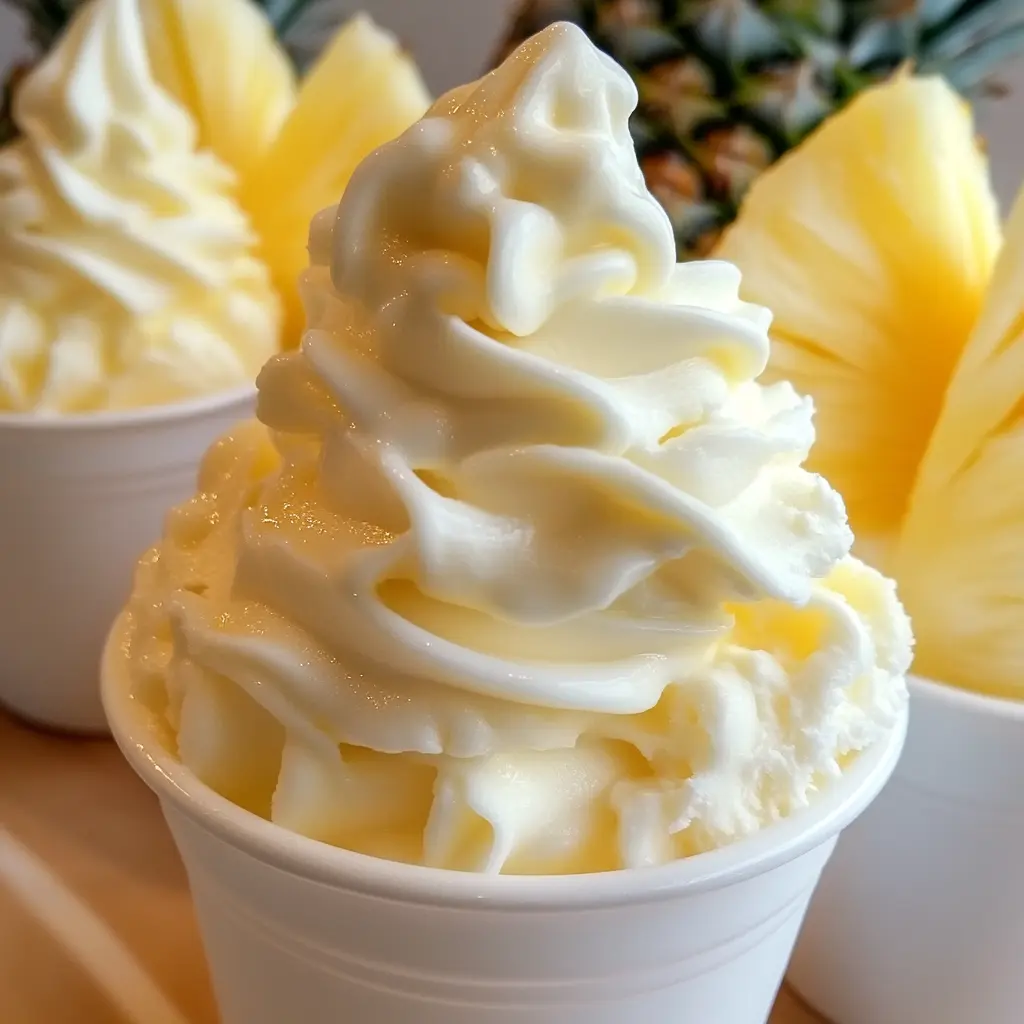
Introduction Imagine sinking your spoon into a cloud of creamy, pineapple-infused delight. That’s exactly what you get with this Homemade Pineapple Soft Serve Ice Cream. In a world filled with processed and sugary desserts, this recipe offers a breath of fresh air. It’s made with just a few simple ingredients, primarily frozen pineapple, which not only contributes to the intense flavor but also gives it that perfect soft serve consistency.
This recipe is born out of a desire for a healthier, more natural dessert option. Store-bought ice creams are often loaded with additives, preservatives, and excessive sugar. By making your own, you have complete control over what goes into your body. The frozen pineapple acts as the base, providing a naturally sweet and tangy flavor. The addition of frozen whipped topping enhances the creaminess, while a touch of honey (or sugar) balances the tartness. A splash of pineapple juice ties everything together, ensuring a smooth and consistent texture.
What sets this recipe apart is its versatility. You can easily adapt it to suit your dietary needs and preferences. For a completely dairy-free version, use coconut whipped cream instead of traditional whipped topping. If you prefer a more intense sweetness, add a bit more honey or sugar. You can also experiment with different variations by adding ingredients like shredded coconut, lime zest, or even a pinch of chili powder for a spicy kick.
This Homemade Pineapple Soft Serve Ice Cream is more than just a dessert; it’s an experience. It transports you to a tropical island with every spoonful, leaving you feeling refreshed and satisfied. It’s a perfect way to end a meal, cool off on a hot day, or simply treat yourself to something special. So, grab your blender, gather your ingredients, and get ready to create a dessert that will become a new favorite in your household.
Ingredients:
- 2 cups frozen pineapple chunks
- 8 oz frozen whipped topping (e.g., Cool Whip)
- 3 tbsp honey (or 2 tbsp sugar)
- 6 oz pineapple juice
Preparation:
Step 1: Gather all your ingredients: 2 cups of frozen pineapple chunks, 8 oz of frozen whipped topping, 3 tablespoons of honey (or 2 tablespoons of sugar), and 6 oz of pineapple juice. Having everything measured and ready to go will make the process smoother and more efficient. Ensure that the pineapple chunks are thoroughly frozen for the best soft serve consistency. The whipped topping should also be frozen to maintain its texture and prevent the soft serve from becoming too runny.
Step 2: In a high-speed blender or food processor, combine the frozen pineapple chunks, frozen whipped topping, honey (or sugar), and pineapple juice. If you don’t have a high-speed blender, a regular blender will work, but you may need to blend for a longer time and scrape down the sides more frequently. A food processor can also be used, but be mindful not to over-process the mixture, as it can become too liquid.
Step 3: Begin blending the ingredients on a medium speed. As the mixture starts to combine, gradually increase the speed to high. Blend until the mixture is smooth and creamy. This may take a few minutes, depending on the power of your blender or food processor. Pause occasionally to scrape down the sides of the blender or food processor with a spatula to ensure that all the ingredients are evenly incorporated. This step is crucial for achieving the perfect soft serve texture.
Step 4: Check the consistency of the mixture. If it appears too thick, add a small amount of extra pineapple juice, one tablespoon at a time, and continue blending until the desired consistency is reached. Be careful not to add too much juice, as this can make the soft serve too liquid and less like traditional soft serve. The goal is to achieve a smooth, creamy, and slightly thick texture that holds its shape when scooped.
Step 5: Once the mixture has reached the desired consistency, you have two options: serve immediately for a soft-serve texture or freeze in a container for 1-2 hours for a firmer consistency. If serving immediately, scoop the soft serve into bowls or cones and enjoy. If freezing for a firmer consistency, transfer the mixture to an airtight container and place it in the freezer. Check the consistency after 1 hour, and if it’s still too soft, continue freezing for another hour. Be careful not to freeze it for too long, as it can become too hard to scoop.
COOKING Rating: Easy
Serving Suggestions:
- Serve in a classic waffle cone for the full ice cream parlor experience.
- Top with shredded coconut, fresh pineapple chunks, or a drizzle of honey.
- Add a sprinkle of toasted nuts for a crunchy texture.
- Create a sundae bar with various toppings like chocolate sauce, sprinkles, and whipped cream.
- Serve alongside grilled pineapple slices for a complementary flavor combination.
- Use it as a base for a smoothie by blending it with extra pineapple juice and other fruits.
- Pair it with a slice of pineapple upside-down cake for a decadent dessert duo.
Tips:
- For the best texture, use high-quality frozen pineapple chunks.
- Adjust the amount of honey or sugar to your personal preference.
- If you don’t have pineapple juice, you can use water or another fruit juice, but it may alter the flavor slightly.
- For a dairy-free version, use coconut whipped cream instead of traditional whipped topping.
- Add a splash of lime juice for an extra zing.
- Store any leftovers in an airtight container in the freezer for up to a week.
- If the soft serve becomes too hard after freezing, let it thaw for a few minutes before scooping.
Prep Time: 5 minutes
Cook Time: 5 minutes
Total Time: 10 minutes
Nutritional Information: Calories: Approximately 200-250 calories per serving (depending on the amount of honey/sugar used) Protein: 1-2 grams Sodium: 20-30mg
Conclusion This Homemade Pineapple Soft Serve Ice Cream is a delightful treat that is both easy to make and incredibly satisfying. With just a few simple ingredients, you can create a dessert that is healthier, fresher, and more flavorful than anything you can buy in a store. Its versatility allows you to customize it to your liking, making it a perfect addition to any occasion. Whether you’re looking for a quick and easy dessert for a weeknight treat or a refreshing option for a summer gathering, this recipe is sure to impress. So, give it a try and experience the taste of homemade goodness!
write 5 questions and answers about this recipe
- Can I use fresh pineapple instead of frozen? Answer: While you can use fresh pineapple, the frozen pineapple is crucial for achieving the soft serve consistency. Fresh pineapple will add moisture and might not result in the same creamy texture. If you use fresh pineapple, consider freezing it beforehand to get the best results.
- Is it possible to make this recipe without whipped topping? Answer: Yes, but the texture will be different. The whipped topping adds creaminess and volume to the soft serve. If you want to avoid whipped topping, you can try using frozen banana slices or coconut cream for a similar effect. Keep in mind that this will change the flavor and nutritional profile of the dessert.
- Can I add other fruits to this recipe? Answer: Absolutely! Feel free to experiment with other frozen fruits like mango, strawberries, or bananas. Just make sure to adjust the amount of pineapple to maintain the overall flavor balance. Adding a mix of fruits can create a unique and delicious twist on the classic pineapple soft serve.
- How long can I store the leftover soft serve in the freezer? Answer: You can store the leftover soft serve in an airtight container in the freezer for up to a week. However, keep in mind that the texture may change after freezing, becoming harder and less creamy. To restore the texture, let it thaw for a few minutes before scooping.
- Is there a vegan alternative to honey in this recipe? Answer: Yes, you can easily replace honey with other vegan sweeteners like maple syrup, agave nectar, or even a sugar substitute like stevia. Adjust the amount to your liking, keeping in mind that different sweeteners have different levels of sweetness. Maple syrup and agave nectar will also add a slight flavor that complements the pineapple.