Description of this recipe
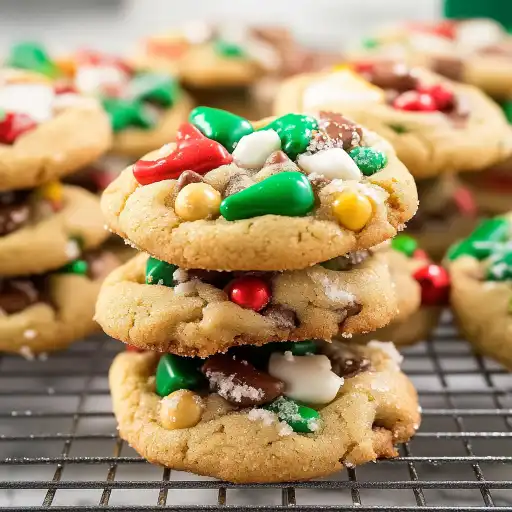
These Kitchen Sink Christmas Cookies are the ultimate holiday mashup! Imagine a cookie that’s sweet, salty, crunchy, and chewy all at the same time. These aren’t your grandma’s classic sugar cookies; they’re a playful explosion of flavors and textures that will surprise and delight everyone who tries them. We’re talking buttery dough loaded with pretzels, potato chips, chocolate chips, M&Ms, and festive sprinkles. It’s a party in every bite, perfect for holiday gatherings, cookie exchanges, or just a fun baking project with the family.
Why you will love this recipe
- Unpredictably Delicious: The combination of sweet and salty ingredients creates a flavor profile that’s both familiar and excitingly new.
- Texture Extravaganza: From the crispy chips and pretzels to the melty chocolate and chewy dough, these cookies offer a satisfying textural experience.
- Customizable: The “kitchen sink” concept means you can easily adapt the recipe to use up leftover holiday snacks or cater to your family’s preferences. Don’t like potato chips? Add some chopped nuts or toffee bits instead.
- Festive and Fun: The red and green M&Ms and sprinkles add a cheerful holiday touch, making them perfect for gifting or bringing to a Christmas party.
- Easy to Make: Despite the long list of ingredients, these cookies are surprisingly simple to bake. The process is straightforward and doesn’t require any fancy techniques.
- Crowd-Pleaser: These cookies are always a hit, especially with kids and those who love a good sweet-and-salty combination. They’re a guaranteed conversation starter!
- Perfect for Using Up Leftovers: Have half a bag of pretzels and some stray chocolate chips lying around? This is the perfect recipe to put those bits and pieces to delicious use.
- They are Addictive: Seriously, it’s hard to eat just one. The combination of textures and flavors makes them utterly irresistible.
Ingredients:
- 2 1⁄2 cups all-purpose flour
- 1 teaspoon baking soda
- 3⁄4 teaspoon salt
- 3⁄4 cup granulated sugar
- 3⁄4 cup brown sugar, packed
- 1 cup butter (2 sticks), softened
- 1 egg, plus 1 egg yolk
- 1 1⁄2 teaspoons vanilla
- 3⁄4 cup + 2 tablespoons red and green M&Ms, divided
- 3⁄4 cup + 2 tablespoons crushed pretzels, divided (I put the pretzels in a resealable bag and use a rolling pin to break into pieces, but not so much that they are completely crushed)
- 3⁄4 cup + 2 tablespoons crushed potato chips, divided (Same process for crushing as the pretzels). I like ridged potato chips like Ruffles the best.
- 1⁄2 cup + 2 tablespoons semi-sweet chocolate chips, divided
- 1⁄2 cup + 2 tablespoons white chocolate chips, divided
- 2 tablespoons Christmas red and green sprinkles (jimmies)
Preparation:
Step 1: Preheat your oven to 375 degrees Fahrenheit (190 degrees Celsius). This ensures that the cookies bake evenly and have a slightly crispy edge.
Step 2: Line a baking sheet with parchment paper. Parchment paper prevents the cookies from sticking to the baking sheet, makes cleanup a breeze, and helps the cookies bake evenly.
Step 3: In a medium-sized bowl, whisk together the flour, baking soda, and salt. Whisking these dry ingredients ensures that they are evenly distributed throughout the dough, resulting in a consistent texture and flavor.
Step 4: Using an electric hand-held mixer or a stand mixer, at medium speed, beat together the sugars and butter until light and fluffy, about 2-3 minutes. Scrape down the sides of the mixer. Creaming the butter and sugar together is a crucial step as it incorporates air into the dough, resulting in a tender and airy cookie. Scrape down the sides to ensure everything is evenly mixed.
Step 5: Add the egg, egg yolk, and vanilla and beat again until thoroughly mixed. The egg and egg yolk add richness and moisture to the dough, while the vanilla enhances the overall flavor. The extra egg yolk adds richness and chewiness!
Step 6: Add the flour mixture to the sugar mixture and mix at low speed just until combined, being careful not to overmix. Overmixing the dough can develop the gluten in the flour, resulting in tough cookies. Mix just until the flour is incorporated.
Step 7: Stir in 3/4 cup M&Ms, 3/4 cup crushed pretzels, 3/4 cup crushed potato chips, 1/2 cup chocolate chips, 1/2 cup white chocolate chips, and the sprinkles. The dough will be stiff. This is where the “kitchen sink” magic happens! The dough will be quite thick and sturdy, which is exactly what you want.
Step 8: Using a medium cookie scoop (about 2 tablespoons), scoop the dough onto the prepared cookie sheet and space the dough 2 inches apart. Using a cookie scoop ensures that the cookies are uniform in size and bake evenly. Spacing them apart allows for proper air circulation and prevents them from sticking together.
Step 9: Bake the cookies for 8-10 minutes, until the bottoms of the cookies are just turning golden brown. Keep a close eye on the cookies as they bake, as oven temperatures can vary. You want the bottoms to be golden brown, but the tops should still be slightly soft.
Step 10: Remove from the oven and immediately press some of the remaining M&Ms, crushed pretzel pieces, crushed potato chips, chocolate chips, and/or white chocolate chips into the tops of the cookies, as desired for presentation. This is your chance to get creative and make the cookies look extra festive! Pressing the toppings into the cookies while they are still warm helps them adhere better.
Step 11: Leave the cookies on the cookie sheet to cool for 2-5 minutes, then remove to a cooling rack to cool completely. Allowing the cookies to cool slightly on the baking sheet before transferring them to a cooling rack helps them to set and prevents them from breaking.
Step 12: Serve immediately or store covered at room temperature for 3-4 days. These cookies are best enjoyed fresh, but they will keep well for a few days in an airtight container.
COOKING Rating:
Easy
Serving Suggestions:
- Serve warm with a glass of cold milk or a mug of hot cocoa.
- Package them in a festive tin or bag for a thoughtful holiday gift.
- Bring them to a cookie exchange party and watch them disappear!
- Enjoy them as a sweet and salty snack any time of day.
- Serve with a scoop of vanilla ice cream for a decadent dessert.
Tips:
- Don’t Overmix: Overmixing the dough will result in tough cookies. Mix just until the ingredients are combined.
- Chill the Dough (Optional): For a slightly chewier cookie, chill the dough for 30 minutes before scooping and baking.
- Use Quality Ingredients: The better the quality of your ingredients, the better the cookies will taste. Use good quality butter, chocolate chips, and vanilla extract.
- Get Creative with Toppings: Feel free to experiment with different toppings based on your preferences and what you have on hand.
- Store Properly: Store the cookies in an airtight container at room temperature to keep them fresh.
Prep Time:
20 minutes
Cook Time:
8-10 minutes
Total Time:
30 minutes
Nutritional Information:
(Note: Nutritional information is an estimate and will vary based on specific ingredients and portion sizes.)
Calories:
Approximately 200-250 per cookie
Protein:
Approximately 2-3 grams per cookie
Sodium:
Approximately 100-150mg per cookie
Conclusion
These Kitchen Sink Christmas Cookies are more than just a recipe; they’re an experience. They’re a celebration of flavor, texture, and the joy of baking. So gather your ingredients, crank up the Christmas tunes, and get ready to create a batch of cookies that will become a holiday tradition for years to come. Don’t be afraid to get creative and make them your own. After all, the best recipes are those that are made with love and a little bit of holiday spirit!
Questions and Answers about this recipe
Q1: Can I substitute the potato chips with something else?
A: Absolutely! If you’re not a fan of potato chips in cookies (though I highly recommend trying it!), you can substitute them with other crunchy snacks like chopped nuts (pecans, walnuts, or almonds would be great), crushed pretzels (for even more pretzel flavor), toffee bits, or even crispy rice cereal. Just make sure to use a similar amount to maintain the texture of the cookies.
Q2: What if I don’t have red and green M&Ms? Can I use regular ones?
A: Of course! The red and green M&Ms add a festive touch, but you can definitely use regular M&Ms or any other kind of candy-coated chocolate pieces. You could even use other seasonal candies like peppermint bark pieces or chopped-up candy canes. The most important thing is to have fun and use what you like!
Q3: My cookies spread out too much when I baked them. What did I do wrong?
A: There are a few reasons why your cookies might have spread too much. One common reason is that the butter was too soft. Make sure your butter is softened but not melted. Another reason could be that you overmixed the dough, which develops the gluten and can cause the cookies to spread. Also, make sure your oven is at the correct temperature. If it’s too low, the cookies will spread before they set. Finally, chilling the dough for 30 minutes before baking can help to prevent spreading.
Q4: Can I make these cookies ahead of time?
A: Yes, you can definitely make the dough ahead of time! Simply prepare the dough as directed, then wrap it tightly in plastic wrap and store it in the refrigerator for up to 2 days. When you’re ready to bake the cookies, let the dough sit at room temperature for about 15-20 minutes to soften slightly, then scoop and bake as directed. You can also freeze the dough for longer storage. Scoop the dough into individual balls, freeze them on a baking sheet, and then transfer them to a freezer bag. They can be stored in the freezer for up to 2 months. When you’re ready to bake, bake from frozen, adding a few extra minutes to the baking time.
Q5: Can I use a different type of flour?
A: While all-purpose flour is the recommended flour for this recipe, you can experiment with other types of flour. If you want to use whole wheat flour, I recommend substituting no more than half of the all-purpose flour with whole wheat flour, as whole wheat flour can make the cookies a bit denser. You can also use a gluten-free all-purpose flour blend, but be sure to choose a blend that is designed for baking and contains xanthan gum, which will help to bind the ingredients together. Keep in mind that using different types of flour may affect the texture and flavor of the cookies.