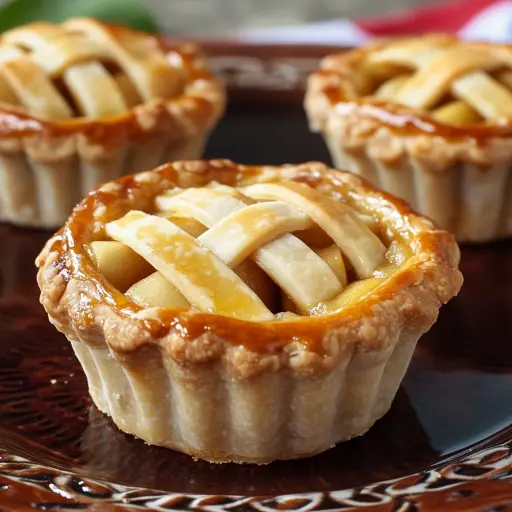
Description: Sweet, spiced apple filling wrapped in golden, flaky crust — these hand-held treats are the perfect fall indulgence! Bite-sized apple pies that are surprisingly easy to make, perfect for fall baking or any time you crave a comforting treat.
Ingredients:
- 2 ready-made pie crusts (approximately 14-16 ounces total)
- 3 cups diced Granny Smith apples (about 4 medium apples)
- ¼ cup white sugar
- ¼ cup packed brown sugar
- 1 tablespoon all-purpose flour
- 1 teaspoon ground cinnamon
- ¼ teaspoon ground nutmeg
- 1 tablespoon lemon juice
- 1 egg (for egg wash)
- Optional: coarse sugar for sprinkling
Preparation:
Step 1: Preheat Oven & Prep Baking Sheet
Preheat your oven to 375°F (190°C). This is crucial for ensuring the crust bakes evenly and achieves that desirable golden-brown color. Prepare a baking sheet by lining it with parchment paper. Parchment paper prevents the mini pies from sticking, making removal easier and cleanup a breeze. Don’t skip this step!
Step 2: Make the Apple Filling
In a large bowl, combine the diced Granny Smith apples with the white sugar, brown sugar, all-purpose flour, ground cinnamon, ground nutmeg, and lemon juice. Gently toss all the ingredients together until the apples are evenly coated. The combination of white and brown sugar adds depth of flavor. Brown sugar provides a hint of molasses, complementing the apple spice. The flour helps to thicken the filling during baking, preventing it from becoming too runny. The cinnamon and nutmeg contribute warmth and that classic apple pie spice. Lemon juice not only brightens the flavor but also prevents the apples from browning prematurely. Make sure to dice the apples into small, even pieces for uniform cooking.
Step 3: Cut the Pie Crusts
Unroll the ready-made pie crusts on a lightly floured surface. A lightly floured surface prevents the dough from sticking and makes it easier to work with. Using a round cutter (about 4 inches in diameter), cut out circles. If you don’t have a round cutter, you can use a bowl or a jar lid as a template. Gently press down and twist to cut out the circles. Re-roll the scraps if needed to maximize the number of circles you get. With the suggested measurements, you should get approximately 12 circles per crust, totaling about 24 mini pie crusts. Pie crusts can vary slightly in size depending on the brand, so adjust accordingly.
Step 4: Assemble the Mini Pies
Place half of the dough circles (about 12) on the prepared baking sheet. Spoon a small mound of the apple filling (about 1 ½ tablespoons) onto the center of each circle. Be careful not to overfill them, as this can cause the filling to spill out during baking. Cover each filled circle with another dough circle, carefully aligning the edges. Gently press the edges together with a fork to seal them securely. This creates a crimped edge that is both aesthetically pleasing and functional, preventing the filling from leaking out. Use a small knife to cut a few slits in the top of each pie. These slits allow steam to escape during baking, preventing the crust from puffing up too much and potentially bursting.
Step 5: Add Egg Wash & Sugar
In a small bowl, beat the egg with 1 tablespoon of water to create an egg wash. Brush the tops of the mini pies with the egg wash. The egg wash gives the crust a beautiful, glossy sheen and helps it to brown evenly. Sprinkle the tops of the pies with coarse sugar if desired. Coarse sugar adds a touch of sweetness and a delightful crunch to the finished pies.
Step 6: Bake to Golden Perfection
Bake in the preheated oven for 18-22 minutes, or until the crusts are golden brown and the filling is bubbling slightly. Keep a close eye on them, as baking times may vary depending on your oven. The crust should be a deep golden color and the filling should be visibly bubbling and slightly thickened.
Step 7: Cool & Serve
Remove the mini apple pies from the oven and allow them to cool on the baking sheet for at least 10 minutes before serving. This allows the filling to set slightly and prevents you from burning your mouth! Serve them warm or at room temperature. They are delicious on their own or with a scoop of vanilla ice cream, a dollop of whipped cream, or a drizzle of caramel sauce.
Why you will love this recipe
- Portable Perfection: These mini pies are the ideal grab-and-go treat, perfect for lunchboxes, picnics, potlucks, or any occasion where you need a single-serving dessert.
- Easy to make: With ready-made pie crusts, this recipe simplifies the process of pie-making, making it accessible for beginner bakers.
- Customizable: Feel free to experiment with different apple varieties, spices, or toppings to create your own unique version.
- Crowd-Pleaser: Everyone loves a good apple pie, and these mini versions are guaranteed to be a hit with kids and adults alike.
- Perfect for Fall: The warm spices and comforting apple flavor make these mini pies the quintessential fall treat.
- Freezer-Friendly: Make a big batch and freeze the baked pies for a quick and easy dessert anytime.
Serving Suggestions:
- Serve warm with a scoop of vanilla ice cream or a dollop of whipped cream.
- Drizzle with caramel sauce or maple syrup.
- Pair with a cup of hot coffee or tea.
- Dust with powdered sugar for an extra touch of sweetness.
- Add a sprinkle of chopped nuts for added texture and flavor.
Tips:
- Use cold pie crust for the best results.
- Don’t overfill the pies, as this can cause them to leak during baking.
- Make sure to seal the edges of the pies tightly to prevent the filling from escaping.
- Cut slits in the top of the pies to allow steam to escape.
- If the crust starts to brown too quickly, tent the pies with foil.
- Let the pies cool slightly before serving to prevent burning your mouth.
- For an extra touch of flavor, add a pinch of salt to the apple filling.
- If you’re using a sweeter apple variety, reduce the amount of sugar in the filling.
- Store leftover pies in an airtight container at room temperature for up to 3 days.
- Baked pies can be frozen for up to 2 months. Thaw in the refrigerator before serving.
- For a festive twist, use cookie cutters to create different shapes for the top crust.
Prep Time: 20 minutes Cook Time: 20 minutes Total Time: 40 minutes
Nutritional Information: (Approximate, may vary based on specific ingredients and serving size)
- Calories: ~190 kcal per mini pie
- Protein: ~2g
- Sodium: ~150mg
Conclusion
These Mini Apple Pies are more than just a recipe; they’re a celebration of fall flavors and a comforting reminder of homemade goodness. Easy to assemble and endlessly adaptable, they’re a perfect choice for both seasoned bakers and kitchen novices. Whether you’re looking for a crowd-pleasing dessert, a delightful snack, or a fun baking project with kids, these bite-sized apple pies are sure to bring a smile to everyone’s face. So grab your ingredients, preheat your oven, and get ready to experience the joy of mini apple pie perfection!
Questions and Answers about Mini Apple Pies:
Q1: Can I use different types of apples for this recipe?
A: Absolutely! While Granny Smith apples offer a nice tartness that balances the sweetness of the filling, you can certainly experiment with other varieties. Honeycrisp, Gala, or Fuji apples would also work well, providing a slightly sweeter and softer filling. A combination of different apple types can also add complexity to the flavor profile. Just be mindful of the sweetness levels and adjust the amount of sugar accordingly.
Q2: Can I make these ahead of time?
A: Yes, you can prepare the mini pies in advance. There are a couple of options:
- Unbaked: Assemble the pies, but don’t add the egg wash or sugar. Cover them tightly with plastic wrap and refrigerate for up to 24 hours. When ready to bake, brush with egg wash, sprinkle with sugar, and bake as directed.
- Baked: Bake the pies completely and let them cool. Store them in an airtight container at room temperature for up to 3 days or freeze them for up to 2 months. Thaw in the refrigerator before serving and reheat gently in the oven or microwave if desired.
Q3: What can I use instead of ready-made pie crust?
A: If you prefer, you can certainly make your own pie crust from scratch. Many recipes are available online, and homemade crust can elevate the flavor and texture of your mini pies. However, using ready-made crust is a convenient shortcut that saves time and effort, especially for busy bakers.
Q4: What if I don’t have coarse sugar?
A: If you don’t have coarse sugar, you can skip it altogether or use granulated sugar as a substitute. However, coarse sugar adds a unique textural element and a subtle sweetness that enhances the overall experience. You can also try using turbinado sugar for a similar effect.
Q5: How can I prevent the bottom crust from getting soggy?
A: A few things can help prevent a soggy bottom crust:
- Blind Bake: For extra crispness, you can partially bake the bottom crust before adding the filling. Place the dough circles on the baking sheet, prick them with a fork, and bake for 5-7 minutes before adding the apple filling.
- Thickener: Ensure you are using the correct amount of flour in the filling to help absorb excess moisture.
- Hot Oven: Ensure the oven is fully preheated before baking.
- Baking Stone: If you have a baking stone, placing it in the oven while preheating can help to create a hotter surface for the pies to bake on, promoting a crispier bottom crust.