Description of this recipe
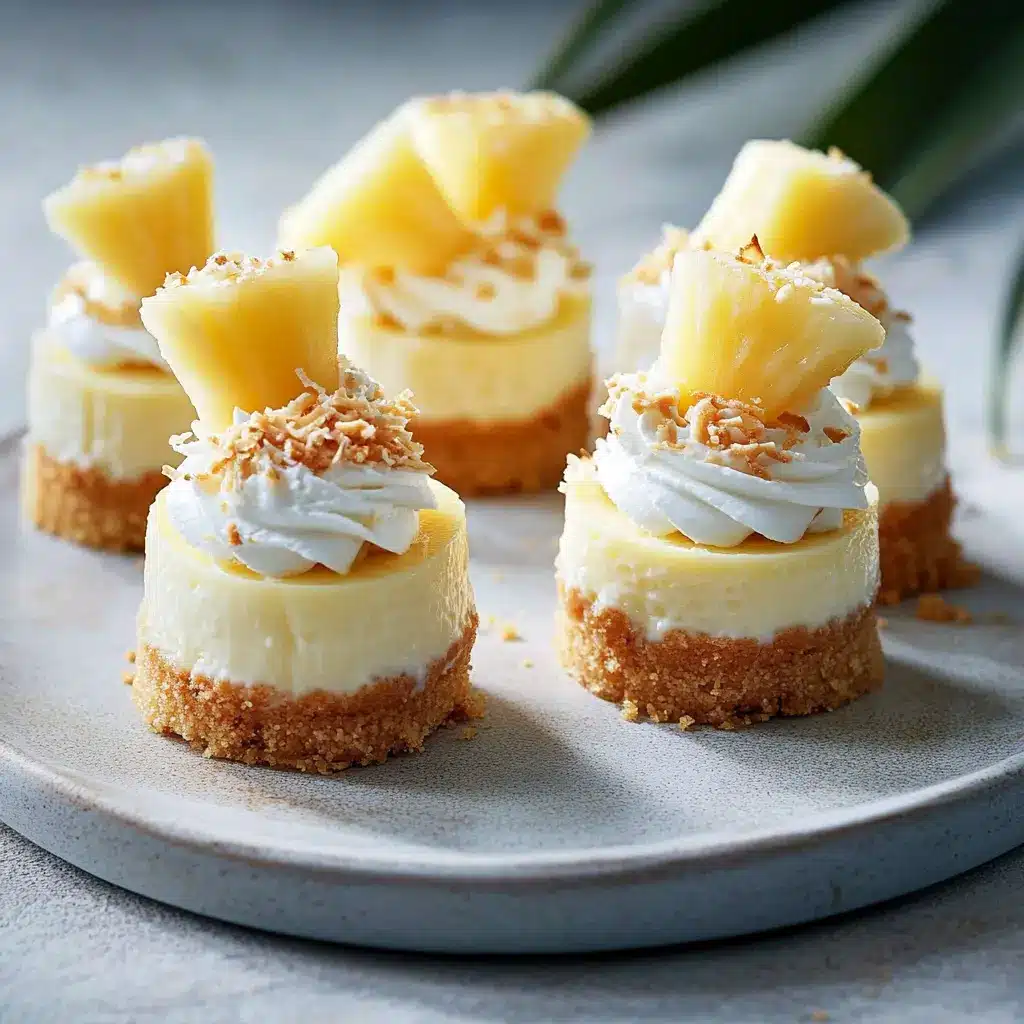
These Mini Pineapple & Coconut Milk Cheesecakes are a tropical twist on a classic dessert, offering a delightful combination of creamy, tangy, and sweet flavors in perfectly portioned individual treats. Imagine the smooth, rich texture of cheesecake infused with the exotic taste of coconut milk and the juicy bursts of pineapple. These cheesecakes are not baked, making them a simple and refreshing option, especially during warmer months, and they’re incredibly easy to prepare, perfect for both novice and experienced bakers.
Why you will love this recipe
You’ll absolutely adore these mini cheesecakes because they are:
- Effortless and No-Bake: No oven required! These cheesecakes come together quickly and easily, making them a stress-free dessert option for any occasion.
- Tropical Paradise in Every Bite: The coconut milk and pineapple create a taste of the tropics, transporting your taste buds to a sunny beach with every mouthful.
- Perfectly Portioned: The mini size makes them ideal for parties, gatherings, or simply a satisfying individual treat.
- Customizable: You can easily adapt the toppings and decorations to suit your preferences and create a visually stunning dessert.
- Make-Ahead Friendly: These cheesecakes can be made well in advance and stored in the refrigerator, making them perfect for entertaining.
- A Crowd-Pleaser: The combination of creamy, sweet, and tangy flavors appeals to a wide range of palates, making them a guaranteed hit with family and friends.
Ingredients:
- 250g plain sweet biscuits (such as Marie)
- 125g unsalted butter, melted
- 500g cream cheese, softened
- 395g can sweetened condensed coconut milk
- 1/4 cup lemon juice
- 1 tsp vanilla extract
- 1/2 cup finely chopped canned pineapple, drained
- 1/4 cup desiccated coconut
- Extra chopped pineapple and toasted coconut flakes, to decorate (optional)
Preparation:
Step 1: Prepare the Base
Line a 12-hole muffin tray with paper cases. This ensures that the cheesecakes can be easily removed and prevents them from sticking to the tin. If you don’t have paper cases, you can lightly grease the muffin tin with butter or cooking spray.
Step 2: Crush the Biscuits
Place the plain sweet biscuits (such as Marie) in a food processor. Pulse until the biscuits are finely crushed into a crumb-like texture. If you don’t have a food processor, you can place the biscuits in a resealable plastic bag and crush them with a rolling pin. Ensure that the biscuits are crushed evenly to create a uniform base.
Step 3: Combine Biscuit Crumbs and Butter
Add the melted unsalted butter to the crushed biscuits in the food processor. Process until the mixture is well combined and resembles wet sand. The butter helps to bind the biscuit crumbs together, creating a solid and flavorful base for the cheesecakes.
Step 4: Press into Muffin Tin
Divide the biscuit mixture evenly between the 12 muffin holes. Using the back of a spoon or your fingers, firmly press the mixture into the base of each muffin cup, creating an even and compact layer. This will serve as the foundation for the creamy cheesecake filling.
Step 5: Refrigerate the Base
Place the muffin tray in the refrigerator and chill the biscuit bases for at least 30 minutes while you prepare the filling. Chilling the base helps it to firm up and prevents it from becoming soggy when the filling is added.
Step 6: Prepare the Cream Cheese
In a large mixing bowl, add the softened cream cheese. Using an electric mixer (handheld or stand mixer), beat the cream cheese until it is smooth and creamy. This step is crucial for achieving a lump-free and velvety cheesecake filling. Ensure that the cream cheese is at room temperature to prevent clumps from forming.
Step 7: Add Condensed Coconut Milk, Lemon Juice, and Vanilla Extract
Add the sweetened condensed coconut milk, lemon juice, and vanilla extract to the bowl with the cream cheese. Continue to beat with the electric mixer until the mixture is light, creamy, and well combined. The condensed coconut milk adds sweetness and a rich coconut flavor, while the lemon juice provides a tangy counterpoint. Vanilla extract enhances the overall flavor profile.
Step 8: Fold in Pineapple and Coconut
Gently fold in the finely chopped drained canned pineapple and desiccated coconut into the cream cheese mixture using a spatula. Be careful not to overmix, as this can deflate the filling. The pineapple adds a juicy burst of tropical flavor, while the desiccated coconut provides a subtle texture and aroma.
Step 9: Spoon Filling into Muffin Cases
Spoon the cheesecake filling evenly over the prepared biscuit bases in the muffin tray, filling each cup to the top. Use the back of a spoon or an offset spatula to smooth the tops of the cheesecakes, ensuring they are level and visually appealing.
Step 10: Chill to Set
Cover the muffin tray with plastic wrap or foil and refrigerate for at least 4 hours, or preferably overnight, to allow the cheesecakes to set completely. This chilling time is essential for the cheesecakes to firm up and develop their creamy texture.
Step 11: Decorate (Optional)
Before serving, you can decorate the mini cheesecakes with extra chopped pineapple chunks and toasted coconut flakes for an added touch of flavor and visual appeal. Other topping options include whipped cream, fresh berries, chocolate shavings, or a drizzle of caramel sauce.
COOKING Rating:
- Ease of Preparation: Easy
- Taste: Excellent
- Presentation: Very Good
Serving Suggestions:
- Serve chilled as a refreshing dessert on a warm day.
- Perfect for parties, potlucks, and gatherings.
- Serve with a dollop of whipped cream or a scoop of vanilla ice cream.
- Garnish with fresh berries, chocolate shavings, or a drizzle of caramel sauce.
Tips:
- Ensure the cream cheese is softened to room temperature for a smoother filling.
- Drain the canned pineapple thoroughly to prevent the cheesecakes from becoming soggy.
- Do not overmix the filling after adding the pineapple and coconut.
- Chill the cheesecakes for at least 4 hours, or preferably overnight, for best results.
- For a richer flavor, use full-fat cream cheese and sweetened condensed coconut milk.
- Store leftover cheesecakes in an airtight container in the refrigerator for up to 3 days.
Prep Time: 20 minutes
Cook Time: 0 minutes (No-Bake)
Total Time: 4 hours 20 minutes (including chilling time)
Nutritional Information: (Per serving, approximate)
Calories: 250 kcal Protein: 4g Sodium: 150mg
Conclusion
These Mini Pineapple & Coconut Milk Cheesecakes are a delightful and easy-to-make dessert that’s perfect for any occasion. The creamy texture, tropical flavors, and perfectly portioned size make them a crowd-pleaser that’s sure to impress. Whether you’re looking for a simple dessert to whip up for a weeknight treat or a show-stopping dessert for a special event, these mini cheesecakes are a delicious and refreshing choice.
Questions and Answers:
Q1: Can I use regular condensed milk instead of condensed coconut milk?
A: While you can use regular sweetened condensed milk, the coconut milk adds a distinct tropical flavor that is essential to the recipe. If you substitute, you’ll lose that unique coconut taste. Consider adding a teaspoon of coconut extract to regular condensed milk to mimic the flavor.
Q2: Can I use fresh pineapple instead of canned pineapple?
A: Yes, you can use fresh pineapple. Just make sure it’s ripe and finely chopped. Drain it well to remove excess juice, as fresh pineapple tends to be juicier than canned.
Q3: How long can I store these cheesecakes in the refrigerator?
A: These cheesecakes can be stored in an airtight container in the refrigerator for up to 3 days. After that, the texture may start to change.
Q4: Can I freeze these cheesecakes?
A: Freezing is not recommended as it can alter the texture of the cheesecake filling. The cream cheese may become grainy after thawing.
Q5: Can I make these cheesecakes gluten-free?
A: Yes, you can easily make these gluten-free by using gluten-free sweet biscuits for the base. Ensure that all other ingredients are also gluten-free to cater to dietary needs.