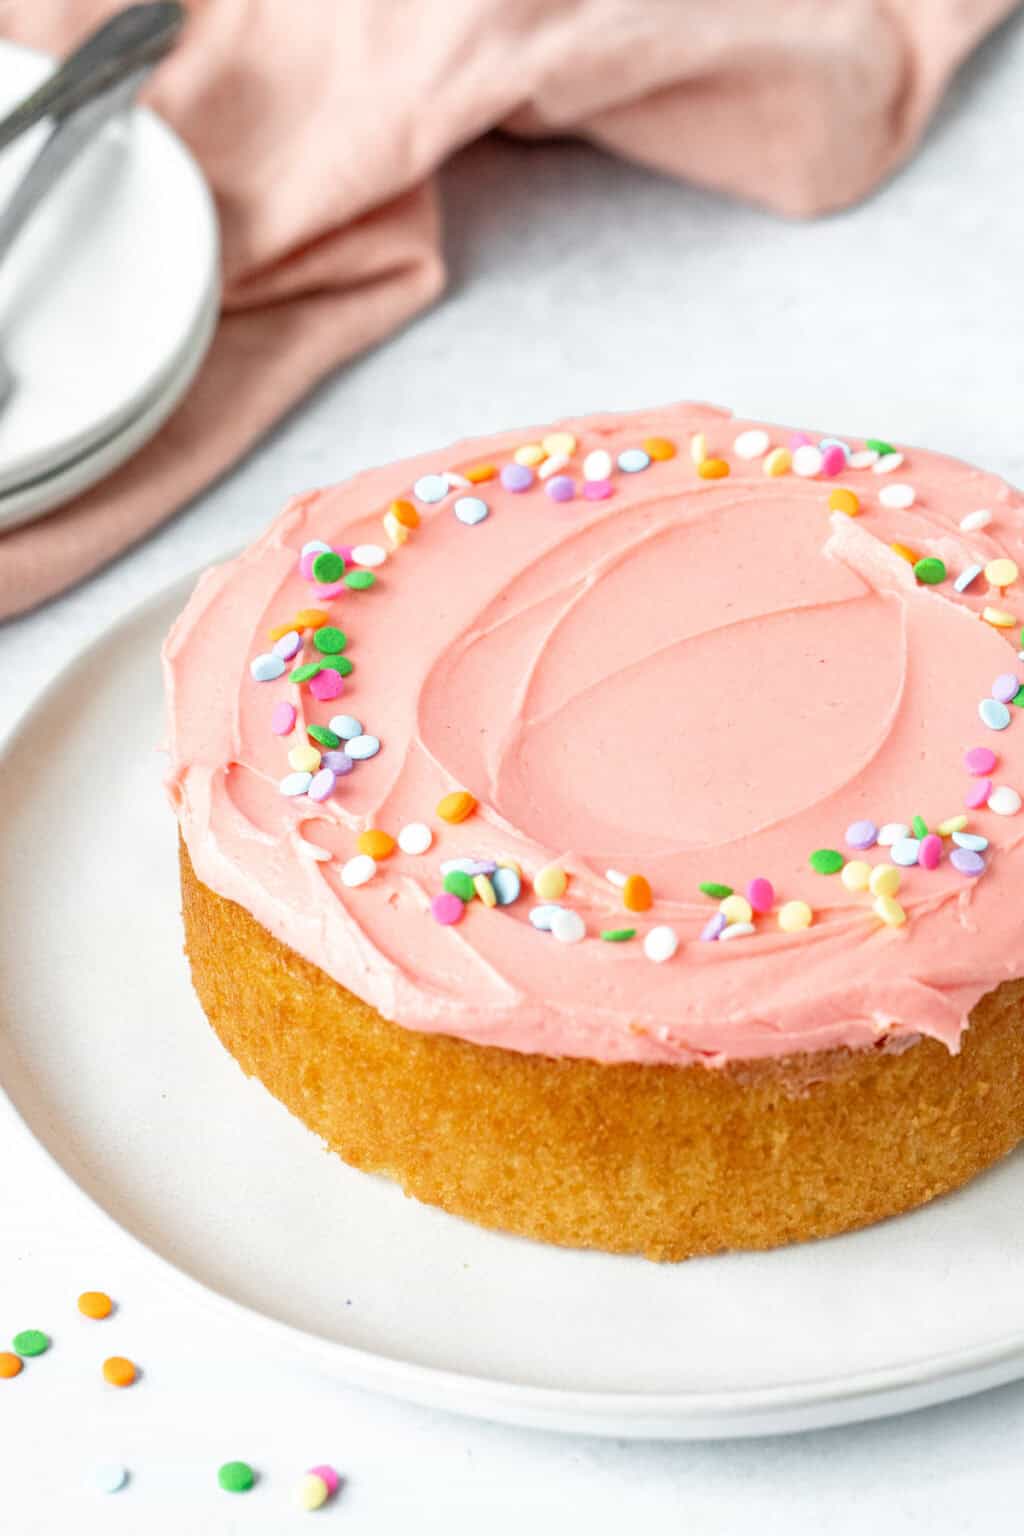
This delightful Mini Vanilla Cake is a scaled-down version of the classic vanilla cake, perfect for satisfying your sweet cravings without committing to a large dessert. It’s moist, tender, and bursting with the comforting flavor of vanilla. Topped with a luscious vanilla buttercream frosting, this miniature cake is ideal for small celebrations, intimate gatherings, or simply a treat for yourself.
Why You Will Love This Recipe
This Mini Vanilla Cake is a winner for several reasons:
- Perfectly Portioned: It’s the ideal size for one or two people, eliminating the temptation of leftover cake.
- Easy to Make: The recipe is straightforward and doesn’t require any fancy equipment or techniques.
- Incredibly Moist and Tender: The combination of ingredients ensures a soft, melt-in-your-mouth texture.
- Classic Vanilla Flavor: The pure vanilla extract infuses both the cake and frosting with a sweet, aromatic taste that everyone loves.
- Customizable: You can easily adapt the recipe to your preferences, adding sprinkles, fruit, or other flavorings.
Ingredients:
Vanilla Cake
- 1 large egg
- 6 tablespoons milk (90 ml), 2% or whole is best
- 2 teaspoons vegetable oil (10 ml), or canola oil
- 1 teaspoon vanilla extract
- ¾ cup all-purpose flour (94 grams)
- ¼ teaspoon baking soda
- ⅛ teaspoon salt
- ½ cup granulated sugar (100 grams)
- ¼ cup unsalted butter (56 grams), softened, but not starting to melt
Vanilla Frosting
- ⅓ cup unsalted butter (75 grams), softened
- 1 – 1 ½ cup powdered sugar (110 – 165 grams), sifted
- ½ teaspoon vanilla extract
- ⅛ teaspoon salt
- 2-3 drops food coloring, optional
- 2-4 teaspoons whipping cream (10-20 ml), or milk
Preparation:
Step 1: Preheat the oven to 350°F (180°C). Prepare your 6-inch round cake pan by lining the bottom with parchment paper. This prevents the cake from sticking and ensures easy removal. Lightly grease the sides of the pan with butter or cooking spray. Make sure the sides of the cake pan are at least 2 inches (5 cm) high to prevent the batter from overflowing during baking.
Step 2: In a small bowl, whisk together the egg, milk, vegetable oil, and vanilla extract. Whisk until the egg is fully incorporated and no streaks or lumps remain. This mixture forms the liquid base of the cake batter, providing moisture and binding the dry ingredients together. Set aside for later use.
Step 3: In a separate, medium-sized bowl, whisk together the all-purpose flour, baking soda, salt, and granulated sugar. Whisking ensures that these dry ingredients are evenly distributed, preventing pockets of baking soda or salt that could affect the cake’s flavor and texture.
Step 4: Add the softened butter (cut into cubes) to the flour mixture. Using a hand-held mixer (or a stand mixer) on low speed, beat the butter into the flour mixture until the butter is broken down into small pieces. Aim for a crumbly texture where no butter pieces are smaller than a pea. This step is crucial for creating a tender cake crumb.
Step 5: While continuing to mix on low speed, slowly drizzle the wet ingredients (from Step 2) into the flour and butter mixture. Mix until the batter is smooth and there are no lumps. Be careful not to overmix the batter, as this can develop the gluten in the flour and result in a tough cake. Stop mixing as soon as the batter is combined.
Step 6: Pour the cake batter into the prepared 6-inch cake pan. Spread the batter evenly to ensure the cake bakes uniformly. Place the pan in the middle rack of the preheated oven.
Step 7: Bake for approximately 30-35 minutes, or until a toothpick inserted into the center of the cake comes out clean. The edges of the cake should also start to pull away slightly from the sides of the pan. If the toothpick has wet batter clinging to it, continue baking for a few more minutes and check again.
Step 8: While the cake is baking, prepare the vanilla frosting. In a medium-sized bowl, beat the softened butter with an electric mixer until it is smooth and creamy. This usually takes a few minutes.
Step 9: Gradually add in 1 cup of sifted powdered sugar, along with the vanilla extract, salt, and optional food coloring (if using). Begin mixing on low speed to prevent the powdered sugar from flying everywhere. Once the ingredients are partially combined, increase the mixer speed to medium and beat until smooth.
Step 10: Gradually add in the remaining powdered sugar, a little at a time, alternating with a teaspoon of whipping cream (or milk). Continue beating until the frosting reaches your desired sweetness and consistency. If the frosting is too thick, add a little more cream or milk. If it’s too thin, add more powdered sugar.
Step 11: Once the cake is baked, remove it from the oven and let it cool in the pan for about 10-15 minutes before inverting it onto a serving plate. Ensure the cake is completely cooled before frosting, as warm cake can melt the frosting and make it difficult to spread.
Step 12: Generously frost the top of the cooled cake with the vanilla buttercream frosting. You can use a spatula or knife to create a smooth, even layer, or get creative with swirls and decorative patterns.
COOKING Rating:
Easy
Serving Suggestions:
- Enjoy a slice with a cup of coffee or tea.
- Serve with fresh berries or a scoop of vanilla ice cream.
- Dust with powdered sugar or cocoa powder for an elegant touch.
- Decorate with sprinkles, edible flowers, or candied fruit.
Tips:
- Ensure all ingredients are at room temperature for optimal mixing.
- Sifting the powdered sugar will help prevent lumps in the frosting.
- Do not overmix the cake batter, as this can result in a tough cake.
- Adjust the amount of powdered sugar in the frosting to your desired sweetness.
- For a richer flavor, use browned butter in the cake batter.
- Add a touch of lemon zest to the batter for a citrusy twist.
- Store leftover cake in an airtight container at room temperature for up to 3 days.
Prep Time:
15 minutes
Cook Time:
30-35 minutes
Total Time:
45-50 minutes
Nutritional Information:
(Approximate values, may vary based on specific ingredients used)
- Calories: 450-550 per serving
- Protein: 4-6 grams
- Sodium: 150-200 mg
Conclusion:
This Mini Vanilla Cake recipe is a delightful way to enjoy a classic dessert in a perfectly portioned size. With its moist, tender crumb and luscious vanilla frosting, it’s sure to become a favorite for any occasion. Whether you’re celebrating a special moment or simply craving something sweet, this mini cake is the perfect treat. The easy-to-follow instructions and customizable options make it accessible to bakers of all skill levels. So, gather your ingredients, preheat your oven, and get ready to indulge in this irresistible Mini Vanilla Cake!
Questions and Answers:
Q1: Can I use a different size cake pan for this recipe?
A: While this recipe is specifically formulated for a 6-inch cake pan, you can adapt it for other sizes. For an 8-inch pan, you may need to increase the ingredients by 50%. However, keep a close eye on the baking time, as it may need to be adjusted. Smaller pans like muffin tins will require significantly less baking time.
Q2: Can I make this cake gluten-free?
A: Yes, you can easily adapt this recipe to be gluten-free by substituting the all-purpose flour with a gluten-free all-purpose flour blend. Be sure to choose a blend that contains xanthan gum, as this will help bind the ingredients and provide structure to the cake.
Q3: How do I prevent my cake from drying out?
A: To prevent your cake from drying out, avoid overbaking it. Start checking for doneness around 30 minutes and remove it from the oven as soon as a toothpick inserted into the center comes out clean. Also, consider adding a tablespoon of sour cream or yogurt to the batter for extra moisture.
Q4: Can I add other flavorings to the frosting?
A: Absolutely! The vanilla frosting is a great base for other flavorings. You can add a few drops of lemon extract, almond extract, or even a tablespoon of cocoa powder for a chocolate version. Experiment with different flavors to create your own unique frosting.
Q5: How long does this cake last?
A: This Mini Vanilla Cake will stay fresh for up to 3 days when stored in an airtight container at room temperature. If you live in a warm climate, you may want to store it in the refrigerator to prevent the frosting from melting.