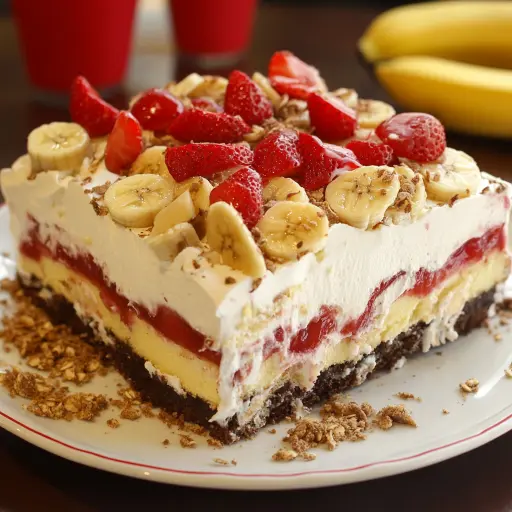
Description:A No-Bake Banana Split Cake is a delightful and refreshing dessert, perfectly capturing the essence of a classic banana split sundae in an easy-to-assemble cake. This dessert features layers of a buttery graham cracker crust, a creamy and sweet cheesecake filling, fresh bananas, tangy pineapple, juicy strawberries, and a luscious whipped topping, all finished with a drizzle of chocolate syrup, chopped nuts, and maraschino cherries. It’s a guaranteed crowd-pleaser, especially during warm weather or at any special gathering, offering a symphony of flavors and textures without ever turning on your oven!
Ingredients:
For the Crust:
- 2 cups graham cracker crumbs
- ½ cup (1 stick) unsalted butter, melted
- ¼ cup granulated sugar
For the Cream Cheese Layer:
- 16 oz (2 packages) cream cheese, softened
- ½ cup (1 stick) unsalted butter, softened
- 2 cups powdered sugar
- 1 teaspoon vanilla extract
For the Fruit Layers:
- 3-4 ripe bananas, sliced
- 1 (20 oz) can crushed pineapple, well-drained
- 1½ cups fresh strawberries, hulled and sliced
For the Topping:
- 1 (8 oz) container whipped topping (Cool Whip)
- ½ cup chopped pecans or walnuts (optional)
- Chocolate syrup, for drizzling
- Maraschino cherries, for garnish
Preparation:
Step 1: Prepare the Crust
- In a medium-sized mixing bowl, thoroughly combine the graham cracker crumbs, melted butter, and granulated sugar. Ensure that all the crumbs are evenly coated with the melted butter and sugar mixture. This will act as a binder and ensure that the crust holds together nicely.
- Transfer the mixture to a 9×13-inch baking dish. Use the bottom of a measuring cup or your fingers to press the graham cracker mixture firmly and evenly into the bottom of the dish. Pay special attention to the corners and edges to create a uniform crust.
- Place the baking dish in the refrigerator and chill for at least 10-15 minutes. This chilling period allows the butter to solidify, helping the crust set and become more stable before adding the subsequent layers. You can also place it in the freezer for a quicker set, about 5-7 minutes.
Step 2: Make the Cream Cheese Layer
- In a large mixing bowl, using an electric mixer (either a stand mixer or a hand mixer), beat the softened cream cheese and butter together until they are completely smooth and creamy. It’s crucial that both the cream cheese and butter are at room temperature to avoid any lumps in the mixture.
- Gradually add the powdered sugar to the cream cheese and butter mixture, beating on low speed initially to prevent a powdered sugar cloud. Once the sugar is incorporated, increase the speed to medium and continue mixing until the mixture is light, fluffy, and completely smooth.
- Stir in the vanilla extract until it is evenly distributed throughout the cream cheese mixture, adding a subtle and aromatic flavor.
- Carefully spread the cream cheese mixture evenly over the chilled graham cracker crust. Use an offset spatula or the back of a spoon to ensure a smooth and uniform layer.
Step 3: Add the Fruit Layers
- Arrange the banana slices in a single layer over the cream cheese filling. To prevent browning, you can lightly toss the banana slices with a bit of lemon juice, but this step is optional. Ensure that the entire cream cheese layer is covered with the banana slices.
- Spread the well-drained crushed pineapple evenly on top of the bananas. Proper drainage is crucial to prevent the cake from becoming soggy. Gently pat the pineapple with a paper towel to remove excess moisture if necessary.
- Add a layer of fresh sliced strawberries over the pineapple. Ensure the strawberries are hulled and sliced uniformly to create an appealing visual layer and even distribution of flavor.
Step 4: Top with Whipped Cream
- Gently spread the whipped topping (Cool Whip) evenly over the fruit layers. Ensure you cover the entire surface with a smooth, even layer of whipped topping.
- If desired, sprinkle the chopped pecans or walnuts over the whipped topping for added crunch and flavor.
- Drizzle chocolate syrup artfully over the top of the whipped cream. You can create a criss-cross pattern or simply drizzle it randomly.
- Garnish the cake with maraschino cherries, placing them evenly across the surface for a classic banana split aesthetic.
Step 5: Chill and Serve
- Cover the baking dish tightly with plastic wrap or foil to prevent the cake from absorbing any unwanted flavors in the refrigerator.
- Refrigerate the cake for at least 4 hours, or preferably overnight, to allow the flavors to meld together and the cake to fully set. This step is essential for the cake to achieve its optimal texture and flavor.
- When ready to serve, slice the cake into squares or rectangles and serve chilled. Each slice should contain a bit of each layer for the perfect bite.
Why You Will Love This Recipe
This No-Bake Banana Split Cake is a guaranteed winner for several reasons:
- Ease of Preparation: The best part about this recipe is that it requires absolutely no baking! It’s perfect for hot summer days when you don’t want to turn on the oven.
- Delicious Flavor: It perfectly captures the essence of a classic banana split sundae in cake form. The combination of the buttery crust, creamy filling, fresh fruit, and whipped topping creates a symphony of flavors and textures.
- Customizable: You can easily customize the recipe to suit your preferences. Swap out fruits, add different toppings, or even incorporate extra layers.
- Crowd-Pleasing: This dessert is always a hit at parties, potlucks, and family gatherings. It’s visually appealing and incredibly delicious.
- Make-Ahead Friendly: Since it needs to chill for several hours, you can make this cake ahead of time, making it perfect for entertaining.
- Versatile: Suitable for any occasion, from casual get-togethers to special celebrations. The refreshing taste makes it a year-round favorite.
Serving Suggestions:
- Serve chilled as a refreshing dessert on a warm day.
- Accompany with a scoop of vanilla ice cream for an extra indulgent treat.
- Pair with a light coffee or iced tea for a perfect afternoon snack.
- Garnish with extra chopped nuts, chocolate shavings, or a sprinkle of cocoa powder for added visual appeal.
- For a themed party, serve in individual parfait glasses to elevate the presentation.
Tips:
- To prevent bananas from browning, toss them lightly with lemon juice.
- Ensure the pineapple is well-drained to prevent the cake from becoming soggy.
- Use high-quality ingredients for the best flavor, especially the cream cheese and whipped topping.
- If you’re short on time, you can use store-bought graham cracker crust.
- Feel free to experiment with different fruits, such as mangoes, blueberries, or raspberries.
- For a richer flavor, use full-fat cream cheese and heavy cream in the whipped topping.
- Make sure the cream cheese and butter are adequately softened for a smooth, lump-free filling.
- If you want an extra layer of flavor, consider adding a thin layer of Nutella or peanut butter between the crust and the cream cheese filling.
- Store leftovers in the refrigerator for up to 3 days.
Prep Time: 20 minutes Cook Time: 0 minutes Total Time: 4 hours 20 minutes (includes chilling time)
Nutritional Information: (Approximate values per serving – may vary based on ingredient brands and specific amounts used)
- Calories: 450-550
- Protein: 5-7g
- Sodium: 200-300mg
Conclusion
The No-Bake Banana Split Cake is more than just a dessert; it’s a celebration of flavors and textures that brings joy to any occasion. Its simplicity and customizable nature make it a favorite among bakers of all skill levels. Whether you’re looking for a refreshing summer treat or a crowd-pleasing dessert for a special event, this cake is sure to deliver. The layers of creamy cheesecake filling, sweet fruits, and whipped topping create a delightful combination that is impossible to resist. So gather your ingredients, follow the easy steps, and prepare to indulge in a slice of pure happiness! Enjoy!
Questions and Answers:
- Question: Can I use a different type of crust instead of graham crackers? Answer: Absolutely! While graham crackers provide a classic flavor and texture, you can certainly substitute with other options. Vanilla wafer cookies, crushed Oreos (without the filling), or even a shortbread crust would work well. Adjust the butter and sugar amounts accordingly to ensure the crust holds together. For example, with Oreos, you may want to reduce the added sugar as the cookies are already quite sweet.
- Question: How can I prevent the bananas from browning too quickly? Answer: The best way to prevent banana slices from browning is to toss them lightly with a bit of lemon juice or lime juice. The acidity in the citrus juice slows down the oxidation process that causes browning. You only need a small amount; about a teaspoon or two should suffice for the number of bananas used in the recipe. Another option is to arrange the banana slices just before you plan to assemble the rest of the cake, minimizing their exposure to air.
- Question: What’s the best way to ensure the cake doesn’t become soggy from the pineapple? Answer: Draining the crushed pineapple thoroughly is essential. After opening the can, place the pineapple in a fine-mesh sieve and press down on it with the back of a spoon to extract as much liquid as possible. You can also gently pat the pineapple with a paper towel to remove any excess moisture. Ensuring the pineapple is well-drained will prevent it from making the cake soggy and help maintain its layers nicely.
- Question: Can I make this cake ahead of time, and how long will it last in the refrigerator? Answer: Yes, this cake is perfect for making ahead of time! In fact, chilling it for at least 4 hours, or preferably overnight, allows the flavors to meld together beautifully. Once assembled, the cake will last in the refrigerator for up to 3 days. Make sure to cover it tightly with plastic wrap or foil to prevent it from drying out or absorbing any odors from the fridge. It’s best to add the chocolate syrup and maraschino cherries just before serving to prevent them from becoming soggy.
- Question: What if I don’t have powdered sugar? Can I use granulated sugar instead? Answer: While powdered sugar is ideal for creating a smooth and creamy cheesecake filling, if you don’t have it on hand, you can make a substitution. You can grind granulated sugar into a finer consistency using a food processor or a high-speed blender. However, be cautious not to over-process it, as it can turn into a paste. If you must use granulated sugar directly, use a smaller amount than the powdered sugar (about 1 3/4 cups instead of 2 cups) and beat the cream cheese and butter mixture for a longer time to ensure the sugar dissolves as much as possible. The texture might not be as smooth as with powdered sugar, but it will still be delicious.