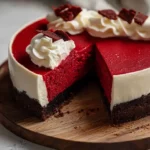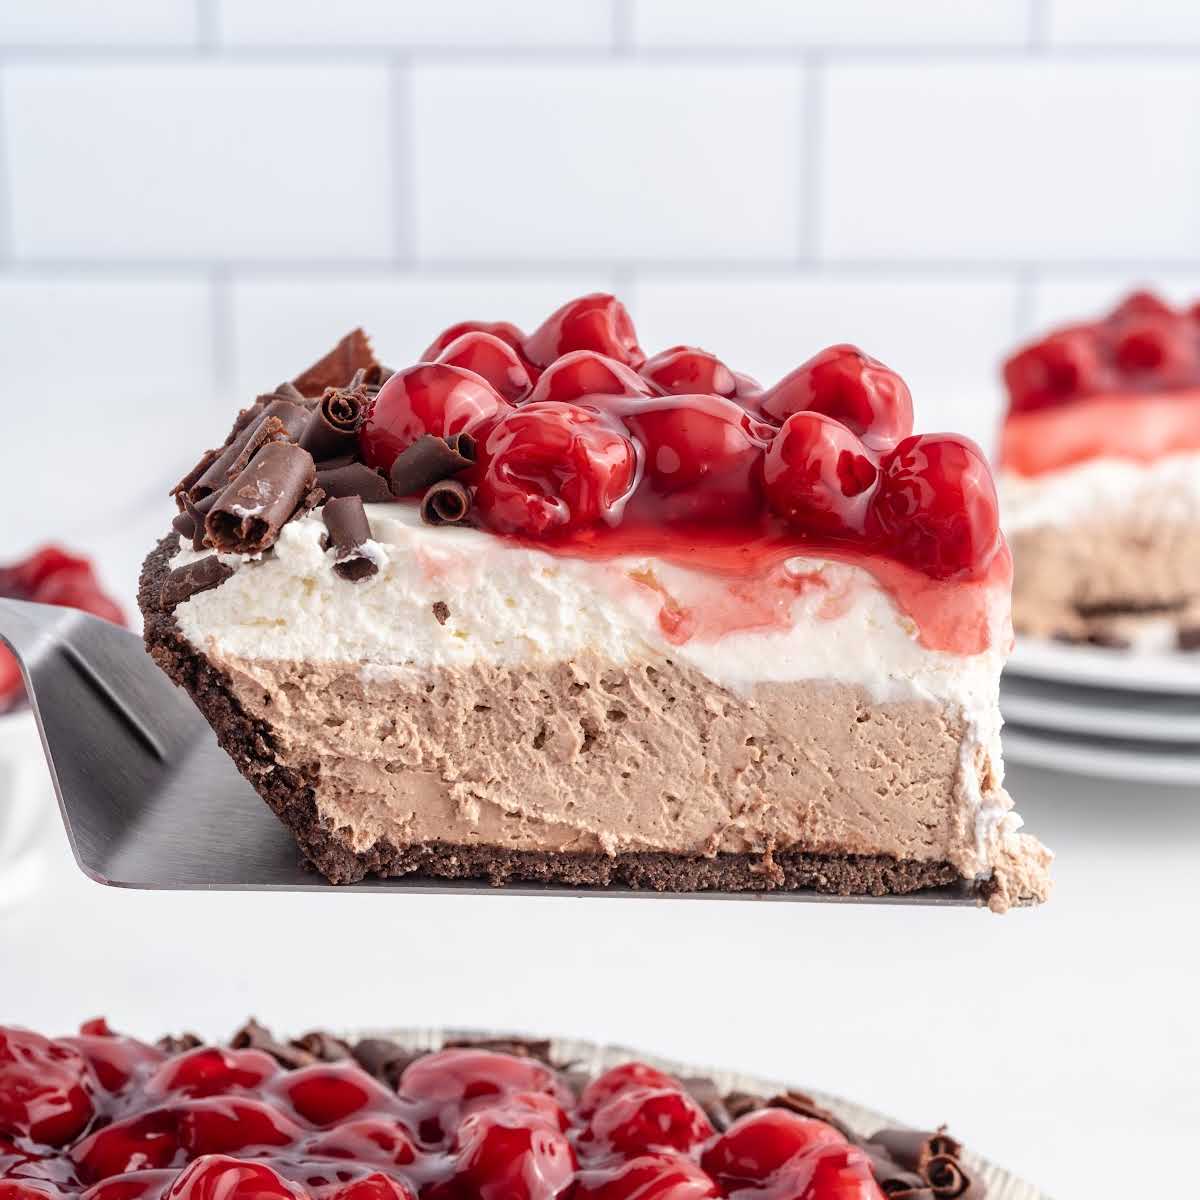
This No-Bake Black Forest Cheesecake is a decadent and delightful dessert that combines the rich flavors of chocolate and cherries with the creamy texture of cheesecake, all without ever turning on your oven! It’s the perfect treat for hot summer days, potlucks, or any occasion where you want to impress with minimal effort. Imagine sinking your fork into layers of Oreo crust, chocolate-infused cheesecake, vanilla-kissed creaminess, and a generous topping of sweet and tart cherry pie filling. This is a dessert that looks as good as it tastes.
Why You Will Love This Recipe
This no-bake cheesecake is a winner for so many reasons:
- No Oven Required: The best part? No baking! This makes it ideal for warmer weather or when you want a hassle-free dessert option.
- Easy to Make: With simple ingredients and straightforward instructions, anyone can create this masterpiece. It’s perfect for beginner bakers or those looking for a quick and satisfying dessert.
- Rich and Decadent: The combination of chocolate, cherries, and creamy cheesecake is simply irresistible. Each bite is an explosion of flavor and texture.
- Impressive Presentation: The layers of dark chocolate, white cream, and vibrant cherries create a visually stunning dessert that’s sure to wow your guests.
- Customizable: Feel free to adapt the recipe to your preferences. Use different flavored Oreo crusts, add a liqueur to the filling, or experiment with other fruit toppings.
- Perfect for Entertaining: Because it needs time to chill, this dessert is the perfect make-ahead treat for parties and gatherings. Prepare it the day before and relax knowing dessert is taken care of.
Ingredients:
- 6 ounces pre-made Oreo pie crust
- 12 ounces cream cheese, room temperature
- ½ cup granulated sugar
- ¾ cup full-fat sour cream
- 1½ teaspoons vanilla extract
- 3 ounces semi-sweet baking bar, chopped (I used Ghirardelli brand)
- 8 ounces tub whipped topping, thawed
- 1 cup canned cherry pie filling, I used Duncan Hines/Comstock more fruit
- Chocolate curls, optional garnish
For the Chocolate Curls
- 4 ounces semi-sweet chocolate baking bar, broken into small pieces (I used Ghirardelli brand)
- 1 tablespoon vegetable shortening, I used Crisco
Preparation:
Step 1: Remove the plastic cover for the pre-made Oreo pie crust and set it aside. This will be the base of your no-bake cheesecake. Make sure the crust is intact and free of any cracks.
Step 2: In a large mixing bowl, using a handheld mixer on medium speed, beat the cream cheese and granulated sugar for 1 minute or until light and fluffy. Room temperature cream cheese is crucial for achieving a smooth and creamy texture.
Step 3: Add the sour cream and vanilla extract to the cream cheese mixture. Beat for an additional 30 seconds until all the ingredients are fully incorporated. The sour cream adds a subtle tang and helps to create a velvety texture.
Step 4: Transfer half of the cream cheese mixture to another large mixing bowl. Set both bowls aside. This is where you’ll create the two distinct layers of your cheesecake: chocolate and vanilla.
Step 5: Add the chopped semi-sweet baking bar to a small microwave-safe bowl and heat for 1 minute at 60% power. Stir, then heat again for another 30 seconds to 1 minute at 60% power. Stir until smooth. Microwaving the chocolate at a lower power prevents it from burning and seizing.
Step 6: To one of the bowls with the cream cheese mixture, fold in the melted semi-sweet chocolate until fully incorporated. This creates the rich chocolate layer that defines the Black Forest flavor. Be gentle when folding to maintain the light and airy texture.
Step 7: Divide the thawed whipped topping equally between the chocolate cream cheese bowl and the plain cream cheese bowl. This adds lightness and volume to both layers of the cheesecake.
Step 8: Fold the whipped topping gently into each of the mixtures. Again, be gentle to avoid deflating the whipped topping. This will result in a light and airy cheesecake.
Step 9: Spread your chocolate cream cheese mixture into an even layer onto the bottom of your pre-made Oreo cookie crust. Use an offset spatula or the back of a spoon to ensure an even distribution of the chocolate layer.
Step 10: Top that with the plain cream cheese mixture and spread it into an even layer as well. Create a smooth surface for the final cherry topping.
Step 11: Cover your pie with the plastic piece that came with the crust (you will just flip it over, and it creates a lid for your pie) and refrigerate your no-bake black forest pie for 8 hours to overnight. This chilling time is essential for the cheesecake to set properly and develop its flavors.
Step 12: Once your pie has chilled and fully firmed up, you will top it with the canned cherry pie filling. I used a heaping cup of the cherry pie filling (I made sure it was mostly cherries and not the sauce) and mounded them in the center of the no-bake black forest cheesecake, making sure to leave 1 to 2 inches around the edge for the optional chocolate curls.
Chocolate Curls
Step 1: Add the semi-sweet chocolate pieces and vegetable shortening to a small, microwave-safe bowl. Microwave for 45 seconds to 1 minute or until the chocolate is melted. Stir to make sure the chocolate is smooth. The vegetable shortening helps to create a smooth and pliable chocolate for easy curling.
Step 2: Pour the melted chocolate onto a rimmed baking tray that has been flipped upside down. The upturned baking tray provides a smooth, curved surface for creating the chocolate curls.
Step 3: Using an offset spatula, spread the melted chocolate into a very thin, even layer. The thinner the layer, the easier it will be to create delicate curls.
Step 4: Place the tray into the freezer for 3 to 5 minutes. You should be able to leave a fingerprint in the chocolate when touched but not a dent. This is the crucial step for achieving the perfect chocolate curl consistency.
Step 5: Using a sharp, straight-edged spatula push up from the bottom of the chocolate in small sections to create the curls. If your chocolate is too hard, you will just get broken pieces and not curls. You can let it sit at room temperature for just a minute or so to soften up enough to create your curls.
Step 6: Once you have made your curls place them on a freezer-safe plate and place them into the freezer until ready to garnish your no-bake black forest cheesecake. This prevents the curls from melting or sticking together.
COOKING Rating:
Easy
Serving Suggestions:
- Serve chilled, straight from the refrigerator.
- Garnish with additional whipped cream, chocolate shavings, or fresh cherries.
- Pair with a glass of milk, coffee, or a dessert wine.
- For an extra touch of indulgence, drizzle with chocolate syrup or caramel sauce.
Tips:
- Ensure your cream cheese is at room temperature for a smooth and creamy texture.
- Don’t overmix the cheesecake filling, as this can result in a dense texture.
- Be gentle when folding in the whipped topping to maintain its lightness.
- Chill the cheesecake for at least 8 hours, or preferably overnight, for the best results.
- For a richer chocolate flavor, use dark chocolate instead of semi-sweet.
- Experiment with different fruit toppings, such as raspberries or strawberries.
- If you don’t have an Oreo pie crust, you can make your own using crushed Oreo cookies and melted butter.
Prep Time:
20 minutes
Cook Time:
0 minutes
Total Time:
20 minutes (plus 8 hours or overnight chilling time)
Nutritional Information:
Note: Nutritional information is an estimate and may vary based on specific ingredients and portion sizes.
Calories:
Approximately 450-550 per serving
Protein:
Approximately 5-7 grams per serving
Sodium:
Approximately 250-350mg per serving
Conclusion
This No-Bake Black Forest Cheesecake is a show-stopping dessert that’s surprisingly easy to make. The combination of chocolate, cherries, and creamy cheesecake is a match made in heaven. Whether you’re a seasoned baker or a beginner, this recipe is sure to impress. So, gather your ingredients, follow the simple steps, and get ready to enjoy a slice of pure indulgence!
Questions and Answers About This Recipe:
Q1: Can I use a different type of crust?
A: Absolutely! While the Oreo crust adds a delicious chocolatey element, you can definitely substitute it with a graham cracker crust or even a chocolate graham cracker crust. Just make sure it’s a pre-made or no-bake crust.
Q2: Can I use fresh cherries instead of canned cherry pie filling?
A: Yes, you can. If using fresh cherries, pit them and cook them down with a little sugar and cornstarch to create a thickened sauce. Let the cherry mixture cool completely before adding it to the top of the cheesecake.
Q3: Can I make this cheesecake ahead of time?
A: Yes, this is actually ideal for making ahead! The cheesecake needs at least 8 hours to chill, so making it the day before you plan to serve it is perfect. This also allows the flavors to meld together even more.
Q4: What if I don’t have vegetable shortening for the chocolate curls?
A: The vegetable shortening helps to make the chocolate more pliable. If you don’t have it, you can try using a small amount of coconut oil or even a tiny bit of butter. Just be careful not to add too much, as it can affect the texture of the chocolate. You can also try making the curls without it, but be extra careful with the temperature of the chocolate.
Q5: How do I store leftover cheesecake?
A: Store any leftover cheesecake in an airtight container in the refrigerator for up to 3-4 days. The cherry topping might start to weep slightly after a few days, but the cheesecake will still taste delicious.