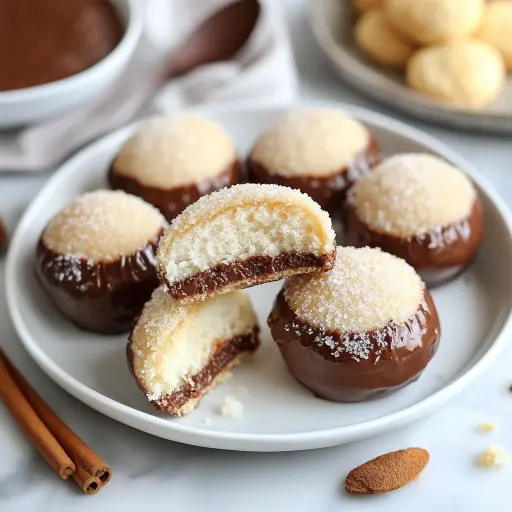
Description: Indulge in these decadent and incredibly easy No-Bake Nutella Truffles! A delightful combination of crushed cookies, creamy ricotta, sweet confectioners’ sugar, and rich Nutella, all coated in shredded coconut. These truffles require no oven time and are perfect for satisfying your sweet cravings or impressing guests with a simple yet elegant treat. A perfect project to get the kids involved in!
Ingredients:
- 250g (approximately 9 ounces) Plain Cookies (such as digestive biscuits, Graham crackers, or vanilla wafers)
- 125g (approximately 1/2 cup) Ricotta Cheese (full-fat, well-drained)
- 50g (approximately 1/4 cup) Confectioners’ Sugar (also known as icing sugar or powdered sugar)
- 50g (approximately 1/2 cup) Shredded Coconut (unsweetened)
- 150g (approximately 1/2 cup) Nutella (or your favorite hazelnut spread)
Preparation:
Before you start, ensure your ricotta cheese is well-drained. You can achieve this by placing it in a fine-mesh sieve lined with cheesecloth and letting it drain in the refrigerator for at least 30 minutes. This will remove excess moisture and improve the texture of the truffles.
Instructions:
Step 1: Crush the Cookies
Thoroughly crush the cookies into a fine powder. The best method is to use a food processor, pulsing until you achieve a sand-like consistency. If you don’t have a food processor, you can place the cookies in a large zip-top bag, seal it tightly, and crush them with a rolling pin. Ensure there are no large pieces of cookie remaining; a uniform powder is crucial for the truffle’s texture.
Step 2: Combine the Ingredients
In a large mixing bowl, combine the crushed cookie powder, well-drained ricotta cheese, confectioners’ sugar, and shredded coconut. Use a spoon or spatula to mix the ingredients together until a compact and homogenous dough forms. The dough should be moist enough to hold its shape but not too sticky. If the mixture appears too dry, add a teaspoon of milk or cream until the desired consistency is reached. If it’s too wet, add a little more cookie powder. The key is to work the mixture until everything is evenly distributed and the dough is pliable.
Step 3: Shape the Truffles
With your hands, form small, walnut-sized balls from the dough. Each truffle should be roughly the same size for uniform presentation. Roll the dough between your palms to create smooth, round balls. Place the formed truffles on a plate or baking sheet lined with parchment paper. This will prevent them from sticking and make the subsequent steps easier.
Step 4: Chill the Truffles
Place the plate of truffles in the refrigerator for 30 minutes (or in the freezer for 20 minutes). Chilling the truffles will help them firm up, making them easier to handle when adding the Nutella filling. This step is essential for maintaining the truffle’s shape and preventing it from becoming overly soft.
Step 5: Add the Nutella Filling
Remove the chilled truffles from the refrigerator or freezer. With a small knife or your finger, gently cut each truffle in half. Place a small dollop (about 1/2 teaspoon) of Nutella in the center of one half. Carefully close the truffle by pressing the two halves together, reforming it into a ball. Be gentle to avoid squishing the filling out. Work quickly to prevent the truffles from warming up too much.
Step 6: Coat with Coconut
Place the remaining shredded coconut in a shallow dish. Roll each truffle in the coconut, ensuring it is evenly coated on all sides. The coconut adds texture and a subtle sweetness that complements the rich Nutella and cookie base. Gently press the coconut onto the truffles to ensure it adheres properly.
Step 7: Final Chill
Return the coated truffles to the refrigerator for another 30 minutes before serving. This final chilling period allows the flavors to meld together and ensures the truffles are firm and ready to enjoy.
Why you will love this recipe:
- Effortless Elegance: These truffles are incredibly easy to make, requiring no baking or complicated techniques. They’re perfect for beginners and seasoned cooks alike.
- Irresistible Flavor: The combination of crushed cookies, creamy ricotta, and the beloved Nutella creates a symphony of flavors that is sure to please any palate.
- Versatile and Customizable: You can easily adapt this recipe to your preferences by using different types of cookies, fillings, or coatings.
- Perfect for Any Occasion: Whether you need a quick dessert for a weeknight craving, a sweet treat for a party, or a homemade gift, these truffles are always a hit.
- Kid-Friendly Activity: This recipe is a fun and engaging activity to do with children. They can help with crushing the cookies, rolling the truffles, and adding the Nutella filling.
Serving Suggestions:
- Serve these truffles chilled as a delightful after-dinner dessert or a sweet treat alongside coffee or tea.
- Arrange them on a decorative platter for a visually appealing presentation at parties or gatherings.
- Pack them in a gift box as a thoughtful and homemade present for friends and family.
- Pair them with fresh berries or a scoop of vanilla ice cream for an extra touch of indulgence.
- Dust them lightly with cocoa powder or confectioners’ sugar for a different aesthetic.
Tips:
- Drain the Ricotta: Make sure to drain the ricotta cheese thoroughly to prevent the truffles from becoming too soft.
- Cookie Variety: Feel free to experiment with different types of cookies to find your favorite flavor combination. Speculoos cookies, shortbread cookies, or chocolate wafers would all be delicious alternatives.
- Mascarpone Substitute: For an even richer and creamier texture, you can substitute the ricotta cheese with mascarpone cheese.
- Coating Variations: Instead of shredded coconut, try coating the truffles in cocoa powder, chopped nuts, sprinkles, or melted chocolate.
- Make Ahead: These truffles can be made a day or two in advance and stored in the refrigerator. This makes them perfect for entertaining.
- Freezing Option: For longer storage, you can freeze the truffles. Place them in an airtight container and freeze for up to 2 months. Thaw them in the refrigerator before serving.
- Nutella Alternative: While Nutella is the star of this recipe, you can use other hazelnut spreads or even peanut butter for a different flavor profile.
- Add Extracts: Enhance the flavor by adding a few drops of vanilla extract, almond extract, or coffee extract to the dough.
- Size Matters: Keep the truffles relatively small (walnut-sized) to make them easy to eat in one or two bites.
- Gentle Handling: Be gentle when shaping and coating the truffles to prevent them from falling apart.
Prep Time: 15 minutes
Cook Time: 0 minutes (No-Bake!)
Total Time: 1 hour 15 minutes (including chilling time)
Nutritional Information (per truffle, estimated):
- Calories: 120-150
- Protein: 2-3g
- Sodium: 20-30mg (depending on the cookies used)
Conclusion:
These No-Bake Nutella Truffles are a testament to how simple ingredients and minimal effort can create a truly exceptional dessert. With their rich, creamy texture and irresistible hazelnut flavor, they are sure to become a favorite in your household. So go ahead, indulge in these delightful treats and share the joy with your loved ones! They are easy to make, fun to share and even more fun to eat!
Frequently Asked Questions (FAQ):
- Can I use a different type of cheese instead of ricotta?
- Yes, you can substitute ricotta cheese with mascarpone cheese for a richer and creamier texture. Cream cheese can also be used, but make sure it’s full-fat and well-drained. The key is to use a cheese that has a relatively dry consistency to prevent the truffles from becoming too soft.
- What if I don’t like coconut? What else can I use to coat the truffles?
- If you’re not a fan of coconut, there are plenty of other delicious options for coating the truffles. You can use cocoa powder for a classic chocolate flavor, finely chopped nuts (such as almonds, walnuts, or hazelnuts) for added crunch, sprinkles for a festive touch, or melted chocolate (dark, milk, or white) for a decadent coating. You can even roll them in crushed cookies for extra flavour.
- How long can I store these truffles?
- These truffles can be stored in the refrigerator for up to 5 days in an airtight container. Make sure to keep them chilled to maintain their texture and prevent them from becoming too soft. For longer storage, you can freeze them for up to 2 months. Thaw them in the refrigerator before serving.
- Can I make these truffles ahead of time?
- Absolutely! These truffles are perfect for making ahead of time. In fact, they taste even better after the flavors have had a chance to meld together in the refrigerator. You can make them a day or two in advance and store them in an airtight container in the refrigerator until you’re ready to serve them.
- My truffle dough is too dry. What can I do?
- If your truffle dough is too dry and crumbly, you can add a teaspoon of milk or cream at a time until the desired consistency is reached. Be careful not to add too much liquid, as this will make the truffles too soft. You can also try adding a tablespoon of melted butter or a bit more Nutella to help bind the ingredients together. Make sure to mix everything thoroughly until the dough is pliable and holds its shape when pressed together.