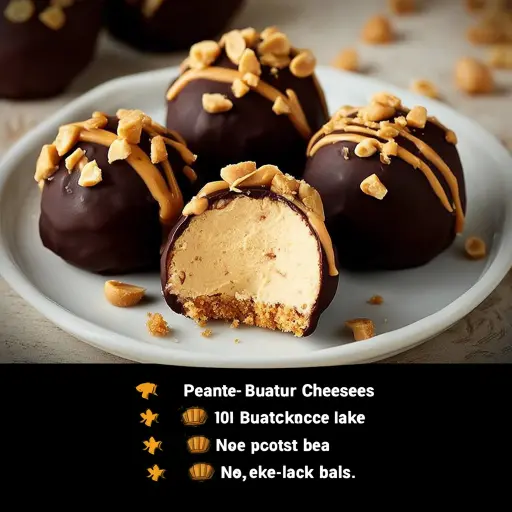
Description: Indulge in the creamy, dreamy goodness of No-Bake Peanut Butter Cheesecake Balls. These delightful little treats are perfect for satisfying your sweet tooth without the fuss of baking. Combining the rich, tangy flavor of cheesecake with the nutty allure of peanut butter, each bite is a symphony of textures and tastes. Coated in luscious chocolate and sprinkled with crunchy peanuts, they’re an irresistible indulgence that’s easy to make and even easier to devour. Perfect for parties, desserts, or just a delightful snack, these cheesecake balls are sure to become a new favorite.
Ingredients:
For the cheesecake filling:
- 1 package (250g) cream cheese, softened
- ½ cup creamy peanut butter (no added sugar)
- ⅓ cup powdered sugar
- 1 teaspoon vanilla extract
- ½ cup crushed digestive biscuits or graham crackers
For the coating:
- 1 cup milk or semi-sweet chocolate chips
- 1 tablespoon coconut oil or butter
For garnish:
- Chopped roasted peanuts
- Extra melted peanut butter (optional drizzle)
Preparation:
Step 1: Prepare the Cheesecake Filling
In a large mixing bowl, ensure that your cream cheese is thoroughly softened. This is crucial for achieving a smooth and creamy texture. Add the softened cream cheese, creamy peanut butter (make sure it’s the no-added-sugar variety to control the sweetness), powdered sugar, and vanilla extract to the bowl.
Step 2: Mix the Ingredients
Using an electric mixer (either a stand mixer or a handheld one), beat the ingredients together until they are perfectly smooth and creamy. Scrape down the sides of the bowl periodically to ensure everything is evenly incorporated. The mixture should be light, fluffy, and free of any lumps.
Step 3: Add the Crushed Biscuits
Once the cream cheese mixture is smooth, gently fold in the crushed digestive biscuits or graham crackers. These crumbs add a subtle crunch and a delightful textural contrast to the creamy filling. Mix until just combined, being careful not to overmix, which can make the mixture tough. The mixture should be thick enough to hold its shape.
Step 4: Chill the Mixture
If the mixture seems too soft to handle, cover the bowl with plastic wrap and refrigerate for about 15–20 minutes. Chilling helps the mixture firm up, making it easier to roll into balls. This step is especially important if your kitchen is warm or if the cream cheese wasn’t quite soft enough to begin with.
Step 5: Shape into Balls
Once the mixture is chilled (if needed), scoop out small portions using a spoon or a small ice cream scoop. Roll each portion between your palms to form bite-sized balls. Place the formed balls on a tray lined with parchment paper.
Step 6: Freeze the Balls
Place the tray of peanut butter cheesecake balls into the freezer for about 30 minutes. Freezing helps the balls firm up completely, which will make them easier to dip into the melted chocolate without losing their shape.
Step 7: Prepare the Chocolate Coating
While the cheesecake balls are freezing, prepare the chocolate coating. In a microwave-safe bowl, combine the chocolate chips with coconut oil or butter. The coconut oil (or butter) helps to thin the chocolate, giving it a smooth and glossy consistency that’s perfect for dipping.
Step 8: Melt the Chocolate
Microwave the chocolate mixture in 20-second intervals, stirring well between each interval. This prevents the chocolate from burning. Continue until the chocolate is completely melted and smooth.
Step 9: Dip the Cheesecake Balls
Remove the tray of frozen cheesecake balls from the freezer. Using a fork or dipping tool, carefully dip each ball into the melted chocolate, ensuring it’s fully coated. Allow any excess chocolate to drip off before placing the coated ball back onto the parchment-lined tray.
Step 10: Garnish with Peanuts
Immediately sprinkle the tops of the chocolate-covered balls with chopped roasted peanuts. The peanuts add a delightful crunch and a nutty flavor that complements both the peanut butter and the chocolate.
Step 11: Add an Optional Peanut Butter Drizzle
For an extra touch of indulgence, melt a small amount of peanut butter and drizzle it over the tops of the chocolate-covered cheesecake balls. This adds a beautiful visual appeal and an extra layer of peanut butter flavor.
Step 12: Chill to Set
Place the tray of coated and garnished cheesecake balls into the refrigerator for another 20–30 minutes, or until the chocolate is completely set. This ensures that the chocolate is firm and doesn’t melt when you handle the balls.
Step 13: Serve and Store
Serve the No-Bake Peanut Butter Cheesecake Balls cold or at room temperature. Store any leftovers in an airtight container in the refrigerator for up to 5 days.
Why You Will Love This Recipe
This recipe is a winner for so many reasons:
- No-Bake Convenience: No oven required! This makes it perfect for hot summer days or when you just want a quick and easy dessert.
- Irresistible Flavor: The combination of creamy cheesecake, peanut butter, and chocolate is simply divine. It’s a flavor explosion in every bite.
- Customizable: Easily adapt the recipe to suit your taste preferences. Use dark chocolate, white chocolate, or even a flavored chocolate for the coating. Add different nuts, sprinkles, or toppings for endless variations.
- Perfect for Any Occasion: These cheesecake balls are great for parties, potlucks, holiday gatherings, or simply as a special treat for yourself.
- Kid-Friendly: Both kids and adults love them, making them a crowd-pleaser for any age group.
- Make-Ahead Friendly: You can prepare these cheesecake balls in advance and store them in the refrigerator until you’re ready to serve, making them perfect for entertaining.
Serving Suggestions:
- Dessert Platter: Arrange the No-Bake Peanut Butter Cheesecake Balls on a dessert platter alongside other sweets like cookies, brownies, and fruit for a beautiful and varied display.
- Party Favors: Package a few cheesecake balls in small cellophane bags tied with ribbon for a delightful party favor.
- After-Dinner Treat: Serve them as a simple yet satisfying after-dinner dessert with a cup of coffee or tea.
- Snack Time: Enjoy a couple of cheesecake balls as a mid-afternoon snack to satisfy your sweet cravings.
- Ice Cream Topping: Crumble a cheesecake ball over a scoop of vanilla ice cream for an extra special treat.
- Gourmet Gift: Place the cheesecake balls in a decorative box and gift them to friends, family, or neighbors for a thoughtful homemade present.
Tips:
- Soften the Cream Cheese: Ensure the cream cheese is fully softened before mixing to avoid lumps and achieve a smooth texture.
- Use Good Quality Chocolate: Opt for high-quality chocolate chips for the coating to get the best flavor and a glossy finish.
- Don’t Overmix: When folding in the crushed biscuits, mix gently until just combined to prevent the mixture from becoming tough.
- Freeze Before Dipping: Freezing the cheesecake balls before dipping them in chocolate helps them hold their shape and prevents the chocolate from melting too quickly.
- Melt Chocolate Slowly: Microwave the chocolate in short intervals, stirring in between, to prevent burning.
- Customize the Toppings: Get creative with the toppings! Try sprinkles, sea salt, shredded coconut, or different types of chopped nuts.
- Store Properly: Store the cheesecake balls in an airtight container in the refrigerator to maintain their freshness and texture.
- Peanut Butter Variations: For a twist, use chunky peanut butter for the filling to add even more texture.
- Vegan Option: Use vegan cream cheese and chocolate to make this recipe suitable for vegan diets.
- Make Mini Bites: Roll the mixture into smaller balls for bite-sized treats that are perfect for snacking.
Prep Time: 25 minutes
Chill Time: 1 hour
Total Time: 1 hour 25 minutes
Nutritional Information:
(Approximate values per ball)
Calories: 210 kcal
Protein: 5g
Sodium: 80mg
Conclusion
No-Bake Peanut Butter Cheesecake Balls are a delightful treat that combines the creamy richness of cheesecake with the nutty flavor of peanut butter and the sweetness of chocolate. Easy to make and utterly irresistible, these little balls of joy are perfect for satisfying your sweet cravings without the hassle of baking. Whether you’re serving them at a party, gifting them to friends, or simply enjoying them as a special snack, they’re sure to bring a smile to everyone’s face. So go ahead, whip up a batch of these delicious cheesecake balls and experience the perfect blend of flavors and textures in every bite!
Questions and Answers About This Recipe
- Q1: Can I use a different type of nut butter instead of peanut butter?
- A1: Absolutely! Feel free to substitute the peanut butter with almond butter, cashew butter, or any other nut butter you prefer. Just keep in mind that the flavor profile will change slightly depending on the nut butter you use. Almond butter, for instance, will give the cheesecake balls a slightly more delicate and sophisticated flavor, while cashew butter will provide a milder and creamier taste. Experiment and find your favorite combination!
- Q2: Can I make these cheesecake balls ahead of time?
- A2: Yes, you definitely can! In fact, making them ahead of time is a great idea. The No-Bake Peanut Butter Cheesecake Balls can be stored in an airtight container in the refrigerator for up to 5 days. This makes them perfect for meal prepping or for getting ahead on your dessert preparations for a party or gathering. Just be sure to keep them chilled to maintain their texture and freshness.
- Q3: What can I use instead of digestive biscuits or graham crackers?
- A3: If you don’t have digestive biscuits or graham crackers on hand, you can use other types of cookies or crackers that have a similar texture and flavor. Vanilla wafers, shortbread cookies, or even crushed pretzels can work well. The key is to choose something that has a slightly sweet and crumbly texture that will complement the creamy filling.
- Q4: Can I use dark chocolate or white chocolate for the coating?
- A4: Absolutely! Feel free to get creative with the chocolate coating. Dark chocolate will provide a richer and more intense flavor, while white chocolate will add a touch of sweetness and a beautiful contrast in color. You can even use flavored chocolate, such as mint chocolate or caramel chocolate, for a unique twist.
- Q5: How do I prevent the chocolate from seizing up when melting it?
- A5: To prevent the chocolate from seizing up when melting it, it’s important to melt it slowly and carefully. Use a microwave-safe bowl and microwave the chocolate in short intervals (20-30 seconds), stirring well between each interval. Adding a tablespoon of coconut oil or butter to the chocolate helps to thin it out and prevents it from becoming too thick or seizing up. Also, make sure that your bowl and utensils are completely dry, as even a small amount of water can cause the chocolate to seize.