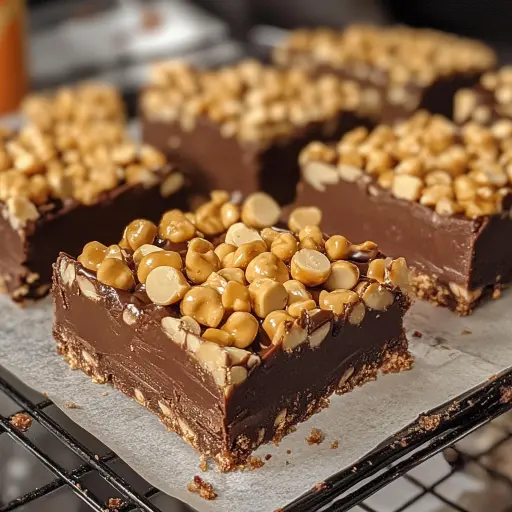
Description: These no-bake Snickers crunch bars are an irresistible symphony of sweet and salty flavors, combined with satisfying crunch and layers of chocolate, caramel, and peanuts. This recipe requires no oven time, making it a perfect, hassle-free dessert or snack.
Ingredients:
Base Layer:
- 2 cups (120g) Rice Krispies cereal
- 1 cup (170g) milk chocolate chips, melted
- 1/2 cup (120ml) creamy peanut butter
Caramel Peanut Layer:
- 1 cup (240ml) caramel sauce
- 3/4 cup (100g) salted peanuts, chopped
Top Layer:
- 1 cup (170g) milk chocolate chips, melted
- 1/4 cup (60ml) creamy peanut butter
Preparation:
Step 1: Prepare the Baking Dish
Start by lining an 8×8-inch (20×20 cm) baking dish with parchment paper. Ensure that the parchment paper overhangs slightly on the sides; this will act as handles, making it easier to lift the finished bars out of the dish later. A perfectly lined dish is essential for clean cuts and easy removal.
Step 2: Create the Base Layer
In a medium-sized, heat-safe bowl, combine the melted milk chocolate chips and creamy peanut butter. You can melt the chocolate in the microwave in 30-second intervals, stirring between each interval to prevent burning. Once the chocolate is fully melted and smooth, add the peanut butter and mix until well combined. This mixture will form the delicious, peanut-buttery foundation for your bars.
Step 3: Incorporate the Rice Krispies
Pour the Rice Krispies cereal into the melted chocolate-peanut butter mixture. Gently stir until all the cereal is evenly coated. Ensure that every piece of cereal is covered, as this will give the base its perfect crunchy texture. Even distribution is key to achieving the best consistency and flavor in every bite.
Step 4: Form and Chill the Base
Transfer the Rice Krispies mixture into the parchment-lined baking dish. Using a spatula or your hands (lightly dampened to prevent sticking), press the mixture firmly and evenly into the bottom of the dish. The base should be compact and uniform in thickness. Once pressed, place the dish in the refrigerator for about 15 minutes. This brief chilling period helps the base set and firm up, providing a solid foundation for the next layers.
Step 5: Layer the Caramel and Peanuts
Remove the dish from the refrigerator. Pour the caramel sauce evenly over the chilled Rice Krispies base. Spread the caramel with a spatula to ensure it covers the entire surface. Next, sprinkle the chopped salted peanuts evenly over the caramel layer. The combination of sweet caramel and salty peanuts creates a delightful contrast that elevates the flavor profile of these bars.
Step 6: Chill the Caramel Layer
Return the baking dish to the refrigerator for another 10–15 minutes. This allows the caramel layer to firm up slightly, preventing it from mixing with the top chocolate layer and ensuring distinct layers in the final product.
Step 7: Prepare the Top Chocolate Layer
While the caramel layer chills, prepare the top chocolate layer. In a clean, heat-safe bowl, combine the melted milk chocolate chips and the remaining creamy peanut butter. Melt the chocolate as before, in 30-second intervals in the microwave, stirring until smooth. Mix in the peanut butter until fully incorporated.
Step 8: Add the Final Layer
Remove the dish from the refrigerator. Pour the melted chocolate-peanut butter mixture over the caramel and peanut layer. Use a spatula to spread it evenly, ensuring a smooth and attractive finish. This final layer is the crowning touch, adding a rich, chocolatey finish to the bars.
Step 9: Final Chill
Place the baking dish back in the refrigerator for at least 1 hour, or until the bars are completely set. This extended chilling period is crucial for ensuring that all layers are firm and the bars can be easily cut without falling apart.
Step 10: Cut and Serve
Once the bars are fully set, remove them from the refrigerator. Using the parchment paper overhang, carefully lift the bars out of the dish and place them on a cutting board. With a sharp knife, cut the bars into squares. The size of the squares can be adjusted to your preference, but smaller squares are perfect for snacking. Serve immediately and enjoy!
Why you will love this recipe
There are countless reasons to adore these No-Bake Snickers Crunch Bars. First and foremost, the recipe is incredibly easy and requires no baking, making it perfect for those who want a delicious treat without the hassle of using an oven. The combination of textures—the crunchy Rice Krispies base, the chewy caramel, the salty peanuts, and the smooth chocolate layers—creates a satisfying experience in every bite. The bars are also highly customizable; you can easily adapt the recipe to your personal preferences by using different types of chocolate, adding extra nuts, or incorporating other favorite ingredients. Finally, these bars are a crowd-pleaser, ideal for parties, gatherings, or simply enjoying as a sweet treat at home. The perfect balance of sweet and salty makes them universally appealing.
Serving Suggestions:
- As a Snack: Enjoy a square or two of these bars as a satisfying afternoon or evening snack.
- Dessert: Serve them as a simple yet delicious dessert after a meal.
- Party Treat: Cut the bars into smaller squares and arrange them on a platter for parties and gatherings.
- Gift Giving: Package the bars in a decorative box or bag to give as a homemade gift.
- Pair with Beverages: Serve with a cold glass of milk, a cup of coffee, or a scoop of vanilla ice cream for an extra indulgent experience.
Tips:
- For extra crunch, add chopped pretzels to the base layer.
- Use dark chocolate instead of milk chocolate for a richer flavor.
- If you want to make the process easier, melt the chocolate chips and peanut butter in a double boiler instead of the microwave. This method prevents the chocolate from burning and ensures a smoother consistency.
- To prevent the caramel from sticking to the knife when cutting, run the knife under hot water and wipe it dry before each cut.
- Store bars in an airtight container in the refrigerator for up to 1 week.
- Add a sprinkle of sea salt on top of the chocolate layer for an extra pop of flavor.
- Experiment with different nut varieties like almonds or pecans to customize the recipe.
- For a creamier texture, use a good-quality caramel sauce, such as homemade or store-bought premium brand.
- If you don’t have parchment paper, you can lightly grease the baking dish with butter or cooking spray. However, using parchment paper makes it much easier to lift the bars out of the dish.
- For a fun twist, add a layer of marshmallow fluff between the caramel and chocolate layers.
Prep Time: 20 minutes
Cook Time: 0 minutes
Total Time: 1 hour 35 minutes (includes chilling time)
Nutritional Information: (Approximate values per serving; will vary based on ingredient brands and portion size)
- Calories: 350
- Protein: 5g
- Sodium: 150mg
Conclusion
These No-Bake Snickers Crunch Bars are an easy and delightful treat that combines the perfect blend of textures and flavors. From the crunchy Rice Krispies base to the gooey caramel and the rich chocolate topping, these bars are sure to satisfy your sweet tooth. Whether you’re looking for a quick snack, a simple dessert, or a crowd-pleasing treat for a party, this recipe is a winner. Give it a try and experience the irresistible goodness of these homemade Snickers Crunch Bars!
Questions and Answers:
Q1: Can I use a different type of chocolate?
A1: Absolutely! While the recipe calls for milk chocolate, you can easily substitute it with dark chocolate, semi-sweet chocolate, or even white chocolate. Using dark chocolate will give the bars a richer, less sweet flavor. Experiment to find your preferred chocolate type that best suits your taste.
Q2: What if I don’t have Rice Krispies cereal? Can I use another cereal?
A2: Yes, you can use other types of crispy rice cereal or even crushed cornflakes as a substitute for Rice Krispies. The key is to use a cereal that provides a good crunch. Just make sure that the texture is similar to Rice Krispies so you can achieve the same delicious outcome!
Q3: How do I prevent the chocolate from seizing up when melting it?
A3: The best way to prevent chocolate from seizing up when melting is to use a double boiler or melt it in the microwave in short intervals (30 seconds at a time), stirring in between. Avoid getting any water or moisture into the chocolate, as this is the most common cause of seizing. If you’re using the microwave, use a microwave-safe bowl and be patient, stirring gently until the chocolate is smooth.
Q4: Can these bars be frozen?
A4: Yes, these bars can be frozen for longer storage. Wrap them individually in plastic wrap and then place them in an airtight container or freezer bag. They can be stored in the freezer for up to 2-3 months. To thaw, place them in the refrigerator for a few hours or overnight before serving. Freezing will soften the Rice Krispies slightly, but the bars will still be delicious.
Q5: Can I make these bars vegan?
A5: Yes, you can make these bars vegan by using vegan milk chocolate chips, vegan caramel sauce, and vegan peanut butter. You will also need to ensure that the Rice Krispies cereal is vegan, as some brands may contain vitamin D3 derived from animal sources. With these substitutions, you can enjoy a delicious vegan version of these No-Bake Snickers Crunch Bars.