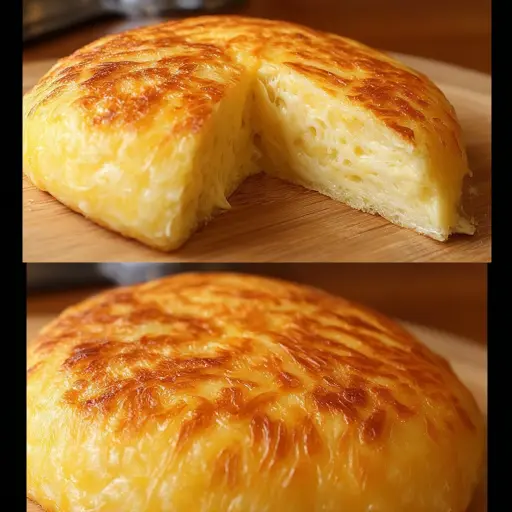
Description: Imagine waking up on a crisp morning, the aroma of freshly baked bread filling your kitchen. But what if you don’t have an oven, or simply don’t want to heat up the whole house for a single loaf? Enter the No-Oven Stovetop Bread – a recipe so simple, so satisfying, and so incredibly versatile that it will become your new go-to. This isn’t just bread; it’s an experience. It’s the warm, comforting embrace of homemade goodness, crafted entirely on your stovetop. Perfect for beginners and seasoned bakers alike, this recipe delivers a soft, fluffy bread with a beautifully golden crust, ready to be enjoyed in countless ways. Whether you’re craving a quick breakfast, a savory sandwich, or a simple side for dinner, this stovetop bread has you covered. It’s time to redefine what it means to bake – without ever turning on your oven.
Ingredients:
- 1 cup all-purpose flour: The foundation of our bread, providing structure and a tender crumb. Ensure it’s fresh for the best rise.
- 1 teaspoon baking powder: The leavening agent that gives our bread its light and airy texture. Make sure it’s not expired for optimal results.
- 1/4 teaspoon salt: Enhances the flavors and balances the sweetness of the other ingredients. Don’t skip it!
- 1/4 cup unsalted butter, melted: Adds richness, flavor, and tenderness to the bread. Melt it slowly to avoid splattering.
- 1/2 cup milk: Provides moisture and helps bind the ingredients together. Whole milk will yield a richer flavor, but any milk will work.
- 1 large egg: Contributes to the structure, richness, and moisture of the bread. Use a room-temperature egg for better incorporation.
Preparation:
Step 1: Combine Dry Ingredients: In a medium-sized mixing bowl, whisk together the all-purpose flour, baking powder, and salt. Whisking is crucial here as it helps to evenly distribute the baking powder and salt throughout the flour, ensuring a consistent rise and flavor in every bite. This step also aerates the flour, which contributes to a lighter, fluffier bread. Make sure there are no lumps of baking powder remaining.
Step 2: Prepare Wet Ingredients: In a separate bowl, crack the egg and beat it lightly with a fork or whisk. Add the melted butter and milk to the beaten egg. Stir until the wet ingredients are well combined. The mixture should be smooth and uniform in color. This step is important because it helps emulsify the butter and milk, creating a cohesive mixture that will evenly distribute throughout the dry ingredients.
Step 3: Combine Wet and Dry Ingredients: Pour the wet ingredients into the bowl with the dry ingredients. Using a spatula or wooden spoon, gently stir the mixture until just combined. Be careful not to overmix the batter. Overmixing can develop the gluten in the flour, resulting in a tough, dense bread. The batter should be thick and slightly lumpy, but there should be no large pockets of dry flour remaining.
Step 4: Heat the Skillet: Place a nonstick skillet or well-seasoned cast-iron pan over low to medium-low heat. If you are not using a nonstick skillet, lightly grease the pan with butter or cooking spray to prevent the bread from sticking. Allow the skillet to heat up slowly, ensuring it is evenly heated before adding the batter. This step is crucial for achieving a golden-brown crust without burning the bread.
Step 5: Cook the Bread: Gently pour the batter into the heated skillet, spreading it evenly to form a thick, round disc, similar to a pancake but thicker. Cover the skillet with a tight-fitting lid. This traps the heat and helps the bread cook evenly, mimicking the environment of an oven. Cook for approximately 10-12 minutes, or until the bottom of the bread is golden brown and the top appears mostly set.
Step 6: Flip and Cook the Other Side: Carefully lift one edge of the bread with a wide spatula to check the bottom for doneness. If it’s golden brown, gently flip the bread over to cook the other side. Cover the skillet again with the lid and continue cooking for another 8-10 minutes, or until the second side is golden brown and the bread is cooked through. To ensure the bread is fully cooked, insert a toothpick into the center; it should come out clean.
Step 7: Cool and Serve: Once the bread is cooked through, remove it from the skillet and place it on a wire rack to cool slightly before slicing and serving. Cooling the bread allows the internal structure to set, making it easier to slice and preventing it from becoming gummy. Let it cool for at least 5-10 minutes before cutting into it.
Why You Will Love This Recipe
This No-Oven Stovetop Bread is a game-changer for several reasons. Firstly, it’s incredibly convenient. No oven is required, making it perfect for those without one or for hot summer days when you want to avoid heating up your kitchen. Secondly, it’s quick and easy to make, with minimal ingredients and simple steps. The entire process, from prep to plate, takes only about 30 minutes. Thirdly, it’s incredibly versatile. You can customize the flavor by adding herbs, spices, cheese, or even chocolate chips to the batter. It’s also a fantastic base for sandwiches, toast, or simply enjoyed with a pat of butter. Finally, the stovetop method creates a uniquely textured bread with a soft, fluffy interior and a beautifully golden, slightly crisp exterior. It’s a comforting and satisfying bread that you’ll want to make again and again.
COOKING Rating:
Easy
Serving Suggestions:
- Classic Toast: Slice the bread and toast it until golden brown. Serve with butter, jam, honey, or your favorite spread.
- Sandwiches: Use the bread as a base for your favorite sandwiches. It pairs well with both savory and sweet fillings.
- Garlic Bread: Brush slices of the bread with garlic butter and toast or grill until golden and crispy.
- Side Dish: Serve slices of the bread alongside soups, stews, salads, or pasta dishes.
- Breakfast Treat: Top slices of the bread with avocado, sliced tomatoes, and a sprinkle of salt and pepper for a simple and delicious breakfast.
- Croutons: Cube the bread and bake or sauté until crispy to make homemade croutons for salads and soups.
Tips:
- Low and Slow: Cook the bread over low to medium-low heat to ensure it cooks evenly and doesn’t burn on the outside before the inside is cooked through.
- Lid is Key: Covering the skillet with a lid is crucial for trapping heat and creating a steamy environment that helps the bread cook evenly.
- Don’t Overmix: Avoid overmixing the batter to prevent the bread from becoming tough. Mix until just combined.
- Check for Doneness: Use a toothpick to check for doneness. If it comes out clean, the bread is cooked through.
- Add Flavor: Get creative with add-ins. Herbs, spices, cheese, or even a touch of sweetness like cinnamon and sugar can transform the flavor of the bread.
- Resting Time: Allow the bread to cool slightly before slicing and serving. This helps it hold its shape and prevents it from becoming gummy.
- Skillet Choice: A well-seasoned cast-iron skillet works best for even heat distribution and a golden-brown crust. A nonstick skillet is also a good option for easy release.
- Storage: Store leftover bread in an airtight container at room temperature for up to 2 days or in the refrigerator for up to 5 days.
Prep Time: 10 minutes
Cook Time: 20 minutes
Total Time: 30 minutes
Nutritional Information: (per slice, based on 4 servings)
- Calories: Approximately 210 kcal
- Protein: Approximately 6 grams
- Sodium: Approximately 200 mg (depending on salt content in butter)
Conclusion
The No-Oven Stovetop Bread is more than just a recipe; it’s a testament to simple pleasures and resourceful cooking. It’s a reminder that you don’t need fancy equipment or complicated techniques to create something delicious and satisfying. Whether you’re a beginner baker or a seasoned pro, this recipe offers a quick, easy, and versatile way to enjoy fresh bread anytime, anywhere. So go ahead, give it a try, and discover the joy of stovetop baking! It’s a delightful experience that brings the comfort of homemade bread right to your fingertips, without ever turning on the oven. This recipe is perfect for busy weeknights, lazy weekends, or any time you crave the simple pleasure of warm, freshly baked bread. Enjoy!
Q&A:
Q: Can I use gluten-free flour for this recipe?
A: Yes, you can substitute all-purpose flour with a gluten-free blend. However, gluten-free flours often require additional binding agents. Consider adding 1/2 teaspoon of xanthan gum to the dry ingredients to help improve the texture and structure of the bread. Also, keep an eye on the moisture level, as gluten-free flours can absorb liquid differently. You may need to adjust the amount of milk slightly to achieve the desired batter consistency.
Q: Can I add herbs or spices to the batter?
A: Absolutely! This recipe is incredibly versatile. You can add herbs like rosemary, thyme, or oregano for a savory twist. Spices like cinnamon, nutmeg, or cardamom can add a warm, comforting flavor. Start with about 1-2 teaspoons of dried herbs or spices, or a tablespoon of fresh, chopped herbs. Adjust the amount to your taste.
Q: What if I don’t have unsalted butter? Can I use salted butter?
A: Yes, you can use salted butter, but you’ll need to reduce the amount of salt you add to the dry ingredients. If using salted butter, omit the 1/4 teaspoon of salt in the recipe or reduce it to a pinch. This will prevent the bread from being too salty.
Q: How do I know when the bread is fully cooked?
A: The best way to check for doneness is to insert a toothpick into the center of the bread. If it comes out clean or with just a few moist crumbs attached, the bread is cooked through. Also, the bread should be golden brown on both sides and feel firm to the touch. If the toothpick comes out with wet batter, continue cooking for a few more minutes, checking periodically.
Q: Can I double or triple this recipe?
A: Yes, you can easily double or triple this recipe to make a larger loaf or multiple loaves. Just be sure to adjust the cooking time accordingly, as larger loaves may take longer to cook through. Also, if you’re making multiple loaves, it’s best to cook them in separate skillets to ensure even cooking.