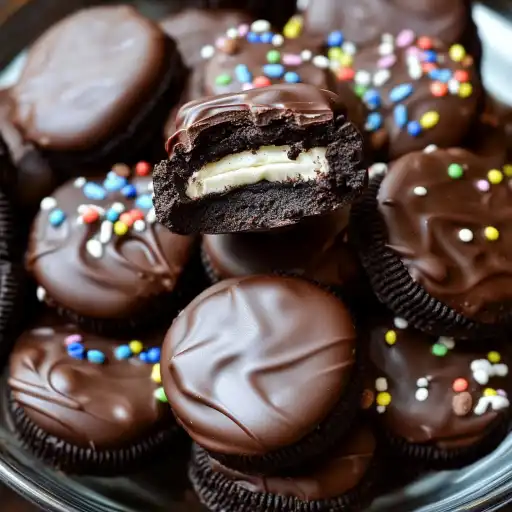
This recipe transforms the humble Oreo cookie into a decadent treat, perfect for parties, holidays, or just a fun afternoon activity. Imagine biting into a crisp Oreo, enveloped in smooth, melted chocolate, complemented by a soft banana slice, and finished with a playful crunch of colorful sprinkles. It’s a delightful explosion of textures and flavors that’s surprisingly simple to create.
Why You Will Love This Recipe
This recipe is a guaranteed crowd-pleaser for several reasons. First, it’s incredibly easy and requires minimal baking skills. The ingredients are readily available, and the process is straightforward, making it a fantastic option for both novice and experienced bakers. Second, it’s infinitely customizable. You can choose your favorite type of chocolate, experiment with different sprinkles, or add other toppings like chopped nuts or shredded coconut. The banana slice adds a layer of freshness and a pleasant, chewy texture that complements the sweetness of the Oreo and chocolate, creating a more complex and satisfying bite. Finally, these chocolate-covered Oreos are visually appealing. The glossy chocolate, vibrant sprinkles, and contrasting colors make them a delightful addition to any dessert table.
Ingredients:
- 28 pieces Oreo cookies
- 500 g chocolate chips or pieces (dark or milk chocolate)
- 1 medium banana (thinly sliced)
- ¼ cups sprinkles
Preparation:
Step 1: Prepare Your Workspace. Line a baking sheet or tray with parchment paper. This prevents the chocolate from sticking and makes it easy to remove the finished Oreos. Gather all your ingredients and tools, ensuring everything is within easy reach. This will streamline the dipping process and prevent the chocolate from setting too quickly.
Step 2: Melting the Chocolate (Microwave Method). Break or chop your chocolate into small, uniform pieces. This ensures even melting and prevents burning. Place the chocolate in a microwave-safe bowl. Microwave the chocolate on a medium-low heat setting (50% power) in short intervals, typically 20-30 seconds at a time. After each interval, remove the bowl and stir the chocolate thoroughly, even if it doesn’t appear fully melted. The residual heat will continue to melt the chocolate. Continue this process until the chocolate is smooth and completely melted. Be patient and avoid overheating, as burnt chocolate can become grainy and unusable.
Step 3: Melting the Chocolate (Double Boiler Method). If you prefer a more controlled melting process, use a double boiler. Fill a saucepan with about an inch of water and place it on the stove. Heat the water over low to medium heat until it simmers gently. Find a heatproof glass or stainless steel bowl that fits snugly on top of the saucepan without touching the simmering water. Place your chocolate pieces in the heatproof bowl and set it over the simmering water. The steam from the water will gently melt the chocolate. Stir the chocolate occasionally as it melts, ensuring it melts evenly. Once the chocolate is smooth and fully melted, carefully remove the bowl from the double boiler.
Step 4: Dipping the Oreos. Take an Oreo cookie and place a thin slice of banana on top. This adds a layer of flavor and texture that complements the chocolate. Dip the Oreo into the melted chocolate, ensuring it’s fully coated. You can use a fork, a dipping tool, or even your fingers. If using a fork, insert it into the cream filling of the Oreo for a secure hold. After dipping, gently lift the Oreo and tap the fork’s edge against the bowl to allow excess chocolate to drip back in. This prevents a thick, uneven coating and ensures a cleaner presentation.
Step 5: Adding Sprinkles and Setting. Place the chocolate-covered Oreo on the parchment paper-lined baking sheet. Before the chocolate sets, sprinkle the top generously with your choice of sprinkles. This adds a pop of color, a delightful crunch, and a festive touch. You can use any type of sprinkles you like, such as rainbow sprinkles, chocolate sprinkles, or even edible glitter. Continue dipping and decorating the remaining Oreos. Once all the Oreos are dipped and sprinkled, place the baking sheet in the refrigerator for about 15-20 minutes to allow the chocolate to harden completely. This will make them easier to handle and prevent the chocolate from melting at room temperature.
COOKING Rating:
Easy
Serving Suggestions:
Serve these chocolate-covered Oreos as a dessert at parties, holidays, or gatherings. They also make a great homemade gift. Arrange them on a platter, in a gift box, or individually wrapped in cellophane bags. Pair them with a glass of milk, hot chocolate, or coffee for a perfect treat. You can also serve them as part of a dessert buffet or alongside other sweet treats.
Tips:
- Chocolate Choice: Use high-quality chocolate for the best flavor. Dark, milk, or white chocolate all work well. You can even use a combination of chocolates for a visually appealing effect.
- Melting Chocolate: Be careful not to overheat the chocolate, as it can burn and become grainy. Melt the chocolate slowly and stir frequently.
- Topping Variations: Get creative with your toppings! Try chopped nuts, shredded coconut, crushed pretzels, sea salt, or even a drizzle of caramel.
- Storage: Store the chocolate-covered Oreos in an airtight container in the refrigerator for up to a week.
- Banana Placement: Ensure the banana slice is firmly placed on the Oreo before dipping to prevent it from falling off during the process.
- Dipping Tools: Experiment with different dipping tools to find what works best for you. Forks, skewers, and dipping spoons are all good options.
- Chocolate Consistency: If the chocolate becomes too thick while dipping, add a teaspoon of vegetable oil or shortening to thin it out.
Prep Time:
15 minutes
Cook Time:
5 minutes
Total Time:
20 minutes
Nutritional Information:
(Note: This is an estimate, as the exact nutritional information will vary depending on the specific ingredients used.)
- Calories: Approximately 150-200 per Oreo
- Protein: 1-2 grams
- Sodium: 50-75 milligrams
Conclusion
Chocolate-covered Oreos with banana slices and sprinkles are a simple yet elegant dessert that’s sure to impress. The combination of textures and flavors is irresistible, and the customizable nature of the recipe makes it perfect for any occasion. Whether you’re looking for a fun activity to do with kids, a quick and easy dessert for a party, or a homemade gift, these chocolate-covered Oreos are a perfect choice. So gather your ingredients, melt some chocolate, and get ready to create a batch of these delightful treats!
Questions and Answers:
Q1: Can I use different types of cookies instead of Oreos?
A: Absolutely! While Oreos are the classic choice, you can experiment with other types of cookies, such as chocolate chip cookies, shortbread cookies, or even graham crackers. Just keep in mind that the dipping time may vary depending on the size and thickness of the cookie.
Q2: How do I prevent the chocolate from seizing up while melting it?
A: Chocolate can seize up if it comes into contact with even a small amount of water. To prevent this, make sure your bowl and utensils are completely dry. Also, avoid overheating the chocolate, as this can also cause it to seize. If the chocolate does seize, try adding a teaspoon of vegetable oil or shortening and stirring vigorously until it becomes smooth again.
Q3: Can I use white chocolate instead of milk or dark chocolate?
A: Yes, you can definitely use white chocolate! White chocolate offers a sweeter flavor profile and a different aesthetic. You might want to consider using a contrasting color of sprinkles to make the white chocolate-covered Oreos stand out.
Q4: How long will these chocolate-covered Oreos last?
A: These chocolate-covered Oreos will last for up to a week if stored in an airtight container in the refrigerator. The chocolate may start to bloom (develop a white coating) over time, but this is just a cosmetic issue and doesn’t affect the taste.
Q5: Can I freeze these chocolate-covered Oreos?
A: While you can freeze them, it’s not highly recommended. The chocolate may become brittle and the sprinkles may lose their color. If you do freeze them, wrap them tightly in plastic wrap and then place them in an airtight container. Thaw them in the refrigerator before serving. Freezing may also affect the texture of the banana slice, making it softer.