Description: This Oven-Roasted Brisket recipe delivers a succulent, melt-in-your-mouth beef experience, perfect for family gatherings, special occasions, or a hearty Sunday dinner. The slow roasting process ensures maximum tenderness, while the aromatic spice rub creates a flavorful crust that seals in all the delicious juices. Served with caramelized onions and a rich, savory broth, this brisket is sure to impress even the most discerning palates. No complicated techniques or fancy equipment required – just simple ingredients and a bit of patience for a truly unforgettable meal.
Ingredients:
• 1 brisket (about 4-5 pounds), with a decent fat cap • 2 tablespoons olive oil (extra virgin) • 2 teaspoons kosher salt (or sea salt) • 1 teaspoon freshly ground black pepper • 1 tablespoon smoked paprika • 1 tablespoon onion powder • 1 tablespoon garlic powder • 1 teaspoon ground cumin • 1 cup beef broth (low sodium preferred) • 1 large onion, thinly sliced • 4 cloves garlic, finely chopped
Preparation:
Step 1: Preheat the Oven: Begin by preheating your oven to a low and slow temperature of 300°F (150°C). This lower temperature allows the brisket to cook slowly and evenly, breaking down the tough connective tissues and resulting in a tender, juicy final product. Make sure your oven rack is positioned in the center to ensure even heat distribution.
Step 2: Prepare the Brisket: Remove the brisket from its packaging and gently pat it dry with a paper towel. This step is crucial because it helps the spice rub adhere better to the surface of the meat. Removing excess moisture also promotes a better sear, if you choose to sear the brisket before roasting. Don’t be tempted to skip this step – it makes a noticeable difference.
Step 3: Oil and Season the Brisket: Drizzle the olive oil evenly over the entire surface of the brisket. The olive oil acts as a binder, helping the spice rub to stick to the meat. Plus, it adds a subtle richness to the overall flavor profile. In a separate bowl, combine the kosher salt, black pepper, smoked paprika, onion powder, garlic powder, and cumin. Mix well to ensure all the spices are evenly distributed. Generously rub this spice mixture over the entire brisket, making sure to coat every nook and cranny. Really massage the spices into the meat for maximum flavor penetration. The smoked paprika adds a beautiful color and smoky depth, while the onion and garlic powders provide a savory base. The cumin adds a hint of earthy warmth, complementing the other spices perfectly.
Step 4: Sear the Brisket (Optional): While searing is an optional step, it adds a significant layer of flavor and enhances the overall presentation of the brisket. Heat a large, oven-safe skillet (cast iron is ideal) over medium-high heat. Once the skillet is hot, carefully place the brisket in the skillet and sear it on both sides for 4-5 minutes per side, until you achieve a rich, golden-brown crust. Searing helps to caramelize the exterior of the meat, creating complex flavors and a delightful textural contrast. Be careful not to overcrowd the skillet, as this will lower the temperature and prevent the brisket from searing properly. If necessary, sear the brisket in two batches.
Step 5: Set Up for Roasting: In a large roasting pan, spread the thinly sliced onions and finely chopped garlic evenly across the bottom. These aromatics will infuse the beef broth with their flavor as the brisket roasts, creating a delicious and complex sauce. Pour the beef broth over the onions and garlic. The beef broth provides moisture and helps to keep the brisket from drying out during the long roasting process. Place the brisket on top of the onion and garlic mixture, making sure the fat side is facing up. The fat will render during cooking, basting the meat and keeping it moist and flavorful.
Step 6: Roast the Brisket: Cover the roasting pan tightly with heavy-duty aluminum foil or a tight-fitting lid. This helps to trap the moisture and create a steamy environment, further tenderizing the brisket. Roast the brisket in the preheated oven for approximately 3-4 hours, or until it is fork-tender. The exact cooking time will depend on the size and thickness of the brisket, as well as the accuracy of your oven. To check for doneness, insert a fork into the thickest part of the brisket. If the fork slides in easily with little to no resistance, the brisket is ready. If it still feels tough, continue roasting for another 30 minutes and check again.
Step 7: Rest the Brisket: Once the brisket is fork-tender, remove it from the oven and carefully remove the foil or lid. Allow the brisket to rest for at least 20 minutes before slicing. This resting period is crucial because it allows the juices to redistribute throughout the meat, resulting in a more tender and flavorful final product. If you slice the brisket immediately after roasting, the juices will run out, leaving you with a dry and less satisfying meal.
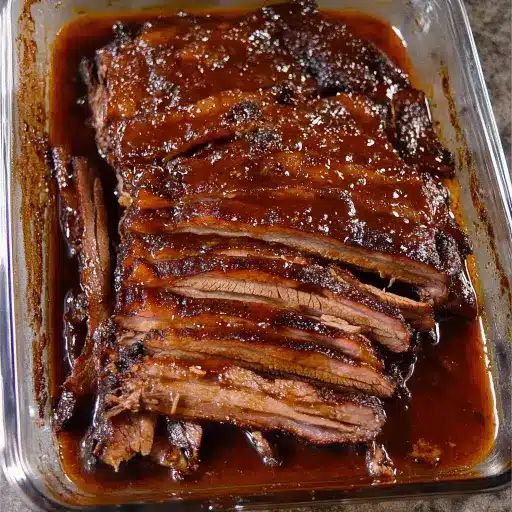
Step 8: Slice and Serve: After the brisket has rested, use a sharp carving knife to slice it thinly against the grain. The “grain” refers to the direction in which the muscle fibers run. Slicing against the grain shortens these fibers, making the brisket easier to chew. Serve the sliced brisket with the caramelized onions and the flavorful broth from the roasting pan as a sauce. This savory sauce is the perfect complement to the rich, tender brisket.
Why You Will Love This Recipe:
This oven-roasted brisket recipe is a guaranteed crowd-pleaser for several reasons:
- Unparalleled Tenderness: The slow and low cooking method ensures that the brisket becomes incredibly tender, melting in your mouth with each bite. The collagen breaks down, transforming into a rich, gelatinous substance that adds to the overall succulence.
- Deep, Savory Flavor: The combination of smoked paprika, onion powder, garlic powder, and cumin creates a complex and deeply savory flavor profile that is both comforting and satisfying. The seared crust adds an extra layer of depth and complexity.
- Minimal Effort: Despite its impressive results, this recipe is surprisingly easy to make. There’s no need for fancy equipment or complicated techniques. Just a few simple ingredients and a bit of patience are all you need to create a restaurant-quality meal.
- Perfect for Entertaining: This recipe is ideal for feeding a crowd. The brisket can be prepared ahead of time and reheated before serving, making it a stress-free option for parties and gatherings.
- Versatile: The oven-roasted brisket can be served in a variety of ways. Enjoy it as a classic main course with sides of mashed potatoes and roasted vegetables, or use it to make sandwiches, tacos, or even brisket chili.
Serving Suggestions:
- Classic Sides: Serve the brisket with traditional sides such as mashed potatoes, roasted vegetables (carrots, potatoes, parsnips), coleslaw, and cornbread.
- Sandwiches: Slice the brisket thinly and pile it high on toasted rolls with your favorite toppings, such as barbecue sauce, coleslaw, and pickles.
- Tacos: Shred the brisket and use it as a filling for tacos, along with your favorite toppings, such as salsa, guacamole, sour cream, and cilantro.
- Brisket Chili: Use leftover brisket to make a hearty and flavorful chili.
- Elegant Plating: For a more formal presentation, arrange the sliced brisket on a platter with a drizzle of the pan sauce and a garnish of fresh herbs.
Tips:
- Choose the Right Cut: When selecting a brisket, look for a packer brisket, which includes both the flat and the point. The point is the fattier part of the brisket, which helps to keep the flat moist during cooking.
- Don’t Skip the Resting Period: Allowing the brisket to rest for at least 20 minutes after roasting is crucial for maximum tenderness and juiciness.
- Slice Against the Grain: Slicing the brisket against the grain is essential for making it easier to chew.
- Make it Ahead: The brisket can be made a day or two in advance and reheated before serving. This is a great way to save time and reduce stress on the day of your event.
- Use a Meat Thermometer: If you want to be absolutely sure that your brisket is cooked to perfection, use a meat thermometer to check the internal temperature. The ideal internal temperature for brisket is around 203°F (95°C).
- Adjust Seasoning to Taste: Feel free to adjust the amount of spices in the rub to suit your personal preferences.
Prep Time: 20 minutes Cook Time: 3-4 hours Total Time: 3 hours 20 minutes – 4 hours 20 minutes (including resting time)
Nutritional Information (per serving, estimated):
Calories: 450-550 (depending on portion size and fat content) Protein: 40-50 grams Sodium: 400-600 mg (depending on the salt content of the beef broth)
Conclusion:
This oven-roasted brisket recipe is a testament to the fact that you don’t need fancy equipment or complicated techniques to create a truly memorable meal. With just a few simple ingredients and a bit of patience, you can transform a tough cut of beef into a succulent, melt-in-your-mouth delicacy. Whether you’re hosting a family gathering, celebrating a special occasion, or simply craving a hearty and satisfying dinner, this recipe is sure to impress. So gather your ingredients, preheat your oven, and get ready to experience the magic of slow-roasted brisket. Enjoy!
Questions and Answers:
Q1: Can I use a different type of oil instead of olive oil? A: Yes, you can substitute the olive oil with another type of oil with a high smoke point, such as avocado oil, canola oil, or vegetable oil.
Q2: What if I don’t have smoked paprika? Can I use regular paprika instead? A: While smoked paprika adds a distinctive smoky flavor, you can use regular paprika as a substitute. However, the overall flavor profile will be slightly different. Consider adding a pinch of smoked salt to compensate for the lack of smokiness.
Q3: How do I reheat leftover brisket without drying it out? A: To reheat leftover brisket, wrap it tightly in foil with a few tablespoons of beef broth or water. Reheat in a low oven (around 250°F or 120°C) until warmed through. Alternatively, you can microwave it in short intervals, covered, with a splash of liquid.
Q4: My brisket turned out tough. What did I do wrong? A: There are several reasons why your brisket might have turned out tough:
- Under-cooking: Brisket requires a long, slow cooking time to break down the tough connective tissues. Ensure you cook it until it is fork-tender.
- Over-cooking: While less common, overcooking can also dry out the brisket and make it tough. Use a meat thermometer to ensure it reaches the ideal internal temperature.
- Slicing with the Grain: Always slice the brisket against the grain to shorten the muscle fibers and make it easier to chew.
- Insufficient Resting Time: Allowing the brisket to rest for at least 20 minutes before slicing is crucial for the juices to redistribute throughout the meat.
Q5: Can I freeze leftover brisket? A: Yes, you can freeze leftover brisket. Wrap it tightly in freezer-safe plastic wrap, then place it in a freezer bag. Remove as much air as possible to prevent freezer burn. Frozen brisket can be stored for up to 2-3 months. Thaw it in the refrigerator overnight before reheating.