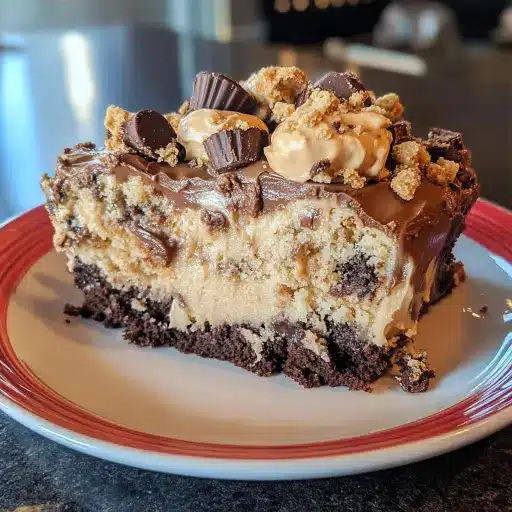
Description: This Peanut Butter Cup Dump Cake is the ultimate easy-to-make dessert for chocolate and peanut butter aficionados. It’s a decadent, gooey, and utterly satisfying treat that requires minimal effort, making it perfect for potlucks, weeknight cravings, or any occasion where you need a crowd-pleasing dessert without spending hours in the kitchen. Imagine layers of rich chocolate cake, pockets of creamy peanut butter, and a generous topping of melted chocolate chips and chopped peanut butter cups. This dump cake is a symphony of flavors and textures that will have everyone reaching for seconds! It’s so simple, even beginner bakers can achieve perfect results every time.
Ingredients:
- 1 box (15.25 oz) chocolate cake mix
- 1 cup creamy peanut butter
- 1 cup milk (any kind works – whole, 2%, almond, etc.)
- 1 cup chocolate chips (semi-sweet or milk chocolate, your preference)
- 1 cup peanut butter cups, chopped (about 10-12 regular-sized cups)
- 1/2 cup vegetable oil (canola or melted coconut oil work as alternatives)
- 3 large eggs
- 1 teaspoon vanilla extract
- 1 cup powdered sugar (for optional topping, adds a beautiful, sweet finish)
Preparation:
Step 1: Preheat and Prep
Preheat your oven to 350°F (175°C). This ensures that the cake bakes evenly and thoroughly. Grease a 9×13-inch baking dish generously. You can use butter, shortening, or a non-stick cooking spray. Make sure to get into all the corners and edges to prevent the cake from sticking. This will make it easier to remove the cake once it’s baked and cooled. If you’re particularly worried about sticking, you can line the baking dish with parchment paper, leaving an overhang on the sides for easy lifting.
Step 2: Combine the Wet and Dry
In a large mixing bowl, whisk together the chocolate cake mix, vegetable oil, milk, eggs, and vanilla extract. It’s important to use a large bowl because the batter will expand as you mix it. Start by whisking the dry cake mix to break up any lumps. Then, add the wet ingredients one at a time, mixing after each addition. Be careful not to overmix the batter, as this can lead to a tough cake. Mix just until everything is well combined and the batter is smooth.
Step 3: Layer One
Pour half of the chocolate cake batter into the prepared baking dish. Use a spatula or spoon to spread it evenly across the bottom of the dish. This will create the base layer of your cake. Make sure the layer is uniform in thickness to ensure even baking. If the batter is a bit thick, you can gently tap the baking dish on the counter to help it settle.
Step 4: Add the Peanut Butter and Half the Toppings
Drop spoonfuls of creamy peanut butter over the chocolate cake batter. You can use a spoon or a small ice cream scoop to distribute the peanut butter evenly. Try to space the spoonfuls apart so that each bite of cake has a pocket of peanut butter. Then, sprinkle half of the chocolate chips and chopped peanut butter cups on top of the peanut butter layer. This creates a gooey, chocolatey, peanut-buttery layer that is sure to please. Make sure to distribute the chocolate chips and peanut butter cups evenly so that every piece of the cake has a good amount of toppings.
Step 5: Layer Two and the Final Toppings
Pour the remaining chocolate cake batter over the peanut butter layer. Gently spread it out to cover the peanut butter and chocolate chips. Be careful not to disturb the peanut butter layer too much. You can use a spatula or the back of a spoon to smooth out the top of the batter. Finally, top the cake with the remaining chocolate chips and chopped peanut butter cups. This final layer of toppings will melt into the cake as it bakes, creating a beautiful and delicious crust.
Step 6: Bake
Bake in the preheated oven for 30-35 minutes, or until a toothpick inserted into the center comes out clean. The baking time may vary depending on your oven, so it’s important to keep an eye on the cake. To test for doneness, insert a toothpick into the center of the cake. If it comes out clean or with a few moist crumbs attached, the cake is done. If the toothpick comes out with wet batter, continue baking for a few more minutes and test again.
Step 7: Cool and Serve
Allow the cake to cool slightly in the baking dish before dusting with powdered sugar, if desired. Let the cake cool for at least 15-20 minutes before serving. This will allow the cake to set up slightly and prevent it from falling apart when you cut into it. If you want to add a touch of elegance, dust the top of the cake with powdered sugar. You can use a sifter or a small strainer to create an even layer of powdered sugar. Serve the cake warm for the ultimate indulgence.
Why You Will Love This Recipe:
- Simplicity: This recipe is incredibly easy to make. It truly is a “dump cake,” meaning you simply dump the ingredients together and bake!
- Flavor Combination: The marriage of chocolate and peanut butter is a classic for a reason. This cake perfectly captures that irresistible pairing.
- Crowd-Pleaser: This cake is a guaranteed hit at parties, potlucks, or any gathering. Everyone loves it!
- Customizable: You can easily adapt this recipe to your liking. Use different types of chocolate chips, add nuts, or even swirl in some caramel sauce.
- Minimal Clean-Up: Because it’s a dump cake, there are fewer dishes to wash!
Serving Suggestions:
- Serve warm with a scoop of vanilla ice cream for a decadent treat.
- Drizzle with melted peanut butter or chocolate sauce for an extra touch of indulgence.
- Top with whipped cream and a sprinkle of chopped peanut butter cups.
- Serve with a glass of cold milk or a cup of hot coffee.
- Enjoy it as a dessert after a casual dinner or bring it to your next potluck.
Tips:
- Make sure your baking dish is well-greased to prevent the cake from sticking.
- Don’t overmix the batter, as this can make the cake tough.
- If you want a richer flavor, use dark chocolate chips or add a tablespoon of instant coffee granules to the batter.
- For a more decadent topping, melt additional chocolate chips and peanut butter cups and drizzle over the cooled cake.
- If you don’t have peanut butter cups, you can substitute with other chocolate candies like Reese’s Pieces or chopped chocolate bars.
- To prevent the peanut butter from sinking to the bottom of the cake, try chilling it slightly before adding it to the batter.
- Store leftover cake in an airtight container at room temperature for up to 3 days.
- For a gluten-free version, use a gluten-free chocolate cake mix.
Prep Time: 15 minutes
Cook Time: 35 minutes
Total Time: 50 minutes
Nutritional Information:
(Approximate values per serving)
- Calories: 450 kcal (Note: This is an estimate and can vary depending on the exact ingredients and portion sizes)
- Protein: 6g (estimated)
- Sodium: 300mg (estimated)
Conclusion:
This Peanut Butter Cup Dump Cake is a winner in every way. It’s quick, easy, delicious, and guaranteed to satisfy your sweet tooth. Whether you’re a seasoned baker or a beginner, this recipe is foolproof and always delivers amazing results. The combination of moist chocolate cake, creamy peanut butter, and melted chocolate chips is simply irresistible. So, gather your ingredients and get ready to indulge in a slice of heaven! This Peanut Butter Cup Dump Cake is more than just a dessert; it’s an experience!
Questions and Answers about the Peanut Butter Cup Dump Cake:
Q1: Can I use a different type of cake mix?
A: Absolutely! While this recipe calls for chocolate cake mix, you can certainly experiment with other flavors. Devil’s food cake mix would enhance the richness, or you could try a yellow or butter cake mix for a lighter, more buttery flavor that still complements the peanut butter. Red velvet cake mix could also offer a unique and visually appealing twist. Just remember that different cake mixes might require slightly adjusted baking times, so keep an eye on the cake as it bakes.
Q2: I don’t have peanut butter cups. What else can I use?
A: No problem! There are plenty of delicious substitutes for peanut butter cups. Reese’s Pieces are a great alternative that provides a similar peanut butter candy flavor. You could also use chopped peanut butter chocolate bars, such as Snickers or Butterfinger, for a different textural element. For a non-peanut butter option, try using chopped chocolate bars (milk, dark, or white) or even other candies like M&Ms or chopped Oreos for a totally different but equally delicious flavor profile. Get creative and use what you have on hand!
Q3: Can I make this cake ahead of time?
A: Yes, you can definitely make this cake ahead of time! It’s actually often better the next day, as the flavors have a chance to meld together. Allow the cake to cool completely before covering it tightly with plastic wrap or transferring it to an airtight container. Store it at room temperature for up to 2-3 days, or in the refrigerator for up to 5 days. When you’re ready to serve, you can warm it slightly in the microwave for a few seconds to restore its gooey texture.
Q4: Can I freeze this dump cake?
A: Yes, you can freeze this dump cake, but it’s best to do so before adding the powdered sugar topping. Let the cake cool completely, then cut it into individual slices. Wrap each slice tightly in plastic wrap, followed by a layer of aluminum foil or place the slices in a freezer-safe container. This will help prevent freezer burn. The cake can be stored in the freezer for up to 2-3 months. When you’re ready to eat it, thaw it in the refrigerator overnight or at room temperature for a few hours.
Q5: My cake is browning too quickly on top. What should I do?
A: If you notice that the top of your cake is browning too quickly before the center is fully baked, you can tent it with aluminum foil. Simply loosely cover the baking dish with a sheet of aluminum foil, making sure it doesn’t touch the cake directly. This will help deflect some of the heat and prevent the top from burning while allowing the center to continue baking. You can also try lowering the oven temperature by 25 degrees Fahrenheit. Keep a close eye on the cake and remove the foil during the last few minutes of baking if necessary to allow the top to brown slightly.