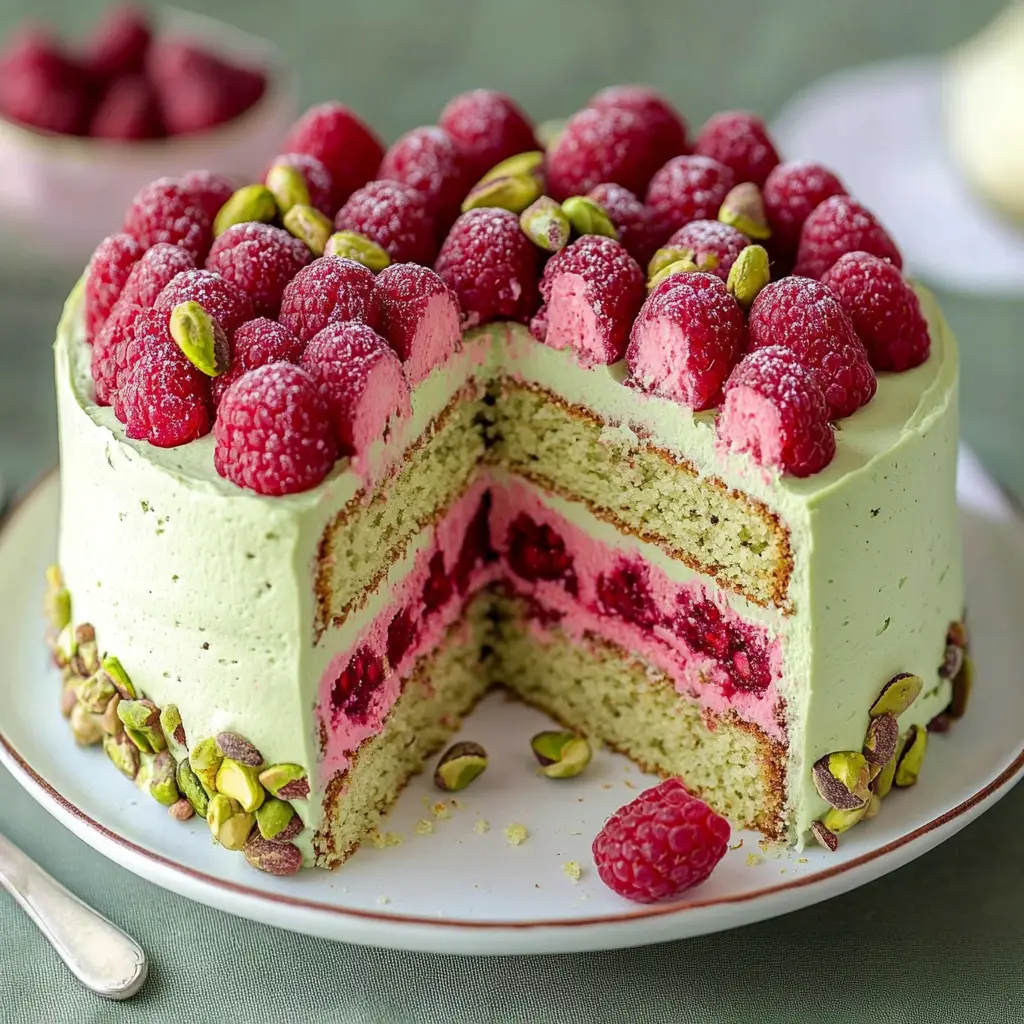
Description of this recipe: This Pistachio Raspberry Cake is a delightful treat that combines the nutty flavor of pistachios with the sweet and tangy burst of fresh raspberries. The cake is moist, tender, and perfectly balanced with a luscious buttercream frosting, making it an ideal dessert for any occasion.
Why you will love this recipe: You will fall in love with this Pistachio Raspberry Cake because it is not only visually stunning but also incredibly delicious. The combination of flavors and textures is simply irresistible. The ground pistachios add a unique nutty dimension to the cake, while the fresh raspberries provide a juicy and tangy contrast. The buttercream frosting is the perfect complement, adding a touch of sweetness and richness. This cake is sure to impress your family and friends, and it’s surprisingly easy to make at home.
Introduction
The Pistachio Raspberry Cake is a celebration of flavors and textures that come together in perfect harmony. This cake is a showstopper, ideal for birthdays, holidays, or any special occasion where you want to impress your guests. The vibrant green hue from the pistachios and the ruby red bursts from the raspberries make it visually appealing, while the moist and tender crumb, coupled with the creamy frosting, make it a delight to eat. This recipe will guide you through the process of creating this masterpiece, ensuring that you achieve a perfect balance of flavors and textures in every bite. So, gather your ingredients and let’s embark on a baking adventure to create a cake that’s as beautiful as it is delicious!
Ingredients:
For the Cake:
- 1 cup unsalted butter, softened
- 1 ½ cups sugar
- 4 large eggs
- 2 cups all-purpose flour
- 1 cup ground pistachios
- 1 teaspoon baking powder
- ½ teaspoon salt
- 1 cup buttermilk
- 1 cup fresh raspberries
For the Frosting:
- 1 cup unsalted butter, softened
- 4 cups powdered sugar
- 2 tablespoons milk
- 1 teaspoon vanilla extract
- ½ cup crushed pistachios (for garnish)
- Fresh raspberries (for decoration)
Preparation:
Step 1: Preheat your oven to 350°F (175°C). Prepare your cake pan by greasing it thoroughly with butter or cooking spray. For extra insurance against sticking, you can also line the bottom of the pan with parchment paper. This is especially helpful if you are using a decorative pan or one that has intricate details. Set the prepared pan aside.
Step 2: In a large mixing bowl, cream together the softened butter and sugar until the mixture is light and fluffy. This usually takes about 3–5 minutes using an electric mixer. Creaming the butter and sugar incorporates air into the mixture, which is essential for a light and tender cake. Make sure your butter is at room temperature for easy creaming. You’ll know it’s ready when the mixture is pale in color and has a fluffy texture.
Step 3: Beat in the eggs one at a time, mixing thoroughly after each addition. This ensures that each egg is fully incorporated into the batter, creating a smooth and emulsified mixture. Beating each egg in individually also helps to prevent the batter from curdling. Continue mixing until the batter is well combined and has a consistent texture.
Step 4: In a separate bowl, whisk together the all-purpose flour, ground pistachios, baking powder, and salt. Whisking these dry ingredients together ensures that they are evenly distributed throughout the batter. The ground pistachios add a nutty flavor and a slightly coarse texture to the cake, while the baking powder helps the cake rise. The salt enhances the flavors of the other ingredients.
Step 5: Gradually add the dry mixture to the butter mixture, alternating with the buttermilk. Begin by adding about one-third of the dry ingredients to the butter mixture, and then add half of the buttermilk. Mix until just combined. Repeat with another third of the dry ingredients, followed by the remaining buttermilk. Finish with the last third of the dry ingredients. This method prevents the gluten in the flour from developing too much, which can result in a tough cake. Mix until the batter is just combined, being careful not to overmix.
Step 6: Gently fold in the fresh raspberries without breaking them apart. Folding the raspberries into the batter ensures that they remain intact and don’t bleed their color into the batter. Be gentle when folding, using a spatula to lift the batter from the bottom of the bowl and fold it over the raspberries. Continue folding until the raspberries are evenly distributed throughout the batter.
Step 7: Pour the batter into the prepared cake pan and smooth the top with a spatula. This ensures that the cake bakes evenly and has a level surface. Gently tap the pan on the counter a few times to release any trapped air bubbles.
Step 8: Bake in the preheated oven for 30–35 minutes, or until a toothpick inserted into the center of the cake comes out clean. Baking times may vary depending on your oven, so it’s important to check the cake for doneness after 30 minutes. If the toothpick comes out with wet batter, continue baking for a few more minutes and check again.
Step 9: Let the cake cool in the pan for 10 minutes before transferring it to a wire rack to cool completely. Cooling the cake in the pan allows it to set and prevents it from breaking apart when you transfer it to the wire rack. Once the cake is completely cool, you can frost it with the buttercream frosting.
Step 10: While the cake is cooling, prepare the buttercream frosting. In a large mixing bowl, cream together the softened butter until it is smooth and creamy. Gradually add the powdered sugar, one cup at a time, mixing on low speed until each addition is fully incorporated. Add the milk and vanilla extract, and beat on high speed until the frosting is light and fluffy.
Step 11: Once the cake is completely cool, frost it with the buttercream frosting. You can use a spatula or a piping bag to apply the frosting. If you want to create a smooth surface, use a spatula to spread the frosting evenly over the top and sides of the cake. If you want to create a more decorative effect, use a piping bag fitted with a decorative tip to pipe swirls or other designs onto the cake.
Step 12: Garnish the cake with crushed pistachios and fresh raspberries. This adds a touch of elegance and visual appeal to the cake. Arrange the pistachios and raspberries in a decorative pattern on top of the frosting.
COOKING Rating: 5/5 Stars (Exceptional)
Serving Suggestions:
- Serve slices of the Pistachio Raspberry Cake with a scoop of vanilla ice cream or a dollop of whipped cream.
- Pair it with a cup of coffee or tea for a delightful afternoon treat.
- Garnish individual slices with extra raspberries and a sprinkle of crushed pistachios.
- Serve chilled for a refreshing dessert on a warm day.
Tips:
- Make sure all your ingredients are at room temperature for optimal mixing.
- Use high-quality pistachios for the best flavor.
- Don’t overmix the batter, as this can result in a tough cake.
- Gently fold in the raspberries to prevent them from breaking apart and bleeding into the batter.
- Allow the cake to cool completely before frosting to prevent the frosting from melting.
Prep Time: 30 minutes
Cook Time: 30-35 minutes
Total Time: 1 hour (plus cooling time)
Nutritional Information: (Approximate per serving)
Calories: 450 kcal Protein: 5 g Sodium: 150 mg
Conclusion
The Pistachio Raspberry Cake is a testament to the magic that happens when complementary flavors and textures unite. The nutty, earthy notes of pistachios blend beautifully with the sweet-tart tang of raspberries, creating a symphony of flavors that dance on your palate. Whether you’re celebrating a special occasion or simply want to treat yourself to something extraordinary, this cake is sure to impress. With its vibrant colors, moist crumb, and luscious frosting, the Pistachio Raspberry Cake is more than just a dessert; it’s an experience to be savored and shared. So, go ahead, bake this masterpiece and create memories that will last a lifetime.
5 Questions and Answers About This Recipe:
Q1: Can I use frozen raspberries instead of fresh raspberries?
A: While fresh raspberries are preferred for their texture and flavor, you can use frozen raspberries if fresh ones are not available. However, keep in mind that frozen raspberries tend to be more delicate and may bleed their color into the batter more easily. To minimize this, do not thaw the raspberries before adding them to the batter, and fold them in gently.
Q2: Can I make this cake ahead of time?
A: Yes, you can definitely make this cake ahead of time. The unfrosted cake can be stored at room temperature for up to 2 days or in the refrigerator for up to 5 days. Wrap it tightly in plastic wrap to prevent it from drying out. The frosted cake should be stored in the refrigerator and is best consumed within 3 days.
Q3: Can I use a different type of nut instead of pistachios?
A: Absolutely! If you’re not a fan of pistachios or have a nut allergy, you can substitute them with other nuts such as almonds, walnuts, or pecans. Just make sure to grind the nuts finely before adding them to the batter. Each nut will impart its own unique flavor to the cake, so choose one that complements the raspberries.
Q4: What if I don’t have buttermilk?
A: If you don’t have buttermilk on hand, you can easily make a substitute by adding 1 tablespoon of white vinegar or lemon juice to a liquid measuring cup, then filling it with milk until it reaches the 1-cup mark. Stir the mixture and let it sit for 5 minutes before using it in the recipe. This will create a tangy liquid that mimics the acidity and thickness of buttermilk.
Q5: Can I make cupcakes instead of a cake?
A: Yes, you can easily adapt this recipe to make cupcakes. Simply fill cupcake liners about two-thirds full with the batter and bake for 18-20 minutes, or until a toothpick inserted into the center comes out clean. The baking time may vary depending on your oven, so keep a close eye on them. Once the cupcakes are cool, frost them with the buttercream frosting and garnish with crushed pistachios and fresh raspberries.