Description of this Recipe
These Pumpkin Pie Pop Tarts are a delightful twist on a classic autumn dessert and the beloved toaster pastry. Imagine the warm, comforting flavors of pumpkin pie encased in a flaky, buttery crust, all perfectly portioned for a handheld treat. These homemade pop tarts are far superior to the store-bought version, offering a richer, more authentic taste that will transport you straight to a cozy fall day. Whether you’re looking for a fun baking project or a unique dessert to impress your friends and family, these Pumpkin Pie Pop Tarts are sure to be a hit. They’re perfect for breakfast, brunch, or a sweet snack any time of day.
Why You Will Love This Recipe
There are countless reasons to fall in love with these Pumpkin Pie Pop Tarts:
- Homemade Goodness: Unlike the commercially produced pop tarts filled with artificial flavors and preservatives, these are made from scratch with real ingredients, offering a taste that is both authentic and satisfying.
- Perfect Fall Flavor: The combination of pumpkin puree and warm spices like cinnamon, nutmeg, and cloves creates that quintessential autumnal flavor profile that everyone craves during the cooler months.
- Customizable: The recipe is incredibly versatile. You can adjust the amount of spices to suit your personal preferences, experiment with different glazes, or add decorative sprinkles for a festive touch.
- Fun to Make: Baking these pop tarts is a fun and engaging activity, perfect for getting kids involved in the kitchen. The process of making the dough, filling the tarts, and decorating them is a rewarding experience.
- Portable and Convenient: These pop tarts are easy to transport, making them ideal for picnics, lunchboxes, or road trips. They’re a delicious and convenient snack that you can enjoy on the go.
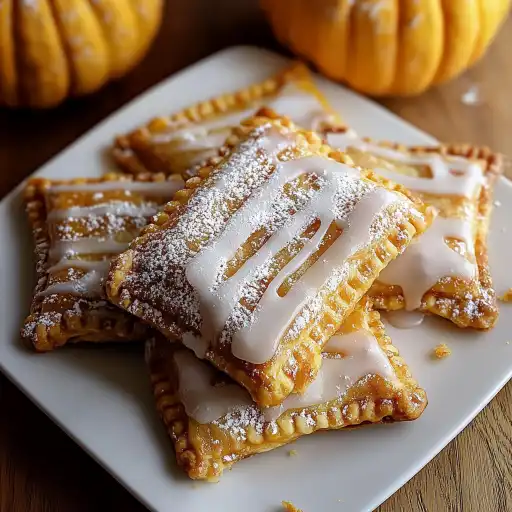
- Impressive Presentation: The golden-brown crust and decorative glaze make these pop tarts visually appealing. They’re a great dessert to serve at gatherings or to give as homemade gifts.
- A Nostalgic Twist: This recipe offers a nostalgic nod to the classic pop tart, but with a sophisticated, homemade twist. It’s a fun way to relive childhood memories while enjoying a more refined and flavorful treat.
Ingredients:
- 2 cups all-purpose flour
- 1 tablespoon granulated sugar
- ½ teaspoon salt
- 1 cup (2 sticks) unsalted butter, chilled and cubed
- 6 to 8 tablespoons ice water
- 1 cup pumpkin puree
- ⅓ cup packed brown sugar
- ½ teaspoon ground cinnamon
- ¼ teaspoon ground nutmeg
- ⅛ teaspoon ground cloves
- ¼ teaspoon ground ginger
- 1 egg yolk
- 2 teaspoons vanilla extract
- 1 egg, beaten (for egg wash)
- ½ cup confectioners’ sugar
- 1 to 2 tablespoons milk
- Sprinkles or coarse sugar for decoration (optional)
Preparation:
Step 1: Make the Dough
In a large bowl, whisk together the all-purpose flour, granulated sugar, and salt. This ensures that the dry ingredients are evenly distributed throughout the dough, resulting in a consistent texture and flavor.
Step 2: Cut in the Butter
Add the chilled and cubed unsalted butter to the flour mixture. Using a pastry cutter or two knives, cut the butter into the flour until the mixture resembles coarse crumbs. This process is crucial for creating a flaky crust. The cold butter pieces will create pockets of steam as the pop tarts bake, resulting in layers of flaky goodness. Work quickly to prevent the butter from melting, as melted butter will result in a tough crust.
Step 3: Add the Ice Water
Gradually add the ice water, one tablespoon at a time, mixing with a fork until the dough comes together. Be careful not to overmix the dough, as this can develop the gluten and make the crust tough. The dough should be just moist enough to hold together when pressed.
Step 4: Chill the Dough
Divide the dough into two equal parts, flatten them into discs, wrap them tightly in plastic wrap, and refrigerate for at least 1 hour. Chilling the dough allows the gluten to relax and the butter to solidify, which will make the dough easier to roll out and prevent it from shrinking during baking. You can even chill the dough overnight for optimal results.
Step 5: Prepare the Pumpkin Filling
In a medium bowl, whisk together the pumpkin puree, packed brown sugar, ground cinnamon, ground nutmeg, ground cloves, ground ginger, egg yolk, and vanilla extract until well combined. The egg yolk adds richness and helps to bind the filling together, while the vanilla extract enhances the overall flavor profile. Taste the filling and adjust the spices to your liking.
Step 6: Preheat the Oven and Prepare the Baking Sheet
Preheat your oven to 375°F (190°C). Line a baking sheet with parchment paper. Parchment paper prevents the pop tarts from sticking to the baking sheet and makes cleanup a breeze.
Step 7: Roll Out the Dough
On a lightly floured surface, roll out one dough disc to about 1/8-inch thickness. Use a sharp knife or a pizza cutter to cut the dough into 3×4 inch rectangles. Repeat with the remaining dough. Try to keep the rectangles as uniform as possible for a professional-looking result.
Step 8: Fill the Pop Tarts
Place half of the rectangles on the prepared baking sheet. Spoon about 1 tablespoon of the pumpkin filling onto each rectangle, leaving a small border around the edges. Be careful not to overfill the pop tarts, as the filling may leak out during baking.
Step 9: Seal the Edges
Brush the edges of the filled rectangles with the beaten egg wash. This will help the top and bottom layers of dough adhere to each other and create a golden-brown crust. Place another rectangle on top of each filled rectangle and use a fork to crimp and seal the edges. Press firmly to ensure that the edges are completely sealed, preventing the filling from leaking out.
Step 10: Vent and Brush with Egg Wash
Prick the tops of the pop tarts with a fork to allow steam to escape during baking. This will prevent the pop tarts from puffing up and cracking. Brush the tops with additional egg wash for a glossy finish.
Step 11: Bake the Pop Tarts
Bake for 20-25 minutes, or until the pop tarts are golden brown. Keep a close eye on them during the last few minutes of baking to prevent them from burning.
Step 12: Cool the Pop Tarts
Remove the pop tarts from the oven and allow them to cool on a wire rack. This will prevent the bottoms from becoming soggy.
Step 13: Make the Glaze
In a small bowl, whisk together the confectioners’ sugar and milk until smooth. Add more milk, one teaspoon at a time, until the glaze reaches your desired consistency.
Step 14: Glaze and Decorate
Drizzle the glaze over the cooled pop tarts and sprinkle with decorative sugar or sprinkles, if desired. The glaze will set as it cools, creating a sweet and visually appealing finish.
COOKING Rating:
- Difficulty: Intermediate
- Taste: Exceptional
- Visual Appeal: High
Serving Suggestions:
- Serve warm or at room temperature.
- Pair with a cup of hot coffee or tea.
- Enjoy as a breakfast treat, snack, or dessert.
- Serve with a dollop of whipped cream or a scoop of vanilla ice cream for an extra decadent treat.
Tips:
- Use cold butter and ice water for the flakiest crust.
- Don’t overmix the dough.
- Chill the dough for at least 1 hour before rolling it out.
- Crimp the edges firmly to prevent the filling from leaking out.
- Prick the tops of the pop tarts to allow steam to escape.
- Adjust the spices in the pumpkin filling to your liking.
- Get creative with the glaze and decorations.
Prep Time:
- 30 minutes
Cook Time:
- 20-25 minutes
Total Time:
- 1 hour 20 minutes (including chilling time)
Nutritional Information:
(Note: Nutritional information is an estimate and may vary based on specific ingredients and portion sizes.)
- Calories: Approximately 300-350 per pop tart
- Protein: Approximately 4-5 grams per pop tart
- Sodium: Approximately 150-200 mg per pop tart
Conclusion
These Pumpkin Pie Pop Tarts are more than just a recipe; they’re an experience. From the satisfying process of making the dough to the delightful aroma that fills your kitchen as they bake, these homemade treats are sure to bring joy to your day. So, gather your ingredients, roll up your sleeves, and get ready to create a batch of these irresistible autumn pastries. Whether you’re sharing them with loved ones or savoring them all by yourself, these Pumpkin Pie Pop Tarts are a delicious way to celebrate the flavors of fall.
Questions and Answers About This Recipe
Q1: Can I use store-bought pie crust instead of making my own?
A: While homemade pie crust is highly recommended for the best flavor and texture, you can use store-bought pie crust as a shortcut. Be sure to use a high-quality brand and allow it to come to room temperature slightly before rolling it out. Keep in mind that the taste and texture may not be quite as good as with homemade crust.
Q2: Can I make these pop tarts ahead of time?
A: Yes, you can make the dough ahead of time and store it in the refrigerator for up to 2 days or in the freezer for up to 2 months. Be sure to wrap it tightly in plastic wrap to prevent it from drying out. You can also bake the pop tarts ahead of time and store them in an airtight container at room temperature for up to 3 days. Reheat them slightly in the oven or toaster before serving.
Q3: Can I use different spices in the pumpkin filling?
A: Absolutely! Feel free to customize the spices in the pumpkin filling to your liking. You can add a pinch of allspice, cardamom, or even a dash of cayenne pepper for a little kick. Experiment with different combinations to find your perfect blend.
Q4: How do I prevent the filling from leaking out during baking?
A: To prevent the filling from leaking out, be sure to leave a small border around the edges of the dough when spooning in the filling. Also, crimp the edges firmly with a fork to seal them tightly. Pricking the tops of the pop tarts with a fork will also help to release steam and prevent the filling from bubbling over.
Q5: What can I use instead of milk in the glaze?
A: If you don’t have milk on hand, you can use water, cream, or even a flavored liqueur like almond or vanilla extract in the glaze. Just add a small amount at a time until you reach your desired consistency.