Description of this recipe:
Red Velvet Brownie Pie is a delightful fusion of two classic desserts: the rich, fudgy goodness of brownies and the comforting structure of a pie. This recipe elevates the traditional brownie by embedding it in a flaky pie crust, offering a unique textural contrast and a visually stunning treat. The signature red hue and subtle cocoa flavor make it a standout dessert, perfect for holidays, special occasions, or simply when you crave something extraordinary. The addition of a cream cheese frosting or a dusting of powdered sugar enhances its appeal, making it irresistible to both the eye and the palate.
Why you will love this recipe:
You’ll adore this Red Velvet Brownie Pie for several compelling reasons:
- Unique Texture and Flavor Combination: This pie combines the chewy, fudgy texture of a brownie with the flaky, buttery crust of a pie, creating a delightful contrast that is both satisfying and exciting. The subtle tang of the red velvet flavor, combined with the rich chocolate notes, makes each bite a complex and enjoyable experience.
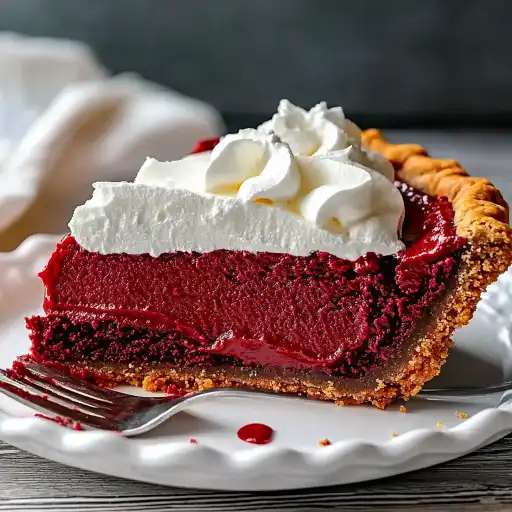
- Visually Stunning: The vibrant red color of the brownie filling, paired with a beautifully browned pie crust, makes this dessert a showstopper. Whether you’re serving it at a dinner party or a holiday gathering, its striking appearance will undoubtedly impress your guests.
- Easy to Make: Despite its sophisticated appearance, this recipe is surprisingly simple to execute. It requires minimal ingredients and straightforward steps, making it accessible to bakers of all skill levels. You can even use a store-bought pie crust to save time without compromising on taste.
- Versatile and Customizable: The Red Velvet Brownie Pie is incredibly versatile. You can customize it with various toppings such as cream cheese frosting, powdered sugar, whipped cream, or even a scoop of vanilla ice cream. Feel free to experiment with different extracts and decorations to suit your personal preferences.
- Perfect for Any Occasion: Whether it’s a birthday, a holiday celebration, or a casual get-together, this pie is the perfect dessert to share with loved ones. Its decadent flavor and beautiful presentation make it a memorable addition to any event.
Ingredients:
- 1 unbaked 9-inch pie crust (homemade or store-bought)
- ½ cup (115 g) unsalted butter, melted
- 1 cup (200 g) granulated sugar
- 1 teaspoon vanilla extract
- 1 tablespoon unsweetened cocoa powder
- 1 tablespoon red food coloring (liquid or gel)
- 1 teaspoon white vinegar
- 2 large eggs
- ¾ cup (95 g) all-purpose flour
- ¼ teaspoon salt
- Optional Toppings:
- Cream cheese frosting
- Powdered sugar for dusting
- Whipped cream or vanilla ice cream for serving
Preparation:
Step 1: Preheat the oven.
Begin by preheating your oven to 350°F (175°C). Ensuring your oven is properly preheated is crucial for even baking and a perfectly set brownie pie. Place your unbaked 9-inch pie crust in a pie dish. If you’re using a homemade crust, make sure it’s well-chilled before placing it in the dish to prevent it from shrinking during baking. Set the prepared crust aside while you prepare the brownie batter.
Step 2: Make the batter.
In a medium-sized mixing bowl, whisk together the melted butter and granulated sugar until the mixture is glossy and well combined. This step is important for creating a smooth and even texture in your brownie pie. Add the eggs one at a time, mixing well after each addition to ensure they are fully incorporated. Stir in the vanilla extract, unsweetened cocoa powder, red food coloring, and white vinegar. Mix until the batter is smooth and the color is uniform. The vinegar helps to enhance the red color and add a slight tang to the flavor profile.
Step 3: Add dry ingredients.
Sift the all-purpose flour and salt into the wet ingredients. Sifting the flour helps to prevent lumps and ensures a lighter, more tender brownie texture. Gently fold the dry ingredients into the wet ingredients until just combined. Be careful not to overmix the batter, as this can result in a tough brownie. The goal is to mix until the flour streaks disappear, leaving you with a smooth and homogenous batter.
Step 4: Fill the crust.
Pour the brownie batter into the prepared pie crust. Use a spatula to spread the batter evenly across the bottom of the crust, ensuring it reaches all the edges. This will help to create a consistent thickness and prevent any uneven baking.
Step 5: Bake.
Place the pie dish in the preheated oven and bake for 30–35 minutes, or until the brownie is set but still slightly fudgy in the center. To test for doneness, insert a toothpick into the center of the pie. The toothpick should come out with a few moist crumbs attached. This indicates that the brownie is perfectly baked – set on the edges but still deliciously gooey in the middle.
Step 6: Cool completely.
Remove the pie from the oven and let it cool completely on a wire rack. This is crucial for allowing the brownie to set properly. Cooling the pie for at least 1 hour will prevent it from being too soft and messy when you slice it.
Step 7: Finish and serve.
Once the pie is completely cool, you can finish it with your choice of toppings. Frost it with a generous layer of cream cheese frosting for a classic red velvet flavor combination. Alternatively, dust it with powdered sugar for a simple yet elegant finish. Serve the Red Velvet Brownie Pie with a dollop of whipped cream or a scoop of vanilla ice cream for an extra touch of indulgence.
COOKING Rating:
- Difficulty: Easy
- Prep Time: 15 minutes
- Cook Time: 30-35 minutes
Serving Suggestions:
- Serve chilled or at room temperature for the best texture and flavor.
- Pair with a scoop of vanilla ice cream or a dollop of whipped cream.
- Garnish with fresh berries or chocolate shavings for an elegant presentation.
- Enjoy with a cup of coffee, tea, or a glass of cold milk.
Tips:
- Use a high-quality red food coloring to achieve the signature vibrant red hue of red velvet. Gel food coloring is recommended for its concentrated color and minimal impact on batter consistency.
- Do not overmix the batter to ensure a tender brownie texture. Mix only until the flour streaks disappear.
- If the pie crust edges are browning too quickly, cover them with aluminum foil during the last 10-15 minutes of baking.
- For a richer flavor, use dark cocoa powder instead of regular unsweetened cocoa powder.
- Store leftover pie in the refrigerator for up to 3 days to maintain its freshness and texture.
Prep Time: 15 minutes
Cook Time: 35 minutes
Total Time: 1 hour 45 minutes (includes cooling time)
Nutritional Information: (Note: Approximate values, will vary based on specific ingredients and serving size)
- Calories: 350-450 per serving
- Protein: 4-6g
- Sodium: 150-250mg
Conclusion:
The Red Velvet Brownie Pie is more than just a dessert; it’s an experience. Combining the best qualities of brownies and pies, this recipe offers a delightful textural contrast, a visually stunning presentation, and a flavor profile that is both comforting and exciting. Whether you’re baking for a special occasion or simply treating yourself, this pie is sure to impress. The ease of preparation, combined with the versatility of customization, makes it a recipe you’ll want to make again and again. Indulge in the decadent goodness of this Red Velvet Brownie Pie and elevate your dessert game to a whole new level.
Questions and Answers about this recipe:
Question 1: Can I use a gluten-free flour blend in this recipe?
Answer: Yes, you can substitute all-purpose flour with a gluten-free flour blend. Ensure that the blend you choose is designed for baking and contains xanthan gum to help bind the ingredients. Keep in mind that the texture of the brownie may be slightly different, potentially a bit more crumbly, compared to using regular flour.
Question 2: What can I use if I don’t have red food coloring?
Answer: If you don’t have red food coloring, you can use beet juice for a natural alternative, although it might alter the color and flavor slightly. Another option is to increase the amount of cocoa powder and add a touch of instant coffee to enhance the chocolate flavor, creating a rich, dark brownie without the red hue.
Question 3: How do I prevent the pie crust from getting soggy?
Answer: To prevent a soggy pie crust, blind bake it for about 10-15 minutes before adding the brownie filling. This involves pre-baking the crust partially to create a barrier against the moisture from the filling. You can also brush the bottom of the crust with a thin layer of melted chocolate to further seal it.
Question 4: Can I make this pie ahead of time?
Answer: Absolutely! The Red Velvet Brownie Pie can be made a day or two in advance. After baking, allow it to cool completely, then cover it tightly with plastic wrap and store it in the refrigerator. When you’re ready to serve, you can add your desired toppings like cream cheese frosting or powdered sugar. Making it ahead of time can actually enhance the flavors as they meld together.
Question 5: What is the best way to cut the pie for serving?
Answer: The best way to cut the pie neatly is to use a warm, sharp knife. Run the knife under hot water, then dry it before each cut. This will help the knife slice through the brownie and crust cleanly without tearing. For an extra clean cut, chill the pie in the refrigerator for about 30 minutes before slicing.