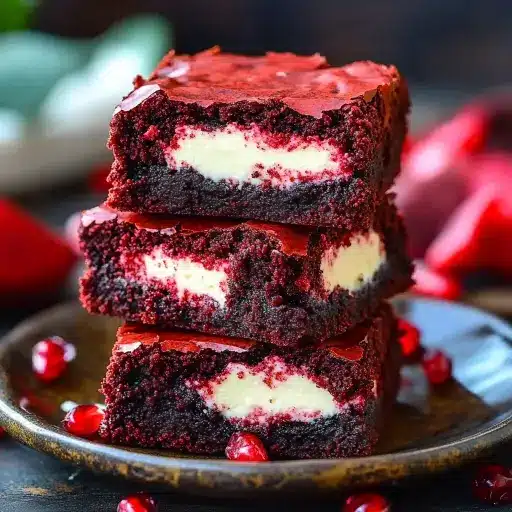
Description: Indulge in the decadent delight of these Red Velvet Cream Cheese Brownies. This recipe blends the classic, slightly tangy flavor of red velvet with the creamy, rich texture of a cream cheese swirl. The result is a fudgy, moist brownie with a beautiful marbled appearance that’s perfect for any occasion – from a casual weeknight treat to a special celebration. These brownies are surprisingly easy to make, utilizing simple ingredients and straightforward techniques, guaranteeing a show-stopping dessert that will impress everyone who tastes them. The combination of the vibrant red velvet base and the contrasting white cream cheese swirl creates a visually stunning and intensely flavorful treat.
Ingredients:
For the Red Velvet Brownie Batter:
- ½ cup (1 stick or 113g) unsalted butter, melted
- 1 cup (200g) granulated sugar
- 2 large eggs, at room temperature
- 2 teaspoons vanilla extract
- 1 tablespoon red food coloring (gel food coloring is recommended for best color)
- ⅓ cup (30g) unsweetened cocoa powder
- ¾ cup (90g) all-purpose flour
- ¼ teaspoon salt
For the Cream Cheese Filling:
- 8 ounces (225g) cream cheese, softened to room temperature
- ¼ cup (50g) granulated sugar
- 1 large egg, at room temperature
- ½ teaspoon vanilla extract
Preparation:
Before you begin, make sure all of your ingredients are measured out and prepared. Having everything ready to go will streamline the baking process and ensure consistent results. Ensure that the cream cheese and eggs are at room temperature, which allows them to blend more smoothly, resulting in a creamier filling and a better brownie texture.
Instructions:
Step 1: Preheat and Prepare
Preheat your oven to 350°F (175°C). This is a crucial step, as baking at the correct temperature ensures that the brownies bake evenly and achieve the desired fudgy texture. Grease an 8×8-inch baking pan thoroughly with butter, shortening, or cooking spray. Then, line the pan with parchment paper, leaving an overhang on two sides. This overhang will act as handles, making it easy to lift the brownies out of the pan once they’ve cooled completely. The parchment paper also prevents the brownies from sticking to the pan, ensuring clean slices.
Step 2: Make the Red Velvet Batter
In a medium-sized mixing bowl, whisk together the melted butter and granulated sugar until smooth and well combined. This step helps to incorporate air into the batter, creating a slightly lighter brownie. Ensure that the butter is not too hot, as this could cook the eggs prematurely. Add the eggs one at a time, beating well after each addition. Then, stir in the vanilla extract and red food coloring until the batter is a vibrant red color. Gel food coloring is recommended for a more intense color without adding excess liquid to the batter.
In a separate bowl, whisk together the cocoa powder, flour, and salt. This step ensures that the dry ingredients are evenly distributed throughout the batter, preventing clumps and creating a consistent brownie texture. Gradually add the dry ingredients to the wet ingredients, stirring until just combined. Be careful not to overmix the batter, as this can develop the gluten in the flour, resulting in tough brownies. Set aside about ¼ cup of this batter in a separate small bowl. This reserved batter will be used for the swirl topping.
Step 3: Make the Cream Cheese Filling
In a separate medium-sized mixing bowl, beat the softened cream cheese and granulated sugar together until smooth and creamy. Ensure that the cream cheese is completely softened to avoid lumps in the filling. Add the egg and vanilla extract, and continue beating until the filling is light and fluffy. Over-beating the cream cheese mixture can introduce too much air, which can cause the filling to puff up and then deflate during baking, so mix until just combined.
Step 4: Assemble the Brownies
Pour the majority of the red velvet batter into the prepared baking pan, spreading it evenly to create a uniform base. Then, carefully pour the cream cheese filling over the red velvet batter, spreading it gently with a spatula. You want to avoid mixing the two batters together at this stage.
Using a small spoon, drop spoonfuls of the reserved red velvet batter randomly over the cream cheese filling. Then, using a knife or a toothpick, gently swirl the red velvet batter into the cream cheese filling to create a marbled effect. Be careful not to over-swirl, as this can muddy the colors and create a less defined swirl pattern.
Step 5: Bake
Place the baking pan in the preheated oven and bake for 28–32 minutes, or until a toothpick inserted into the center of the brownies comes out with a few moist crumbs. The brownies should be set around the edges, but still slightly soft in the center. Avoid over-baking, as this can result in dry brownies.
Once the brownies are baked, remove them from the oven and let them cool completely in the pan before slicing. Cooling the brownies completely allows them to set properly, making them easier to slice and preventing them from crumbling. Once cooled, lift the brownies out of the pan using the parchment paper overhang and slice them into squares.
Why You Will Love This Recipe
These Red Velvet Cream Cheese Brownies are irresistible for several reasons. First, the combination of flavors – the slight tang of red velvet and the creamy richness of cream cheese – is simply divine. Second, the texture is perfect: fudgy, moist, and incredibly satisfying. Third, they look absolutely stunning, with their vibrant red and white swirls. But perhaps the best reason to love this recipe is that it’s easy to make, even for novice bakers. The simple ingredients and straightforward instructions ensure a successful bake every time. These brownies are a guaranteed crowd-pleaser, perfect for potlucks, parties, or simply a cozy night in.
Serving Suggestions:
- Serve the brownies chilled or at room temperature.
- Dust with powdered sugar for an elegant touch.
- Top with a scoop of vanilla ice cream or whipped cream for a decadent dessert.
- Pair with a cup of hot coffee or tea.
- Cut into smaller squares for a party or gathering.
Tips:
- Use gel food coloring for a vibrant red color without adding excess liquid.
- Ensure that the cream cheese and eggs are at room temperature for a smooth filling.
- Do not overmix the brownie batter, as this can result in tough brownies.
- Avoid over-baking the brownies to maintain their fudgy texture.
- Cool the brownies completely before slicing to prevent crumbling.
- For a more intense red velvet flavor, add a teaspoon of vinegar to the batter.
- Store leftover brownies in an airtight container at room temperature for up to 3 days or in the refrigerator for up to a week.
Prep Time: 15 minutes
Cook Time: 28-32 minutes
Total Time: Approximately 1 hour 15 minutes (including cooling time)
Nutritional Information: (Estimated per brownie, based on a recipe yielding 16 brownies)
- Calories: Approximately 250-300 calories
- Protein: Approximately 4-5 grams
- Sodium: Approximately 100-150 mg
Note: Nutritional information is an estimate and can vary based on specific ingredients and portion sizes.
Conclusion
Red Velvet Cream Cheese Brownies offer a delightful twist on classic brownies. The combination of the rich, slightly tangy red velvet and the creamy, sweet cream cheese swirl makes for an unforgettable dessert experience. Easy to make and visually appealing, these brownies are perfect for any occasion and are sure to impress. So go ahead, bake up a batch and treat yourself and your loved ones to this irresistible indulgence! The satisfying blend of flavors and textures will leave you craving more.
Frequently Asked Questions (FAQ)
Q1: Can I use a different size pan?
A: While this recipe is optimized for an 8×8-inch pan, you can adapt it for a 9×13-inch pan. However, you’ll need to adjust the baking time accordingly, likely reducing it by a few minutes. Keep a close eye on the brownies and check for doneness using the toothpick test. Note that using a larger pan will result in thinner brownies.
Q2: Can I make this recipe gluten-free?
A: Yes, you can substitute the all-purpose flour with a gluten-free all-purpose flour blend. Ensure that the blend is designed for baking and contains xanthan gum to provide structure to the brownies. The texture might be slightly different, but the flavor should remain similar.
Q3: Can I use a different type of food coloring?
A: While liquid food coloring can be used, gel food coloring is highly recommended for its concentrated color and minimal liquid content. Liquid food coloring may dilute the batter, potentially affecting the texture of the brownies.
Q4: Can I freeze these brownies?
A: Yes, these brownies freeze well. Allow them to cool completely, then wrap them tightly in plastic wrap and place them in a freezer-safe bag or container. They can be stored in the freezer for up to 2-3 months. Thaw them at room temperature before serving.
Q5: My cream cheese filling sank into the brownie batter. What did I do wrong?
A: This can happen if the cream cheese filling is too thin or the brownie batter is too thick. Make sure the cream cheese is fully softened and the egg is well incorporated into the filling. Also, be careful not to overmix the brownie batter. Gently spread the cream cheese filling over the brownie batter and avoid pressing down too hard.