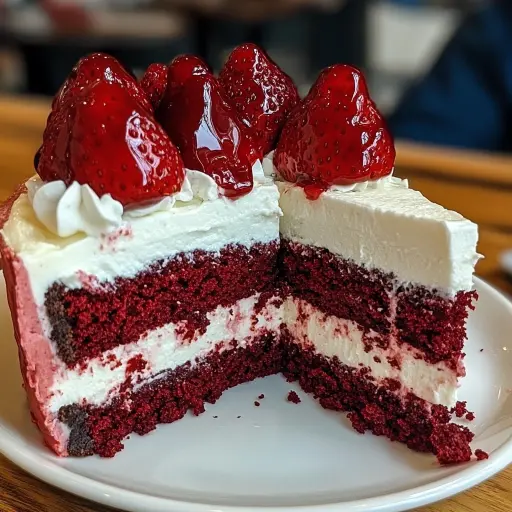
Description: Indulge in a decadent Red Velvet Strawberry Cheesecake, a delightful fusion of the classic red velvet cake, a creamy, dreamy cheesecake layer, and the bright, refreshing sweetness of fresh strawberries. This show-stopping dessert is guaranteed to impress at any celebration or special occasion, offering a perfect balance of textures and flavors that will tantalize your taste buds and leave you craving for more. Prepare to embark on a culinary adventure that is both visually stunning and utterly irresistible!
Ingredients:
For Red Velvet Cake:
- 1 ¼ cups (150g) all-purpose flour
- 1 cup (200g) granulated sugar
- 1 tablespoon (7g) unsweetened cocoa powder
- ½ teaspoon (2.5ml) baking powder
- ¼ teaspoon (1.25ml) baking soda
- ¼ teaspoon (1.25ml) salt
- ½ cup (120ml) vegetable oil (such as canola or sunflower oil)
- ½ cup (120ml) buttermilk
- 1 large egg, at room temperature
- 1 teaspoon (5ml) vanilla extract
- 1 tablespoon (15ml) red food coloring (gel food coloring is recommended for a richer color)
- ½ teaspoon (2.5ml) white vinegar
For Cheesecake Layer:
- 16 ounces (450g) cream cheese, softened to room temperature (full-fat cream cheese recommended)
- ½ cup (100g) granulated sugar
- 2 large eggs, at room temperature
- 1 teaspoon (5ml) vanilla extract
For Topping:
- 1 cup (approximately 150g) fresh strawberries, hulled and sliced
- ½ cup (120ml) strawberry preserves or jam
- Whipped cream, for garnish (optional)
- Chocolate shavings, for garnish (optional)
Preparation:
Step 1: Baking the Red Velvet Cake
- Preheat your oven to 350°F (175°C). This is crucial for even baking and a perfectly textured cake.
- Grease an 8-inch round cake pan with butter or cooking spray. Then, line the bottom with a circle of parchment paper. This ensures easy release of the cake after baking and prevents sticking.
- In a medium-sized bowl, whisk together the all-purpose flour, granulated sugar, cocoa powder, baking powder, baking soda, and salt. This ensures that the dry ingredients are evenly distributed, preventing lumps and promoting even rising.
- In a separate, larger bowl, whisk together the vegetable oil, buttermilk, egg, vanilla extract, red food coloring, and white vinegar. The vinegar reacts with the buttermilk to create a tangy flavor and activate the baking soda, resulting in a light and fluffy cake.
- Gradually add the wet ingredients to the dry ingredients, mixing on low speed until just combined. Be careful not to overmix, as this can develop the gluten in the flour and result in a tough cake. A few streaks of flour are okay.
- Pour the batter into the prepared cake pan and spread evenly.
- Bake for 25-30 minutes, or until a wooden skewer inserted into the center comes out clean or with a few moist crumbs attached. The baking time may vary depending on your oven, so it’s essential to check for doneness.
- Let the cake cool in the pan for 10 minutes before inverting it onto a wire rack to cool completely. Ensure the cake is completely cool before assembling the cheesecake.
Step 2: Preparing the Cheesecake Layer
- Preheat the oven to 325°F (160°C). Reduce the temperature for a gentle bake that prevents cracking.
- Grease an 8-inch springform pan with butter or cooking spray. Wrap the bottom of the pan tightly with aluminum foil to prevent water from seeping in during baking. This creates a water bath effect, which helps to bake the cheesecake evenly and prevents it from cracking.
- In a large bowl, beat the softened cream cheese with the granulated sugar using an electric mixer on medium speed until smooth and creamy. Make sure there are no lumps of cream cheese remaining.
- Add the eggs one at a time, beating well after each addition. Be careful not to overmix, as this can incorporate too much air into the batter, which can cause the cheesecake to puff up and then collapse during cooling.
- Stir in the vanilla extract.
- Pour the cheesecake batter into the prepared springform pan.
- Place the springform pan inside a larger baking pan. Pour hot water into the larger pan until it reaches about halfway up the sides of the springform pan.
- Bake for 40-45 minutes, or until the edges of the cheesecake are set, but the center still jiggles slightly. The cheesecake will continue to set as it cools.
- Turn off the oven and crack the oven door open slightly. Let the cheesecake cool in the oven for 1 hour to prevent cracking.
- Remove the cheesecake from the oven and let it cool completely at room temperature.
- Once cooled, cover the cheesecake with plastic wrap and refrigerate for at least 2 hours, or preferably overnight, to allow it to set completely.
Step 3: Assembling the Cake
- Once the red velvet cake and cheesecake layers are completely cooled, gently release the cheesecake from the springform pan.
- Place the cooled red velvet cake on a serving platter.
- Carefully place the cheesecake layer on top of the red velvet cake.
Step 4: Adding the Strawberry Topping
- In a small saucepan, gently heat the strawberry preserves over low heat until melted and smooth. If the preserves are too thick, you can add a tablespoon or two of water to thin them out.
- Pour the melted strawberry preserves over the top of the cheesecake, spreading it evenly.
Step 5: Garnish and Chill
- Arrange the sliced fresh strawberries on top of the melted strawberry preserves.
- Garnish with whipped cream and chocolate shavings, if desired.
- Cover the assembled cheesecake with plastic wrap and chill in the refrigerator for at least 1-2 hours before serving to allow the flavors to meld together.
Why You Will Love This Recipe:
This Red Velvet Strawberry Cheesecake is a guaranteed crowd-pleaser for several reasons:
- Perfect Flavor Combination: The tangy red velvet cake perfectly complements the creamy, rich cheesecake and the sweet, refreshing strawberries.
- Stunning Presentation: The vibrant red cake, white cheesecake, and bright red strawberries create a visually appealing dessert that will impress your guests.
- Variety of Textures: The moist cake, smooth cheesecake, and fresh fruit offer a delightful textural experience.
- Versatile Dessert: Perfect for birthdays, holidays, or any special occasion.
- Make-Ahead Friendly: The cake and cheesecake layers can be made ahead of time, making it a convenient dessert for entertaining.
COOKING Rating:
- Difficulty: Intermediate
- Time Commitment: Requires patience and attention to detail.
Serving Suggestions:
- Serve chilled for the best flavor and texture.
- Cut into slices and serve with a dollop of whipped cream.
- Garnish with fresh mint leaves for an extra touch of elegance.
- Serve with a glass of sparkling wine or champagne for a celebratory dessert.
- Pair with a scoop of vanilla ice cream for an extra indulgent treat.
Tips:
- Use gel food coloring for a more vibrant red velvet color.
- Ensure your cream cheese is softened to room temperature for a smooth cheesecake batter.
- Do not overmix the cheesecake batter to prevent cracking.
- Use a water bath when baking the cheesecake to prevent cracking.
- Cool the cheesecake slowly to prevent cracking.
- Chill the cheesecake for at least 2 hours before serving to allow it to set completely.
- If you don’t have buttermilk, you can make a substitute by adding 1 tablespoon of lemon juice or white vinegar to a measuring cup, then filling it with milk to reach ½ cup. Let it sit for 5 minutes before using.
- For a richer chocolate flavor, add a tablespoon of melted dark chocolate to the red velvet cake batter.
- Experiment with other fruit toppings, such as blueberries, raspberries, or blackberries.
Prep Time: 30 minutes Cook Time: 1 hour 15 minutes Total Time: 2 hours 45 minutes (including cooling and chilling time)
Nutritional Information: (Approximate values per serving) Please note these are estimates and can vary based on specific ingredients and portion sizes.
- Calories: 450
- Protein: 8g
- Sodium: 200mg
Conclusion:
The Red Velvet Strawberry Cheesecake is more than just a dessert; it’s an experience. It’s a testament to the magic that happens when classic flavors combine to create something truly special. From the tender crumb of the red velvet cake to the smooth, decadent cheesecake and the burst of freshness from the strawberries, every bite is a symphony of textures and tastes. So, gather your ingredients, put on your apron, and prepare to bake a masterpiece that will be the highlight of your next celebration. Your friends and family will thank you!
Frequently Asked Questions:
- Can I make this recipe ahead of time? Answer: Absolutely! In fact, this dessert is best made ahead of time. You can bake the red velvet cake and cheesecake layers a day or two in advance and store them separately in the refrigerator. Assemble the cake and add the strawberry topping a few hours before serving to allow the flavors to meld together. This makes it a convenient option for entertaining.
- Can I freeze the Red Velvet Strawberry Cheesecake? Answer: While you can freeze the cheesecake, it’s not highly recommended as freezing can alter the texture of the cheesecake and make it slightly grainy. If you do freeze it, wrap it tightly in plastic wrap and then in aluminum foil. Thaw it slowly in the refrigerator overnight before serving.
- Can I use a different type of cake pan? Answer: While an 8-inch round cake pan is ideal, you can use a 9-inch round cake pan, but the cake layer will be thinner and may require slightly less baking time. Avoid using smaller pans as the batter may overflow.
- I don’t have red food coloring. Can I still make this recipe? Answer: The red food coloring is what gives the cake its signature red velvet color. If you don’t have it, you can omit it, but the cake will not be red velvet in appearance. The taste will still be delicious, though.
- Can I use frozen strawberries instead of fresh strawberries? Answer: While fresh strawberries are preferred for their texture and flavor, you can use frozen strawberries if necessary. Thaw them completely and drain any excess liquid before slicing and using them as a topping. Keep in mind that frozen strawberries may be softer than fresh strawberries.