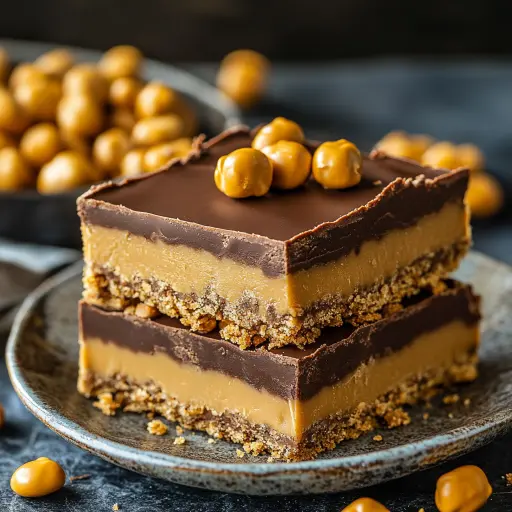
Description: Indulge in the irresistible combination of peanut butter and chocolate with these easy-to-make Reese’s Peanut Butter No-Bake Bars. Requiring no baking, these bars are perfect for satisfying your sweet tooth and are a crowd-pleaser at any gathering. With a buttery graham cracker crust, a creamy peanut butter filling, and a rich chocolate topping adorned with peanut butter cups and Reese’s Pieces, these bars are a delectable treat that’s sure to become a family favorite.
Ingredients:
- 2 cups graham cracker crumbs
- 1 cup (2 sticks) unsalted butter, melted
- 1 cup creamy peanut butter (ensure it’s a no-stir variety for best consistency)
- 2 ½ cups powdered sugar, sifted
- 1 teaspoon pure vanilla extract
- 1 cup mini chocolate chips
- 2 cups semi-sweet chocolate chips (for topping)
- ½ cup creamy peanut butter (for topping)
- ½ cup chopped Reese’s Peanut Butter Cups (for garnish)
- ¼ cup Reese’s Pieces or additional chocolate chips (for garnish)
Preparation:
Step 1: Prepare the Base Begin by ensuring your graham crackers are finely ground. You can use a food processor for quick work, pulsing until you achieve a sand-like consistency. Alternatively, place the graham crackers in a large zip-top bag and crush them with a rolling pin. In a large mixing bowl, combine the graham cracker crumbs with the melted butter. Stir thoroughly until the crumbs are completely moistened and evenly distributed, forming the base of your bars.
Step 2: Create the Peanut Butter Layer In the same bowl, or a separate one if desired, add the 1 cup of creamy peanut butter. Ensure your peanut butter is smooth and creamy; natural peanut butter tends to separate and may not provide the desired consistency for this recipe. Add the sifted powdered sugar. Sifting the powdered sugar is crucial to prevent clumps and ensure a smooth, creamy filling. Gradually incorporate the powdered sugar into the peanut butter, mixing well with each addition. The mixture will become quite thick, so be prepared to use a bit of elbow grease. Add the vanilla extract for an enhanced flavor profile, mixing until everything is uniformly combined into a smooth, thick peanut butter mixture.
Step 3: Incorporate Chocolate Chips Now, gently fold in the 1 cup of mini chocolate chips. The mini chocolate chips add a delightful texture and burst of chocolate flavor throughout the peanut butter layer. Be careful not to overmix, as this can cause the chocolate chips to melt slightly and discolor the mixture.
Step 4: Assemble the Bars Prepare a 9×13-inch baking pan by lightly greasing it. This prevents the bars from sticking and allows for easy removal. You can also line the pan with parchment paper, leaving an overhang on the sides, to make lifting the bars out of the pan even simpler. Press the peanut butter mixture evenly into the prepared pan. Use the back of a spoon or a spatula to ensure the mixture is firmly packed and level across the entire surface. This creates a uniform base for the chocolate topping.
Step 5: Prepare the Chocolate Topping In a microwave-safe bowl, combine the 2 cups of semi-sweet chocolate chips with the ½ cup of creamy peanut butter. Microwave in 30-second intervals, stirring well after each interval, until the chocolate and peanut butter are completely melted and smooth. Be cautious not to overheat the mixture, as this can cause the chocolate to seize or burn. Alternatively, you can melt the chocolate and peanut butter in a double boiler over simmering water, stirring constantly until smooth.
Step 6: Add the Finishing Touches Pour the melted chocolate mixture over the peanut butter layer, spreading it evenly with a spatula. Ensure the chocolate covers the entire surface to create a seamless and appealing top layer. While the chocolate is still melted, sprinkle the chopped Reese’s Peanut Butter Cups and Reese’s Pieces (or additional chocolate chips) over the top. Gently press the toppings into the melted chocolate to ensure they adhere well.
Step 7: Chill and Serve Cover the pan with plastic wrap and refrigerate for at least 2 hours, or until the bars are firm. This chilling time is essential for the bars to set properly and allow the flavors to meld together. Once chilled, remove the bars from the refrigerator. If you lined the pan with parchment paper, lift the bars out using the overhang. Cut the bars into equal-sized squares or rectangles using a sharp knife. For cleaner cuts, you can run the knife under hot water and wipe it clean between each slice.
Why You Will Love This Recipe
These Reese’s Peanut Butter No-Bake Bars are a symphony of flavors and textures that will tantalize your taste buds. The rich, buttery graham cracker crust provides a perfect foundation for the creamy, peanut butter filling, which is studded with delightful mini chocolate chips. The decadent chocolate topping, infused with peanut butter, adds a layer of indulgence that is simply irresistible. The addition of chopped Reese’s Peanut Butter Cups and Reese’s Pieces elevates these bars to a whole new level of peanut butter and chocolate perfection.
What truly sets these bars apart is their ease of preparation. Requiring no baking, they are a fantastic option for those with limited time or for occasions when you want to avoid turning on the oven. The simple steps make it a great recipe to involve kids in the kitchen, fostering a love for baking and creating lasting memories. These bars are also incredibly versatile – they can be made ahead of time and stored in the refrigerator, making them perfect for parties, potlucks, or any time you need a delicious dessert on hand.
Serving Suggestions:
- Serve chilled for the best texture and flavor.
- Cut into small squares for a bite-sized treat or larger bars for a more substantial dessert.
- Serve with a scoop of vanilla ice cream for an extra indulgent experience.
- Pair with a glass of cold milk or a hot cup of coffee.
- Wrap individually for party favors or to take on the go.
Tips:
- For a richer flavor, use high-quality chocolate chips and peanut butter.
- Ensure the peanut butter is smooth and creamy for the best texture. Natural peanut butter may separate and not provide the desired consistency.
- Sifting the powdered sugar is essential to prevent clumps and ensure a smooth filling.
- Microwave the chocolate and peanut butter in short intervals, stirring frequently to prevent burning.
- Chill the bars for at least 2 hours to allow them to set properly.
- For cleaner cuts, run the knife under hot water and wipe it clean between each slice.
- Store leftover bars in an airtight container in the refrigerator for up to a week.
- Experiment with different toppings, such as crushed pretzels, chopped nuts, or sea salt.
- Add a layer of caramel for an extra decadent treat.
Prep Time:
15 minutes
Cook Time:
0 minutes (no baking required)
Total Time:
2 hours 15 minutes (includes chilling time)
Nutritional Information:
(Per bar, approximate)
Calories: 320 Protein: 6g Sodium: 150mg
Conclusion
These Reese’s Peanut Butter No-Bake Bars are a delightful combination of simplicity and indulgence. They are easy to make, packed with flavor, and sure to satisfy any sweet tooth. Whether you’re looking for a quick dessert for a weeknight treat or a crowd-pleasing option for a special occasion, these bars are the perfect choice. The combination of peanut butter, chocolate, and crunchy toppings creates a symphony of textures and flavors that will leave you wanting more. So, gather your ingredients, follow the simple steps, and prepare to enjoy a no-bake treat that will become a new favorite in your household.
Questions and Answers:
- Q: Can I use natural peanut butter for this recipe? A: While you can use natural peanut butter, it’s important to note that it may affect the consistency of the bars. Natural peanut butter tends to separate, which can result in a less smooth and creamy filling. If you do use natural peanut butter, make sure to stir it very well before measuring and be prepared for a slightly different texture in the final product. Using a no-stir creamy peanut butter is recommended for the best results.
- Q: How do I prevent the chocolate from seizing when melting it in the microwave? A: Preventing the chocolate from seizing is crucial for achieving a smooth and glossy topping. The key is to microwave the chocolate and peanut butter in short intervals, typically 30 seconds each, and stir well between each interval. This allows the chocolate to melt gradually and evenly, reducing the risk of overheating. If you notice the chocolate starting to seize, stop microwaving immediately and stir vigorously. Sometimes, adding a small amount of vegetable oil or shortening can help to smooth out the mixture.
- Q: Can I make these bars ahead of time? A: Absolutely! These bars are perfect for making ahead of time. In fact, allowing them to chill in the refrigerator for a few hours or even overnight can enhance the flavor and texture. Simply store the finished bars in an airtight container in the refrigerator, and they will be ready to enjoy whenever you need a sweet treat. They can last in the refrigerator for up to a week.
- Q: What can I use instead of graham cracker crumbs? A: If you don’t have graham crackers on hand, you can substitute them with other types of cookie crumbs, such as digestive biscuits or shortbread cookies. The key is to use a cookie that has a similar texture and flavor profile to graham crackers. Ensure the cookie crumbs are finely ground before mixing them with the melted butter to create a uniform base.
- Q: Can I freeze these bars? A: Yes, these bars can be frozen for longer storage. To freeze them, cut the chilled bars into individual pieces and wrap each piece tightly in plastic wrap. Then, place the wrapped bars in a freezer-safe container or bag. They can be stored in the freezer for up to 2-3 months. When ready to serve, thaw the bars in the refrigerator for a few hours or at room temperature for about 30 minutes before enjoying.
“””