Description of this recipe
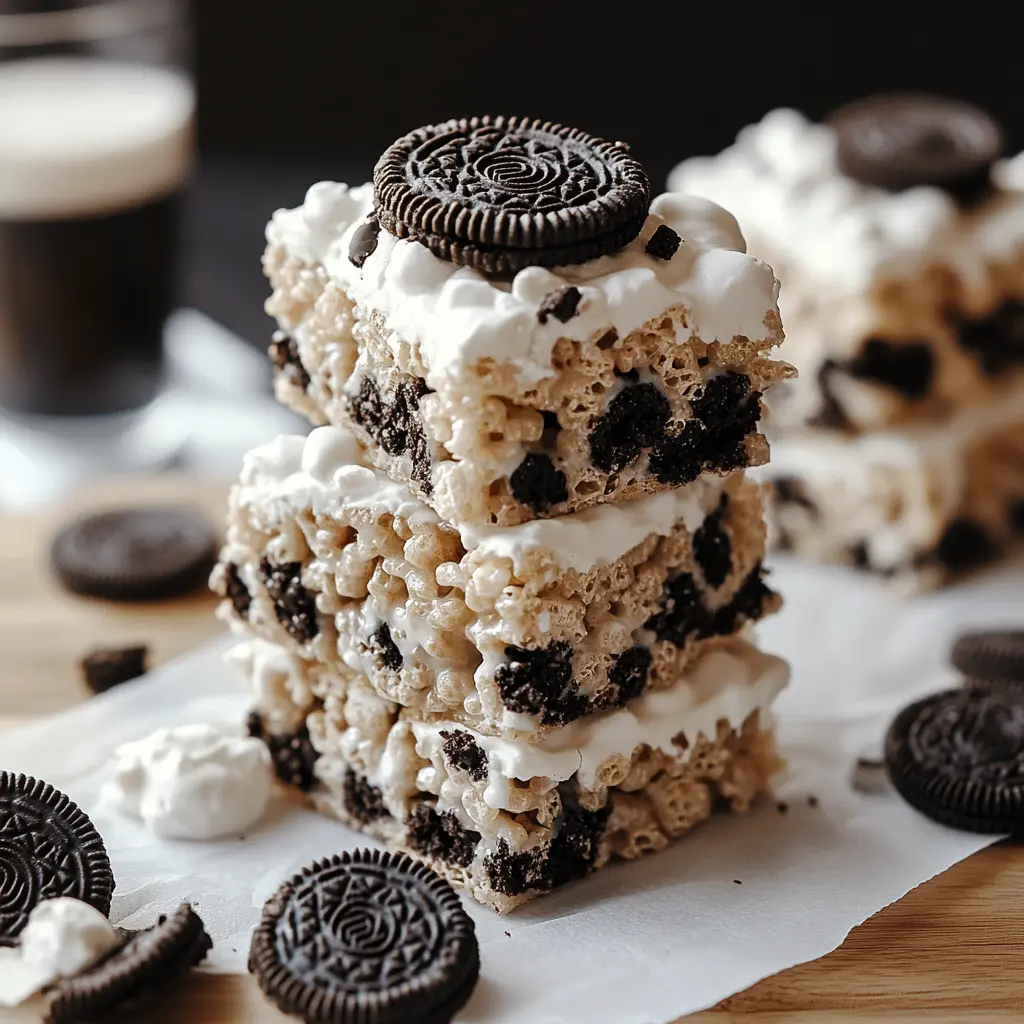
This recipe takes the classic Rice Krispie Treat, a beloved childhood snack, and elevates it with the irresistible addition of crushed Oreo cookies. It’s a simple, no-bake dessert that’s perfect for quick treats, school lunches, parties, or any time you crave a sweet, crunchy, and chocolatey indulgence. The combination of the crisp Rice Krispies, gooey marshmallows, and the signature chocolate and creamy filling of the Oreos creates a symphony of textures and flavors that will appeal to kids and adults alike. This recipe maintains the ease and simplicity of the original while offering a delightful upgrade.
Why you will love this recipe
You’ll fall head over heels for these Oreo Rice Krispie Treats for several reasons:
- Effortless Elegance: They’re incredibly easy to make. This recipe requires minimal effort and simple ingredients, making it a perfect option for busy weeknights or when you need a quick dessert fix. No oven needed!
- Crowd-Pleasing Flavor: The combination of classic Rice Krispie Treats and Oreo cookies is a match made in dessert heaven. The crunchy, chocolatey, and creamy flavors are universally loved.
- Customizable Delight: This recipe is a blank canvas for your creativity! You can easily add other mix-ins like sprinkles, chocolate chips, or different Oreo flavors to tailor it to your preferences.
- Nostalgic Comfort: These treats evoke a sense of nostalgia and bring back happy childhood memories. They’re a simple pleasure that can brighten up any day.
- Perfect for Any Occasion: Whether you’re looking for a snack for your kids, a dessert for a party, or a sweet treat for yourself, these Oreo Rice Krispie Treats are a versatile option.
- No-Bake Wonder: During hot summer months, or any time you want to avoid turning on the oven, this no-bake dessert is the perfect solution.
- Texture Paradise: The combination of the crunchy Rice Krispies, the slightly chewy marshmallows, and the crisp Oreo pieces creates a delightful textural contrast that makes each bite exciting.
Introduction
Rice Krispie Treats are a quintessential American snack, instantly recognizable and universally adored. They evoke feelings of warmth, nostalgia, and simple joy. For generations, they’ve been a go-to treat for bake sales, school lunches, and after-school snacks. But sometimes, even the most beloved classics deserve a little sprucing up.
This recipe takes the iconic Rice Krispie Treat and gives it a modern makeover with the addition of Oreo cookies. The cookies add a delightful crunch, a rich chocolate flavor, and a creamy sweetness that perfectly complements the marshmallowy goodness of the original. It’s a simple twist that elevates the treat to a whole new level of deliciousness.
This recipe is perfect for anyone who wants to add a little excitement to their Rice Krispie Treat routine. It’s also a great way to use up leftover Oreos (if that’s even possible!). Whether you’re a seasoned baker or a complete novice, you’ll find this recipe easy to follow and incredibly rewarding.
Ingredients:
- 4 cups Rice Krispies cereal: The foundation of our treat, providing that signature crispy texture. Use a fresh box for maximum crunch!
- 10 Oreo cookies, crushed: The star of the show! Use your favorite Oreo flavor – classic, double-stuffed, golden, or even a specialty flavor like mint or peanut butter. For the best results, crush them into coarse pieces. You can adjust the quantity based on your Oreo love.
- 3 tablespoons butter: Butter is essential for creating a rich, smooth base for the marshmallow mixture. Use unsalted butter to control the overall sweetness of the treats. You can use salted butter if you prefer, but omit a pinch of salt later in the process.
- 1 package (10 oz) mini marshmallows: These melt down beautifully to create the gooey, sticky binder that holds everything together. Fresh marshmallows are key for a soft and chewy texture.
- 1 teaspoon vanilla extract: Vanilla extract enhances the sweetness and adds a subtle depth of flavor. Use pure vanilla extract for the best results, but imitation vanilla extract will also work in a pinch.
Preparation:
Step 1: Prepare the Baking Dish:
Line a 9×9-inch baking dish with parchment paper, leaving an overhang on two sides for easy removal. Alternatively, lightly grease the dish with butter or cooking spray to prevent sticking. This step is crucial for preventing your treats from sticking to the pan and making them easier to cut and serve.
Step 2: Melt the Butter:
In a large saucepan, melt the butter over medium heat, stirring occasionally. Ensure the butter is completely melted and smooth before moving on to the next step. Use a heavy-bottomed saucepan to prevent the butter from burning.
Step 3: Melt the Marshmallows:
Add the mini marshmallows to the melted butter in the saucepan. Stir continuously with a rubber spatula until the marshmallows are completely melted and smooth. This may take a few minutes, so be patient and keep stirring to prevent burning. Reduce the heat to low if the marshmallows start to brown too quickly. Don’t let the marshmallows get too hot, as this can make the treats hard when they cool.
Step 4: Incorporate the Vanilla Extract:
Remove the saucepan from the heat and stir in the vanilla extract. This adds a subtle layer of flavor that complements the marshmallow and Oreo flavors.
Step 5: Combine the Ingredients:
Fold in the Rice Krispies cereal and crushed Oreos until evenly coated with the marshmallow mixture. Be gentle when mixing to avoid crushing the cereal. Ensure all the Rice Krispies and Oreos are coated with the marshmallow mixture for the best results. The texture should be evenly dispersed throughout the mixture.
Step 6: Press into the Baking Dish:
Transfer the mixture to the prepared baking dish and press it down evenly with a spatula or your fingers (lightly greased with butter or cooking spray to prevent sticking). Pack the mixture down firmly to create a compact and cohesive treat. Make sure the corners and edges are well-packed.
Step 7: Cool and Cut:
Let the Rice Krispie Treats cool completely at room temperature for about 30 minutes before cutting into squares or rectangles. This allows the treats to firm up and makes them easier to cut. Use a sharp knife to cut the treats into your desired shapes. For clean cuts, you can run the knife under hot water and wipe it dry before each cut.
COOKING Rating:
EASY! This recipe is perfect for beginner cooks and kids. It requires minimal cooking skills and is almost impossible to mess up.
Serving Suggestions:
- Enjoy them as a simple snack with a glass of milk or a cup of coffee.
- Pack them in lunchboxes for a sweet treat.
- Serve them at parties, picnics, or potlucks.
- Cut them into fun shapes using cookie cutters for a festive touch.
- Drizzle them with melted chocolate or caramel for an extra layer of indulgence.
- Serve them with a scoop of vanilla ice cream for a decadent dessert.
Tips:
- Use fresh ingredients: Fresh marshmallows and Rice Krispies will result in the best texture.
- Don’t overcook the marshmallows: Overcooked marshmallows will make the treats hard and brittle.
- Work quickly: Once the marshmallows are melted, work quickly to combine the ingredients and press them into the baking dish.
- Press firmly: Press the mixture firmly into the baking dish to ensure the treats hold together well.
- Store properly: Store the Rice Krispie Treats in an airtight container at room temperature for up to 3 days.
- Mix-ins Galore: Add other mix-ins such as sprinkles, chocolate chips, M&Ms, or chopped nuts for added flavor and texture.
- Oreo Variations: Experiment with different Oreo flavors like Golden Oreos, Mint Oreos, or Peanut Butter Oreos to create unique variations.
- For extra gooey treats: Use a bit more butter, it will make it extra gooey.
- Use Parchment Paper: Using parchment paper makes clean up a breeze.
- Adding Sprinkles: Add sprinkles before it cools down to ensure that the sprinkles stay.
Prep Time:
5 minutes
Cook Time:
10 minutes
Total Time:
15 minutes + 30 minutes cooling time
Nutritional Information (per serving, approximate):
*Calories: 200 *Protein: 2g *Sodium: 100mg
Conclusion
These Oreo Rice Krispie Treats are a delightful twist on a classic snack. They’re easy to make, customizable, and sure to please everyone who tries them. So, gather your ingredients, get in the kitchen, and whip up a batch of these irresistible treats. You won’t be disappointed! This recipe is a reminder that sometimes the simplest pleasures are the best. The combination of familiar flavors and textures creates a comforting and satisfying experience that will leave you wanting more. Enjoy!
Questions and Answers about this Recipe:
Q1: Can I use a different size baking dish?
A: Absolutely! While a 9×9 inch baking dish is recommended for the best thickness, you can certainly adapt the recipe to fit other sizes. Using a larger pan, like a 9×13 inch, will result in thinner treats. If using a smaller pan, the treats will be thicker. Keep an eye on the cooling time as it may vary depending on the thickness of the treats.
Q2: What if I don’t have mini marshmallows? Can I use regular-sized marshmallows instead?
A: Yes, you can substitute regular-sized marshmallows for mini marshmallows. However, you’ll need to cut them into smaller pieces before melting them to ensure they melt evenly and smoothly. Also, make sure the weights are equal. A 10 oz bag of regular marshmallows is a good substitution.
Q3: How can I prevent the Rice Krispie Treats from being too hard?
A: The key to preventing hard Rice Krispie Treats is to avoid overcooking the marshmallows. Melt them over low heat, stirring constantly, and remove the saucepan from the heat as soon as they are completely melted and smooth. Overcooking the marshmallows will result in a hard, brittle treat. Also, ensure you are using fresh marshmallows, as stale ones tend to harden more easily.
Q4: Can I add other ingredients besides Oreos?
A: Definitely! This recipe is a great base for adding other mix-ins to customize your treats. You can add chocolate chips, sprinkles, M&Ms, chopped nuts, dried fruit, or even peanut butter chips. Just fold them in with the Rice Krispies and Oreos before pressing the mixture into the baking dish. Be creative and experiment with your favorite flavors!
Q5: How long will these treats stay fresh?
A: These Oreo Rice Krispie Treats are best enjoyed within 2-3 days of making them. Store them in an airtight container at room temperature to maintain their freshness and texture. Avoid storing them in the refrigerator, as this can make them hard and stale. Over time, the treats will lose their soft, gooey texture.