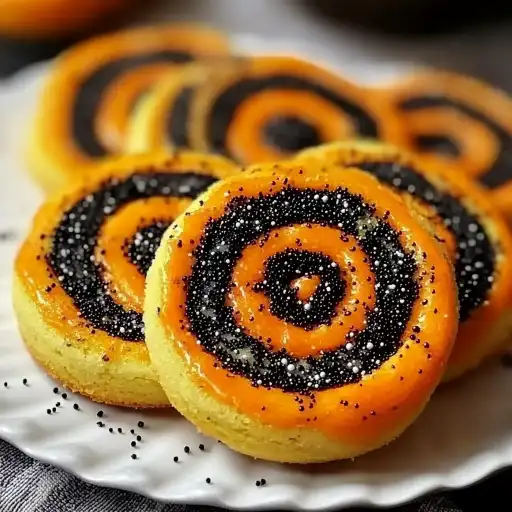
Description of this recipe
These Halloween Pinwheel Cookies are a delightful and visually appealing treat perfect for your spooky celebrations. Combining buttery, vanilla-flavored dough with vibrant Halloween colors, these cookies are as fun to make as they are to eat. The swirl design adds a touch of whimsy, making them a favorite among kids and adults alike. Get ready to impress your friends and family with these festive, homemade cookies!
Why you will love this recipe
You’ll absolutely adore these Halloween Pinwheel Cookies because they offer a perfect blend of simplicity and creativity. The recipe is straightforward, allowing you to involve the whole family in the baking process. The colorful swirls and optional sprinkle coating make these cookies a standout treat for Halloween parties or a spooky movie night. Plus, the delicious buttery flavor combined with a hint of vanilla ensures that these cookies are not just eye-catching but also incredibly satisfying. They’re a delightful way to add some festive flair to your baking repertoire!
Ingredients:
- 2 ½ cups (300 g) all-purpose flour
- ½ tsp baking powder
- ½ tsp salt
- ¾ cup (170 g) unsalted butter, softened
- 1 cup (200 g) granulated sugar
- 1 large egg
- 1 ½ tsp vanilla extract
- Gel food coloring (orange, purple, black, or green)
- ½ cup Halloween sprinkles (optional, for rolling edges)
Preparation:
Step 1: Mix Dry Ingredients: In a medium bowl, whisk together the all-purpose flour, baking powder, and salt. This ensures that the baking powder is evenly distributed throughout the flour, which helps the cookies rise uniformly. Whisking also aerates the flour, resulting in a lighter, more tender cookie.
Step 2: Cream Butter & Sugar: In a large mixing bowl, beat the softened unsalted butter and granulated sugar together until the mixture becomes light and fluffy. This step is crucial as it incorporates air into the butter, which contributes to the cookie’s overall texture. Use an electric mixer for best results, and scrape down the sides of the bowl periodically to ensure even mixing.
Step 3: Combine Wet Ingredients: Add the large egg and vanilla extract to the creamed butter and sugar mixture. Mix until everything is well combined. The egg adds richness and structure to the dough, while the vanilla extract enhances the flavor, giving the cookies a warm, comforting aroma.
Step 4: Gradually Incorporate Dry and Wet Ingredients: Gradually add the dry ingredients to the wet ingredients, mixing just until a dough forms. Be careful not to overmix the dough, as this can develop the gluten in the flour, resulting in a tough cookie. Mix until the ingredients are just combined and the dough comes together.
Step 5: Divide and Color the Dough: Divide the dough into portions depending on how many colors you plan to use (e.g., four portions for orange, purple, black, and green). Tint each portion with gel food coloring. Gel food coloring is preferred over liquid food coloring because it provides a more vibrant color without adding excess liquid to the dough. Knead the color into each portion until it is evenly distributed.
Step 6: Roll Out the Dough Layers: On a lightly floured surface, roll each colored dough portion into a rectangle about ¼ inch thick. Ensure that the rectangles are roughly the same size and shape for a uniform pinwheel design. Use a rolling pin to achieve an even thickness.
Step 7: Layer and Roll Up the Dough: Carefully stack the colored dough rectangles on top of each other. You can alternate the colors for a visually appealing effect. Once stacked, gently roll the layers tightly into a log. This creates the pinwheel effect. Wrap the log in plastic wrap to maintain its shape and prevent it from drying out.
Step 8: Chill the Dough: Refrigerate the wrapped dough log for at least 2 hours, or preferably overnight. Chilling the dough is essential as it firms up the butter, making it easier to slice and preventing the cookies from spreading too much during baking.
Step 9: Slice and Prepare to Bake: Preheat your oven to 350°F (175°C). Line baking sheets with parchment paper to prevent the cookies from sticking. Remove the chilled dough log from the refrigerator and slice it into ¼-inch thick rounds. If desired, roll the edges of each slice in Halloween sprinkles for an extra festive touch.
Step 10: Bake the Cookies: Place the sliced cookies on the prepared baking sheets, leaving a little space between each cookie. Bake for 9–11 minutes, or until the edges are lightly golden. Keep a close eye on the cookies to prevent them from burning.
Step 11: Cool and Serve: Once baked, transfer the cookies to a wire rack and let them cool completely before serving. This allows the cookies to firm up and prevents them from breaking.
COOKING Rating:
Easy to Medium
Serving Suggestions:
- Serve these cookies at Halloween parties or gatherings.
- Pair them with a glass of cold milk or hot cocoa.
- Package them in Halloween-themed treat bags as party favors.
- Enjoy them while watching your favorite spooky movies.
- Arrange them on a festive platter with other Halloween treats like brownies and cupcakes.
Tips:
- Use gel food coloring for the most vibrant colors.
- Make sure your butter is softened but not melted for the best texture.
- Chilling the dough is essential for easy slicing and preventing spreading.
- Don’t overbake the cookies; they should be slightly soft in the center.
- Get creative with your color combinations and sprinkle choices!
Prep Time:
30 minutes (plus chilling time)
Cook Time:
9-11 minutes
Total Time:
2 hours 40 minutes (including chilling time)
Nutritional Information:
(Note: Nutritional information is approximate and may vary based on specific ingredients and serving size.)
Calories: Approximately 120-150 per cookie Protein: 1-2 grams Sodium: 30-40 milligrams
Conclusion
These Halloween Pinwheel Cookies are a fantastic way to celebrate the spooky season with a fun, festive, and delicious treat. With their vibrant colors, delightful swirls, and buttery vanilla flavor, these cookies are sure to be a hit with everyone. Whether you’re baking with family or preparing for a Halloween party, this recipe is a winner. Enjoy the process of creating these unique and charming cookies, and savor every bite of the Halloween magic!
Questions and Answers about this recipe:
Q1: Can I use different food coloring for these cookies?
A1: Absolutely! While the recipe suggests using orange, purple, black, or green gel food coloring for a Halloween theme, you can use any colors you like. Feel free to get creative and use colors that match your party theme or personal preferences. Just remember to use gel food coloring for the best results, as it provides more vibrant colors without adding excess liquid to the dough.
Q2: How long can I store these cookies?
A2: These Halloween Pinwheel Cookies can be stored in an airtight container at room temperature for up to 5 days. To maintain their freshness, make sure they are completely cooled before storing them. You can also freeze the baked cookies for up to 2 months. When ready to serve, thaw them at room temperature.
Q3: Can I make the dough ahead of time and bake the cookies later?
A3: Yes, you can definitely make the dough ahead of time. In fact, chilling the dough is a crucial step in this recipe. You can prepare the dough, wrap it in plastic wrap, and refrigerate it for up to 2 days before slicing and baking. This makes it convenient for planning ahead and baking the cookies when you’re ready to serve them.
Q4: What can I do if my dough is too sticky to roll out?
A4: If your dough is too sticky to roll out, try adding a little extra flour, one tablespoon at a time, until the dough becomes more manageable. Also, ensure that your work surface is lightly floured to prevent the dough from sticking. Chilling the dough for a longer period can also help to firm it up, making it easier to roll out.
Q5: Can I add chocolate chips or other mix-ins to the dough?
A5: While this recipe is designed for pinwheel cookies, you can certainly add chocolate chips or other mix-ins to the dough if you like. Consider adding mini chocolate chips, chopped nuts, or even Halloween-themed sprinkles to the dough before rolling it out. Just be sure not to add too many mix-ins, as this can affect the texture and shape of the cookies.