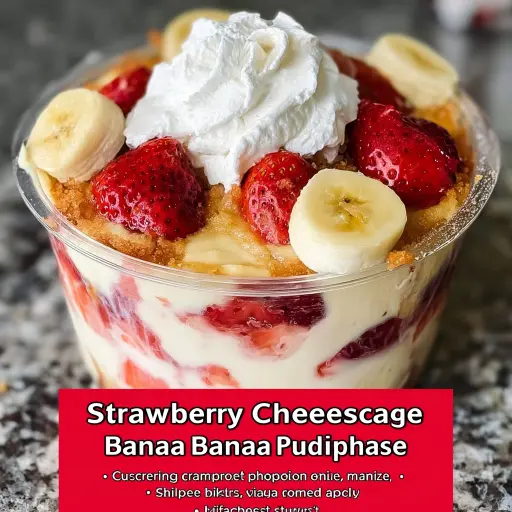
Description: A delightful no-bake dessert that combines the creamy richness of cheesecake with the fruity sweetness of strawberries and bananas, all layered with vanilla wafers for a satisfying crunch. This easy-to-make pudding is perfect for potlucks, picnics, or any occasion where you need a crowd-pleasing dessert.
Ingredients:
- 2 ripe bananas, sliced
- 1 cup strawberries, hulled and sliced
- 1 package (8 oz) cream cheese, softened
- 1 cup powdered sugar
- 1 teaspoon vanilla extract
- 2 cups whipped topping (such as Cool Whip)
- 1 package (3.4 oz) instant cheesecake pudding mix
- 2 cups milk (whole or 2% recommended)
- 1 package (12 oz) vanilla wafers
Preparation:
Step 1: Prepare the Cream Cheese Mixture In a large mixing bowl, beat the softened cream cheese with an electric mixer until it is smooth and creamy. This usually takes about 2-3 minutes. Make sure there are no lumps, as this will ensure a smooth and luxurious texture for your pudding.
Step 2: Add Sweetness and Flavor Gradually add the powdered sugar to the cream cheese, mixing on low speed until it is fully incorporated. Be sure to scrape down the sides of the bowl occasionally to ensure even mixing. Add the vanilla extract and mix until well combined. The vanilla extract enhances the overall flavor profile, adding a touch of warmth to the creamy mixture.
Step 3: Incorporate Whipped Topping Gently fold in the whipped topping until it is fully incorporated into the cream cheese mixture. Be careful not to overmix, as this can deflate the whipped topping and result in a less airy texture. Folding is key to maintaining the light and fluffy consistency of the pudding.
Step 4: Prepare the Cheesecake Pudding In a separate bowl, whisk together the instant cheesecake pudding mix and milk until the mixture thickens. This usually takes about 2 minutes. Ensure that there are no clumps of pudding mix remaining. The mixture should have a smooth and creamy consistency.
Step 5: Layer the Ingredients Now it’s time to assemble your Strawberry Cheesecake Banana Pudding. In a trifle dish or a large bowl, layer half of the vanilla wafers at the bottom. Ensure that the wafers cover the base evenly, creating a stable foundation for the rest of the layers.
Step 6: Add Cream Cheese and Fruit Spread half of the cream cheese mixture over the vanilla wafers, ensuring an even layer. Then, layer half of the banana slices and half of the strawberries over the cream cheese mixture. The combination of creamy and fruity layers adds depth and complexity to the dessert.
Step 7: Repeat the Layers Repeat the layers with the remaining vanilla wafers, cream cheese mixture, bananas, and strawberries. This creates a visually appealing and delicious layered effect.
Step 8: Garnish and Chill Top the pudding with any remaining whipped topping and garnish with additional strawberries if desired. The extra strawberries add a pop of color and freshness to the dessert.
Step 9: Refrigerate Refrigerate the pudding for at least 2 hours before serving to allow the flavors to meld together and the wafers to soften slightly. Chilling the pudding overnight will result in an even richer taste and texture.
Why You Will Love This Recipe
This Strawberry Cheesecake Banana Pudding is a dessert lover’s dream come true! It’s incredibly easy to make, requiring no baking at all, making it perfect for those hot summer days or when you’re short on time. The combination of creamy cheesecake, sweet bananas, and juicy strawberries creates a symphony of flavors that will tantalize your taste buds. The vanilla wafers add a delightful crunch to each bite, providing a satisfying contrast to the smooth and creamy layers. Plus, it’s a crowd-pleaser that’s sure to be a hit at any gathering. This pudding is also incredibly versatile. You can easily customize it by adding other fruits, such as blueberries, raspberries, or peaches. You can also use different types of cookies, such as graham crackers or chocolate wafers.
Cooking Rating:
Easy
Serving Suggestions:
- Serve chilled as a refreshing dessert on a warm day.
- Garnish with extra strawberries, whipped cream, or a drizzle of chocolate syrup.
- Pair with a scoop of vanilla ice cream for an extra indulgent treat.
- Serve in individual parfait glasses for an elegant presentation.
- Bring to potlucks, picnics, and barbecues as a crowd-pleasing dessert.
Tips:
- Use ripe but firm bananas for the best flavor and texture.
- Chill the pudding overnight for an even richer taste and texture.
- If you don’t have a trifle dish, you can use a large bowl or individual serving dishes.
- For a richer flavor, use full-fat cream cheese and whole milk.
- Add a layer of crushed graham crackers for a cheesecake-like crust.
- Drizzle with caramel sauce or chocolate syrup for added indulgence.
- If you want a less sweet pudding, reduce the amount of powdered sugar.
- For a healthier option, use light cream cheese and sugar-free pudding mix.
- Store leftovers in the refrigerator for up to 3 days.
Prep Time: 20 minutes
Cook Time: 0 minutes
Total Time: 2 hours 20 minutes (includes chilling time)
Nutritional Information:
(Note: Nutritional information is an estimate and may vary based on specific ingredients and portion sizes.)
- Calories: Approximately 320 kcal per serving
- Protein: Approximately 5 grams per serving
- Sodium: Approximately 200 milligrams per serving
Conclusion:
This Strawberry Cheesecake Banana Pudding is a delightful and easy-to-make dessert that’s perfect for any occasion. With its creamy texture, sweet and fruity flavors, and crunchy vanilla wafers, it’s sure to be a hit with everyone. Whether you’re looking for a simple dessert for a family gathering or a crowd-pleasing treat for a potluck, this pudding is a winner. So go ahead and give it a try – you won’t be disappointed!
Questions and Answers about this Recipe:
Q1: Can I use a different type of cookie instead of vanilla wafers?
A: Absolutely! Feel free to experiment with different types of cookies to create your own unique twist on this recipe. Graham crackers, chocolate wafers, or even shortbread cookies would all work well. Just keep in mind that the flavor of the cookie will impact the overall taste of the pudding.
Q2: Can I make this pudding ahead of time?
A: Yes, this pudding is actually best made ahead of time, as it allows the flavors to meld together and the wafers to soften slightly. You can prepare it up to 24 hours in advance and store it in the refrigerator until you’re ready to serve.
Q3: Can I use fresh homemade whipped cream instead of store-bought whipped topping?
A: Yes, fresh homemade whipped cream would be a delicious addition to this pudding. Just be sure to whip it to stiff peaks before folding it into the cream cheese mixture. Keep in mind that homemade whipped cream may not hold its shape as well as store-bought whipped topping, so it’s best to add it shortly before serving.
Q4: Can I add other fruits to this pudding?
A: Absolutely! This pudding is incredibly versatile, and you can easily customize it by adding other fruits, such as blueberries, raspberries, peaches, or even chopped pineapple. Just be sure to adjust the amount of fruit to your liking.
Q5: Is there a way to make this pudding healthier?
A: Yes, there are a few ways to make this pudding healthier. You can use light cream cheese, sugar-free pudding mix, and a reduced amount of powdered sugar. You can also add some healthy ingredients, such as chia seeds or flaxseed meal, to boost the nutritional value.