Description:
Indulge in the ultimate sweet treat with this Strawberry Crunch Cake. Layers of moist strawberry cake, creamy cheesecake, and crunchy strawberry-infused cookie crumbs create a symphony of textures and flavors. Perfect for celebrations or a delightful dessert any day of the week, this cake will impress your family and friends. Get ready for a delicious and unforgettable experience!
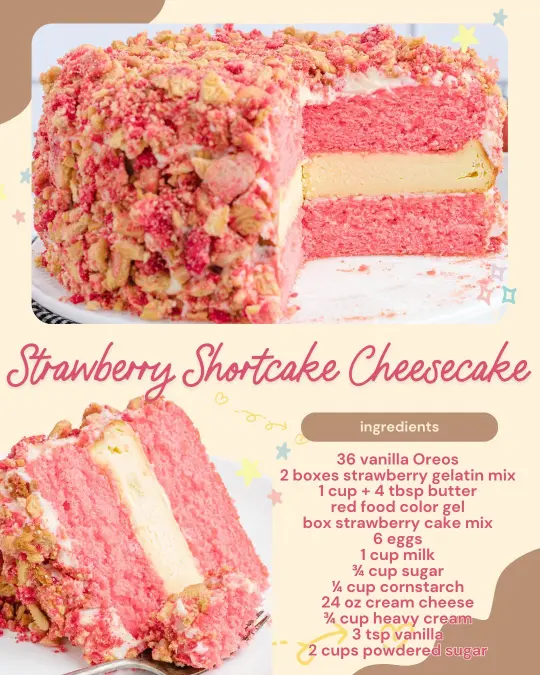
Ingredients:
FOR THE COOKIE CRUMB LAYER:
36 vanilla sandwich cookies, coarsely crushed
3-ounce box strawberry gelatin mix
4 tablespoons unsalted butter, melted
5 to 6 drops red food color gel
FOR THE STRAWBERRY CAKE LAYERS:
16.5-ounce box Strawberry Supreme cake mix
3 large eggs, room temperature
½ cup unsalted butter, melted (1 stick)
1 cup whole milk
3-ounce box strawberry gelatin mix
FOR THE CHEESECAKE LAYER:
¾ cup granulated sugar
¼ cup cornstarch
16-ounce package cream cheese, softened
¼ cup heavy cream
2 teaspoons pure vanilla extract
3 large eggs, room temperature
FOR THE FROSTING:
8 ounces cream cheese, softened
½ cup heavy cream
½ cup unsalted butter, softened (1 stick)
1 teaspoon vanilla extract
2 cups powdered sugar
Preparation:
step 1: Prepare the Cookie Crumbs
Preheat the oven to 350°F (175°C). Line a standard baking sheet with parchment paper and set aside.
Evenly divide the coarsely crushed vanilla sandwich cookies into 2 small mixing bowls. This will allow you to create the distinct vanilla and strawberry flavored crumbs.
Step 2: Infuse the Crumbs with Strawberry Flavor
Pour one of the 3-ounce boxes of dry strawberry gelatin mix over one of the bowls of cookie crumbs. Stir to combine thoroughly. This ensures that the strawberry flavor is evenly distributed throughout the crumbs.
Step 3: Butter the Crumbs
Pour 2 tablespoons of the melted unsalted butter over the plain cookie crumb bowl and mix well. This helps the crumbs bind together slightly and become golden brown when baked.
Step 4: Add Color to the Strawberry Crumbs
Drop 5 to 6 drops of red food coloring gel into the remaining 2 tablespoons of melted butter and stir to mix the coloring. Ensure that the color is vibrant and evenly distributed in the butter.
Step 5: Create the Strawberry Crumble
Pour the tinted melted butter over the gelatin crumb mixture. Stir very well to ensure the color is evenly distributed throughout the crumbs. The color should be uniformly mixed in to give it an appealing look.
Step 6: Bake the Crumbs
Evenly sprinkle both the vanilla and strawberry bowls of buttered cookie crumbs onto the prepared baking sheet. Bake for 10 minutes. Keep a close eye on them to prevent burning.
Step 7: Cool the Crumbs
Allow the cookie crumbs to completely cool on the baking sheet. As they cool, they will become crisp and crunchy.
Step 8: Prepare the Cake Pans
Preheat the oven to 350°F (175°C). Generously spray two 9-inch round cake pans with baker’s spray (Baker’s Joy). This will help the cakes release easily after baking.
Step 9: Mix the Cake Batter
Using a stand mixer or an electric handheld mixer and a medium-size mixing bowl, add the Strawberry Supreme cake mix, eggs, melted unsalted butter, milk, and strawberry gelatin mix. Mix all ingredients together on medium speed until well incorporated and smooth. The gelatin enhances the strawberry flavor and adds moisture to the cake.
Step 10: Bake the Cake Layers
Evenly divide the cake batter between the 2 prepared round cake pans. Bake for 24 to 28 minutes, or until a toothpick inserted into the center comes out clean. Make sure to leave the oven on to bake the cheesecake afterward.
Step 11: Cool the Cake Layers
Allow the cakes to completely cool on a cooling rack. Once cooled, remove the cakes from the pans and set them aside. Cooling completely will prevent the cake from breaking when layering.
Step 12: Reduce the Oven Temperature
Reduce the oven temperature to 325°F (160°C).
Step 13: Prepare the Sugar and Cornstarch Mixture
In a small mixing bowl, whisk together the granulated sugar and the cornstarch. This mixture will help stabilize the cheesecake and give it a smooth texture.
Step 14: Prepare the Springform Pan
Line the bottom of a 9-inch springform pan with parchment paper, and generously spray the springform pan with nonstick spray. This will ensure that the cheesecake releases cleanly from the pan.
Step 15: Mix the Cheesecake Batter
Using a stand mixer or an electric handheld mixer on medium-high speed, cream together the cream cheese, heavy cream, and vanilla extract. Make sure the cream cheese is softened for a smooth batter.
Step 16: Add the Eggs
Reduce the mixer speed to low, add the eggs one at a time, until all eggs are well incorporated. Mixing on low speed prevents too much air from getting into the batter.
Step 17: Incorporate the Sugar and Cornstarch
Leaving the mixer on low, slowly add the granulated sugar and the cornstarch mixture. Increase the speed to medium and mix until the batter is smooth and creamy.
Step 18: Bake the Cheesecake
Pour the cheesecake batter into the prepared springform pan. Bake at 325°F (160°C) for 40 minutes.
Step 19: Cool in the Oven
Leaving the oven door closed, turn the oven off and leave the cheesecake in the oven for 20 additional minutes. This helps prevent the cheesecake from cracking.
Step 20: Cool on a Rack
Remove the cheesecake and allow it to cool on a cooling rack for 30 minutes.
Step 21: Freeze the Cheesecake
Tightly cover the cheesecake and place it in the freezer for 1 hour. Freezing helps the cheesecake set up and makes it easier to handle during assembly.
Step 22: Make the Frosting
Using either a stand mixer or a handheld mixer and a medium-size mixing bowl, on medium-high speed, cream together the cream cheese, heavy cream, and unsalted butter for 1 ½ to 2 minutes. Be sure to scrape down the sides of the bowl with a silicone spatula.
Step 23: Add Vanilla
Lower the mixer speed to low and slowly add the vanilla extract.
Step 24: Add Powdered Sugar
Keeping the mixer speed low, slowly add the powdered sugar 1 cup at a time. Increase the speed to medium and mix until smooth and creamy.
Step 25: Assemble the Cake
Using your choice of serving plate, center one of the strawberry cake layers.
Step 26: Frost the First Layer
Scoop out ¼ cup of frosting and place it in the center of the bottom cake layer. Using either an offset spatula or a silicone spatula, evenly smooth out the frosting. Don’t worry if there are crumbs in the frosting.
Step 27: Add the Cheesecake
Remove the cheesecake from the freezer. Carefully run a sharp, flexible knife along the inside edge of the cheesecake. Slowly release the springform sides. Line a flat plate with wax paper and place it on top of the cheesecake. Securely turn the cheesecake upside down to remove the base of the springform pan and the parchment paper. Carefully turn the cheesecake right side up and place it on top of the bottom layer of strawberry cake.
Step 28: Frost the Cheesecake Layer
Scoop out another ¼ cup of frosting to smooth over the cheesecake layer.
Step 29: Add the Top Cake Layer
Place the top strawberry cake layer on top of the cheesecake layer.
Step 30: Frost the Entire Cake
Evenly spread the remaining frosting over the rest of the cake. Again, do not worry if there are crumbs; the cookie crumb coating will hide them.
Step 31: Add the Crunch
Break the cooled cookie crumbs into small pieces.
Step 32: Cover with Cookie Crumbs
Sprinkle the top of the cake with cookie crumbs. Using your hands, gently press/pat the cookie crumbs on the sides of the cake.
Why You Will Love This Recipe
This Strawberry Crunch Cake recipe is a delightful combination of flavors and textures that will leave you wanting more. The moist strawberry cake layers are perfectly complemented by the creamy cheesecake filling, while the crunchy strawberry cookie crumbs add a satisfying texture.
Here’s what makes this cake so special:
- Unique Flavor Profile: The strawberry cake and strawberry-infused crumbs create a cohesive and delicious strawberry flavor. The cheesecake layer adds a touch of richness and creamy tanginess.
- Textural Contrast: The combination of the soft cake, creamy cheesecake, and crunchy crumbs makes every bite a delightful experience.
- Eye-Catching Presentation: The vibrant pink color and crumbly exterior make this cake visually appealing and perfect for celebrations.
- Crowd-Pleasing: This cake is a guaranteed hit with both kids and adults. It’s perfect for birthdays, holidays, or any special occasion.
- Adaptable: While this recipe is for strawberry crunch cake, it can be adapted to other flavors by using different cake mixes and flavored gelatin.
Serving Suggestions:
- Serve chilled for the best flavor and texture.
- Garnish with fresh strawberries for an extra touch of elegance.
- Pair with a scoop of vanilla ice cream or whipped cream.
- Enjoy with a cup of coffee or tea.
- Slice into generous portions for a decadent dessert experience.
Tips:
- Make sure all ingredients are at room temperature for the best results. This ensures even mixing and baking.
- Do not overmix the cake batter or cheesecake batter. Overmixing can lead to a tough cake or cheesecake.
- Cool the cake layers and cheesecake completely before assembling the cake to prevent the frosting from melting.
- Use high-quality ingredients for the best flavor.
- If you don’t have baker’s spray, you can use shortening and flour to grease and flour the cake pans.
- Store leftover cake in the refrigerator for up to 3 days.
Prep Time: 45 minutes
Cook Time: 1 hour 28 minutes
Total Time: 2 hours 13 minutes (plus 1 hour chilling time)
Nutritional Information: (Approximate values, varies based on specific ingredients)
Calories: 650-750 per slice
Protein: 8-10 grams per slice
Sodium: 300-400 mg per slice
Conclusion:
This Strawberry Crunch Cake is a labor of love, but the end result is well worth the effort. The combination of flavors, textures, and visual appeal makes it a truly unforgettable dessert. Whether you’re celebrating a special occasion or simply craving something sweet, this cake is sure to impress. So gather your ingredients, preheat your oven, and get ready to create a masterpiece that will delight your taste buds and leave everyone wanting more. Enjoy!
Questions and Answers about This Recipe:
Question 1: Can I use a different flavor cake mix?
Answer: Absolutely! While this recipe is designed for strawberry cake, you can easily adapt it to other flavors. For instance, you could use a vanilla or white cake mix and substitute the strawberry gelatin with a complementary flavor, such as lemon or raspberry. Be creative and experiment with different flavor combinations to suit your preferences. Just be sure that the gelatin and cake mix flavors complement each other.
Question 2: Can I make this cake ahead of time?
Answer: Yes, you can! In fact, making the cake ahead of time is a great way to save time and stress on the day you plan to serve it. You can bake the cake layers and cheesecake a day or two in advance and store them separately in the refrigerator. The cookie crumbs can also be made ahead of time and stored in an airtight container at room temperature. Assemble the cake a few hours before serving, or even the day before, and keep it refrigerated until ready to serve.
Question 3: What if I don’t have a springform pan?
Answer: While a springform pan is ideal for making cheesecakes because it allows for easy removal, you can still make this recipe without one. If you don’t have a springform pan, you can bake the cheesecake in a regular 9-inch cake pan. Line the bottom of the pan with parchment paper and grease the sides thoroughly. Once the cheesecake is cooled, invert the pan onto a plate and carefully remove the parchment paper. Be extra gentle to avoid cracking the cheesecake.
Question 4: Can I reduce the sweetness of the cake?
Answer: Yes, you can adjust the sweetness to your liking. To reduce the sweetness, you can decrease the amount of sugar in the cheesecake layer by about 1/4 cup. You can also use a less sweet frosting recipe or simply use a thinner layer of frosting. Additionally, using fresh, tart strawberries as a garnish can help balance the sweetness of the cake.
Question 5: How do I prevent the cheesecake from cracking?
Answer: Cracking is a common issue with cheesecakes, but there are a few things you can do to minimize the risk. First, make sure not to overbake the cheesecake. It should be set around the edges but still have a slight wobble in the center. Second, cool the cheesecake gradually by turning off the oven and leaving it in the oven with the door closed for an hour before transferring it to a cooling rack. This allows the cheesecake to cool slowly and prevents it from shrinking too quickly, which can cause cracks. Finally, adding a bit of cornstarch to the cheesecake batter can help stabilize it and reduce the likelihood of cracking.