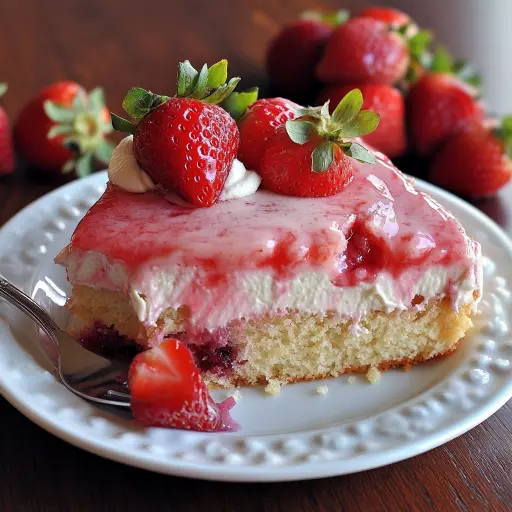
Description: A delightful and visually stunning Strawberry Earthquake Cake. This recipe combines the ease of a cake mix with a luscious cream cheese swirl and a vibrant strawberry glaze, resulting in a moist, flavorful, and unforgettable dessert. The cake is surprisingly simple to make, yet its impressive presentation makes it perfect for special occasions, potlucks, or simply indulging in a little bit of homemade goodness. Get ready to experience a flavor explosion with every bite!
Ingredients:
For the Cake Base:
- 1 box strawberry cake mix (plus ingredients listed on the box, typically eggs, oil, and water)
For the Cream Cheese Swirl:
- 8 oz cream cheese, softened
- 1/2 cup powdered sugar
- 1 teaspoon vanilla extract
For the Strawberry Glaze:
- 1 cup fresh strawberries, mashed
- 1/3 cup granulated sugar
- 1 tablespoon lemon juice
- 1 teaspoon cornstarch mixed with 1 tablespoon water (1 teaspoon cornstarch + 1 tablespoon water)
For Garnish:
- Fresh strawberries, sliced
- Drizzle of white chocolate (optional)
Preparation:
Step 1: Preheat and Prepare
Preheat your oven to 350°F (175°C). This temperature ensures even baking and prevents the cake from becoming dry. Grease a 9×13-inch baking dish thoroughly. Use butter, shortening, or cooking spray to coat the bottom and sides of the dish. This will prevent the cake from sticking and ensure easy removal after baking. Lightly flour the greased dish for extra insurance against sticking.
Step 2: Make the Cake Batter
Prepare the strawberry cake batter according to the package instructions. Follow the measurements and mixing instructions provided on the cake mix box precisely. Typically, this involves combining the cake mix with eggs, oil, and water. Mix until just combined, being careful not to overmix, which can result in a tough cake. Pour the prepared batter evenly into the greased and floured baking dish. Spread it out so its evenly distributed.
Step 3: Prepare the Cream Cheese Swirl
In a medium bowl, combine the softened cream cheese, powdered sugar, and vanilla extract. Ensure the cream cheese is softened to room temperature for easier mixing and a smoother swirl. Use an electric mixer (handheld or stand mixer) to beat the ingredients together until completely smooth and creamy. There should be no lumps of cream cheese remaining.
Step 4: Create the Swirl
Drop dollops of the cream cheese mixture randomly over the top of the strawberry cake batter in the baking dish. Use a knife or skewer to gently swirl the cream cheese mixture into the cake batter. Be careful not to overmix or completely blend the mixtures; the goal is to create a marbled or swirled effect. This step gives the cake its signature “earthquake” appearance and adds pockets of creamy cheesecake flavor.
Step 5: Bake the Cake
Carefully place the baking dish into the preheated oven. Bake for 30-35 minutes, or until a toothpick inserted into the center of the cake comes out clean or with only a few moist crumbs attached. Check for doneness after 30 minutes and adjust baking time accordingly. Overbaking will result in a dry cake.
Step 6: Cool the Cake
Remove the baked cake from the oven and place it on a wire rack to cool completely. Allow the cake to cool completely before adding the glaze. This prevents the glaze from melting and running off the cake.
Step 7: Prepare the Strawberry Glaze
While the cake is cooling, prepare the strawberry glaze. In a small saucepan, combine the mashed fresh strawberries, granulated sugar, and lemon juice. Use a potato masher or fork to thoroughly mash the strawberries. The lemon juice enhances the strawberry flavor and adds a touch of acidity.
Step 8: Cook the Glaze
Cook the strawberry mixture over medium heat, stirring constantly until it begins to bubble and the sugar is dissolved. In a separate small bowl, whisk together the cornstarch and water to create a slurry. The cornstarch acts as a thickening agent for the glaze.
Step 9: Thicken the Glaze
Pour the cornstarch slurry into the saucepan with the strawberry mixture. Stir constantly until the glaze thickens and becomes glossy. This should take about 1-2 minutes. Remove the saucepan from the heat and let the glaze cool to room temperature. The glaze will thicken further as it cools.
Step 10: Glaze and Garnish
Once the cake has cooled completely and the glaze has cooled to room temperature, drizzle the strawberry glaze evenly over the top of the cake. Arrange fresh strawberry slices on top of the glazed cake. For an extra touch of elegance, drizzle melted white chocolate over the strawberries. Let the glaze set slightly before serving.
Why you will love this recipe
This Strawberry Earthquake Cake is a guaranteed crowd-pleaser for so many reasons. First, it’s incredibly easy to make, thanks to the use of a boxed cake mix as a base. This makes it a perfect option for beginner bakers or anyone short on time. Despite its simplicity, the cake delivers a burst of flavor. The combination of the strawberry cake, creamy cheesecake swirl, and tangy strawberry glaze is simply irresistible.
The cake is also a visual masterpiece. The marbled effect of the cream cheese swirl and the vibrant red glaze topped with fresh strawberries create a stunning presentation that is sure to impress your guests. Every slice is a delightful combination of textures and flavors, from the moist cake to the creamy swirl and the juicy strawberries.
Moreover, this cake is versatile and can be adapted to suit your preferences. Feel free to experiment with different cake mix flavors, such as vanilla or lemon, or use other berries for the glaze, such as raspberries or blueberries. The possibilities are endless!
Serving Suggestions:
- Serve the Strawberry Earthquake Cake chilled or at room temperature.
- Pair it with a scoop of vanilla ice cream or a dollop of whipped cream.
- Offer it as a dessert at potlucks, picnics, birthday parties, or any special occasion.
- Serve it with a cup of coffee or tea for a delightful afternoon treat.
Tips:
- Ensure the cream cheese is softened to room temperature for a smooth and lump-free swirl.
- Do not overmix the cake batter, as this can result in a tough cake.
- Let the cake cool completely before adding the glaze to prevent it from melting.
- If the glaze is too thick, add a tablespoon of water at a time until it reaches the desired consistency.
- Store leftover cake in an airtight container in the refrigerator for up to 3 days.
Prep Time:
20 minutes
Cook Time:
35 minutes
Total Time:
55 minutes
Nutritional Information:
(Estimated, per serving. Actual values may vary depending on specific ingredients and portion sizes.)
Calories: Approximately 320
Protein: Approximately 4g
Sodium: Approximately 250mg
Conclusion
The Strawberry Earthquake Cake is a delightful and easy-to-make dessert that combines the best of both worlds: the simplicity of a cake mix with the indulgence of a homemade treat. Its stunning appearance, delightful flavor combination, and versatility make it a winner every time. Whether you’re a seasoned baker or a beginner, this recipe is sure to impress your family and friends. So, gather your ingredients, preheat your oven, and get ready to create a truly unforgettable dessert experience!
Questions and Answers about this Recipe:
Q1: Can I use frozen strawberries for the glaze?
A: Yes, you can use frozen strawberries for the glaze. Thaw them completely and drain any excess liquid before mashing them. Keep in mind that frozen strawberries may release more water than fresh strawberries, so you might need to adjust the amount of cornstarch slightly to achieve the desired glaze thickness.
Q2: Can I make this cake gluten-free?
A: Yes, you can make this cake gluten-free by using a gluten-free strawberry cake mix. Follow the package instructions for the gluten-free cake mix and proceed with the rest of the recipe as directed.
Q3: Can I substitute the cream cheese with something else?
A: If you’re looking for a substitute for cream cheese, you could try using Neufchâtel cheese, which has a similar texture but slightly less fat. Alternatively, you could use a vegan cream cheese alternative, but be sure to choose one that is suitable for baking.
Q4: How can I prevent the cake from sticking to the pan?
A: To prevent the cake from sticking to the pan, grease the baking dish thoroughly with butter, shortening, or cooking spray. Then, lightly flour the greased dish for extra insurance against sticking. You can also line the bottom of the dish with parchment paper.
Q5: Can I make this cake ahead of time?
A: Yes, you can make this cake ahead of time. Bake the cake as directed and let it cool completely. Then, wrap it tightly in plastic wrap and store it in the refrigerator for up to 2 days. Prepare the glaze separately and store it in an airtight container in the refrigerator. When you’re ready to serve, drizzle the glaze over the cake and garnish with fresh strawberries.