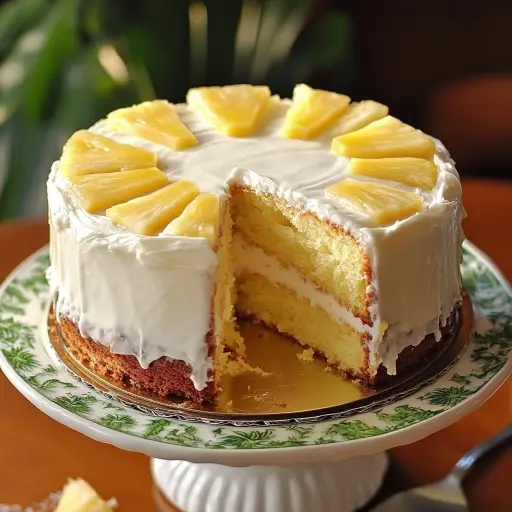
Description: This Tropical Pineapple Juice Cake is a moist and flavorful delight that brings a taste of the tropics to your table. The combination of the tender cake infused with pineapple juice, a creamy and tangy filling, and a sweet, glossy glaze creates a truly unforgettable dessert experience. Perfect for celebrations, potlucks, or simply a delightful treat to brighten any day, this cake is sure to become a family favorite.
Ingredients:
For the Cake:
- 2 ½ cups all-purpose flour
- 1 tbsp baking powder
- ½ tsp baking soda
- ½ tsp salt
- 1 cup unsalted butter, softened
- 1 ½ cups granulated sugar
- 4 large eggs
- 1 tsp vanilla extract
- ¾ cup sour cream
- ¾ cup pineapple juice (fresh or canned)
For the Filling:
- 1 ½ cups heavy whipping cream
- 8 oz cream cheese, softened
- ¾ cup powdered sugar
- 1 tsp vanilla extract
For the Glaze & Topping:
- ½ cup pineapple juice
- 1 tbsp cornstarch
- 2 tbsp sugar
Preparation:
Step 1: Preheat and Prep the Pans
Preheat your oven to 350°F (175°C). Grease and flour two 9-inch round cake pans. You can also line the bottoms with parchment paper rounds for easy removal. This step is crucial; greasing and flouring prevents the cake from sticking and parchment paper ensures a clean release, preserving the cake’s beautiful structure.
Step 2: Dry Ingredients Unite!
In a medium bowl, whisk together the all-purpose flour, baking powder, baking soda, and salt. Whisking is essential to evenly distribute the baking powder and baking soda throughout the flour, leading to a uniform rise in the cake. Nobody wants a cake that only rises on one side! Set aside for now.
Step 3: Creaming the Dream!
In a large mixing bowl, cream together the softened unsalted butter and granulated sugar until light and fluffy. This step, creaming, is vital for incorporating air into the batter, which contributes to the cake’s tenderness and light texture. Use an electric mixer (stand mixer or hand mixer) for best results. Scrape down the sides of the bowl occasionally to ensure even mixing. This creaming process usually takes 3-5 minutes.
Step 4: Egg-cellent Additions!
Beat in the eggs one at a time, ensuring each egg is fully incorporated before adding the next. Then, stir in the vanilla extract. Adding the eggs one at a time allows for better emulsification and prevents the batter from curdling. Vanilla extract enhances the overall flavor profile of the cake, adding a subtle warmth and complexity.
Step 5: Alternate Additions, Maximum Flavor!
Gradually add the dry ingredients to the wet ingredients, alternating with the sour cream and pineapple juice. Begin and end with the dry ingredients, mixing until just combined. Overmixing can lead to a tough cake, so be gentle and avoid prolonged mixing once the ingredients are incorporated. The order of addition is important for creating a well-emulsified batter, preventing gluten development, and ensuring a tender crumb. The sour cream adds moisture and a slight tang, complementing the sweetness of the cake and pineapple juice. The pineapple juice provides a burst of tropical flavor and also contributes to the cake’s moistness.
Step 6: Bake to Perfection!
Divide the batter evenly between the prepared cake pans. Bake for 25-30 minutes, or until a wooden skewer inserted into the center comes out clean. The baking time can vary depending on your oven, so it’s always a good idea to start checking the cakes around the 25-minute mark.
Step 7: Cooling is Key!
Let the cakes cool in the pans for 10 minutes before inverting them onto a wire rack to cool completely. Cooling the cakes in the pans prevents them from breaking or sticking. Cooling completely before frosting is essential to prevent the frosting from melting.
Step 8: Filling Frenzy!
While the cakes are cooling, prepare the filling. In a large bowl, beat the heavy whipping cream until stiff peaks form. In a separate bowl, beat the softened cream cheese and powdered sugar until smooth and creamy. Gently fold the whipped cream into the cream cheese mixture. Stir in the vanilla extract. Making sure the cream cheese is sufficiently softened is essential for a smooth, lump-free filling. Folding in the whipped cream gently maintains its volume, resulting in a light and airy filling.
Step 9: Assemble and Adorn!
Once the cakes are completely cool, level them if necessary by slicing off any domed tops. Place one cake layer on a serving plate. Spread the filling evenly over the cake layer. Top with the second cake layer.
Step 10: Glaze Galore!
In a small saucepan, whisk together the pineapple juice, cornstarch, and sugar. Cook over medium heat, stirring constantly, until the glaze thickens and becomes clear. Let the glaze cool slightly before pouring it over the top of the cake. Cornstarch is the key to thickening the glaze, creating a beautiful, glossy finish.
COOKING Rating: Intermediate
Why you will love this recipe:
This Tropical Pineapple Juice Cake is a winner for so many reasons! First and foremost, the flavor profile is absolutely divine. The pineapple juice infuses the cake with a subtly sweet and tangy tropical essence that pairs beautifully with the rich, creamy filling. The combination of the moist cake, the luscious filling, and the glossy glaze creates a textural symphony that delights the palate. It’s not just a cake; it’s an experience!
Beyond the taste, this cake is surprisingly easy to make. While it has several components, each step is straightforward and manageable. The recipe uses readily available ingredients, so you won’t have to hunt down exotic items at specialty stores. It’s a great recipe for intermediate bakers looking to expand their skills without being overwhelmed.
Finally, this cake is incredibly versatile. It’s perfect for birthdays, holidays, potlucks, or any occasion that calls for a special treat. Its tropical flavor makes it especially well-suited for summer gatherings, but it’s equally enjoyable year-round. Plus, it’s a guaranteed crowd-pleaser!
Serving Suggestions:
- Serve chilled or at room temperature.
- Garnish with fresh pineapple slices or toasted coconut flakes for an extra touch of elegance.
- Pair with a scoop of vanilla ice cream or a dollop of whipped cream.
- Serve with a glass of chilled pineapple juice or a tropical cocktail.
- For a more decadent treat, drizzle with caramel sauce or white chocolate ganache.
Tips:
- Ensure all ingredients, especially the butter and cream cheese, are at room temperature for best results.
- Don’t overmix the cake batter, as this can lead to a tough cake.
- Use fresh pineapple juice for the best flavor, but canned pineapple juice works well too.
- If you don’t have sour cream, you can substitute plain Greek yogurt.
- To prevent the glaze from soaking into the cake, let it cool slightly before pouring it over the cake.
- Store the cake in the refrigerator for up to 3 days.
Prep Time: 30 minutes Cook Time: 30 minutes Total Time: 1 hour (plus cooling time)
Nutritional Information: (Approximate, per serving) Note that the nutritional content of this cake can vary greatly based on ingredients and serving sizes. Calories: 450 Protein: 5g Sodium: 250mg
Conclusion:
The Tropical Pineapple Juice Cake is a testament to the power of simple ingredients combined with careful technique. It’s a cake that embodies both comfort and elegance, making it a delightful addition to any occasion. The moist cake infused with pineapple, the creamy filling, and the sweet glaze create a harmonious blend of flavors and textures that will leave you craving more. So, gather your ingredients, preheat your oven, and embark on a baking adventure that will transport you to a tropical paradise with every bite!
Questions and Answers about this Recipe:
Q1: Can I use a different type of flour for this cake?
A: While all-purpose flour is the recommended choice for this recipe because it provides the right balance of structure and tenderness, you can experiment with other flours. Cake flour will result in an even softer and more delicate cake, but it may not have as much structural integrity. If you use cake flour, consider reducing the amount by a tablespoon or two. Gluten-free flour blends can also be used, but be sure to use a blend specifically designed for baking cakes, and you might need to add a binder like xanthan gum to help with structure. Keep in mind that using different flours will alter the texture and flavor of the cake.
Q2: What can I do if I don’t have any pineapple juice on hand?
A: If you don’t have pineapple juice readily available, there are a few substitutions you can try. You could use the juice from a can of crushed pineapple, but make sure to drain it well first. Another option is to blend fresh pineapple and strain the pulp to extract the juice. If neither of those options works, you can use apple juice or even orange juice as a substitute, although the flavor profile will be different. Keep in mind that the pineapple juice contributes not only flavor but also moisture to the cake, so make sure your substitute is similarly hydrating.
Q3: How do I prevent the cake from sticking to the pan even if I grease and flour it?
A: Greasing and flouring is a great first step, but for added insurance, especially with delicate cakes, try lining the bottom of the cake pans with parchment paper rounds. Cut the parchment paper to fit the bottom of the pan perfectly. This provides an extra layer of protection and ensures a clean release every time. After the cake has cooled slightly, run a thin knife or spatula around the edges of the pan to loosen any stubborn spots before inverting it onto a wire rack.
Q4: Can I make this cake ahead of time?
A: Absolutely! In fact, this cake is often even better the day after it’s made, as the flavors have had time to meld and deepen. You can bake the cake layers ahead of time, wrap them tightly in plastic wrap, and store them at room temperature for a day or two, or freeze them for longer storage. The filling can also be made a day ahead and stored in the refrigerator. Assemble the cake and glaze it a few hours before serving, or even the day before, and store it in the refrigerator. Just be sure to bring it to room temperature slightly before serving for the best flavor and texture.
Q5: Is it possible to make cupcakes instead of a layered cake with this recipe?
A: Yes, you can definitely adapt this recipe to make cupcakes! The baking time will be shorter, so you’ll need to adjust accordingly. Line a muffin tin with cupcake liners, fill each liner about two-thirds full, and bake at 350°F (175°C) for 18-22 minutes, or until a toothpick inserted into the center comes out clean. Let the cupcakes cool completely before frosting with the cream cheese filling and drizzling with the pineapple glaze. This adaptation is perfect for parties or individual servings.