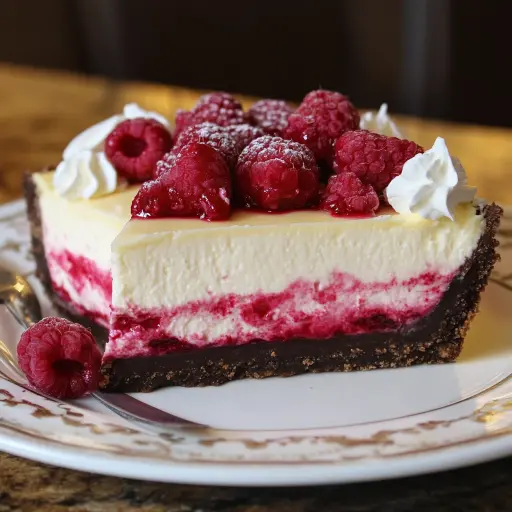
Description: This White Chocolate Raspberry Cheesecake is a decadent and visually stunning dessert, perfect for special occasions or any time you want to treat yourself. It combines the creamy richness of white chocolate with the tart, fruity burst of raspberries, all nestled on a buttery graham cracker crust. The beautiful raspberry swirl not only adds a delicious flavor contrast but also creates an elegant presentation that will impress your guests. This cheesecake is surprisingly easy to make, though it does require some patience, especially during the cooling and chilling stages. But trust me, the end result is well worth the effort.
Ingredients:
Crust:
- 1 ½ cups graham cracker crumbs (or Oreo crumbs for a chocolate twist)
- 2 tbsp granulated sugar
- 6 tbsp unsalted butter, melted
Cheesecake Filling:
- 4 (8 oz) packages cream cheese, softened
- 1 cup granulated sugar
- 1 tsp vanilla extract
- 4 large eggs
- ½ cup sour cream
- 8 oz white chocolate, melted and slightly cooled
- ¼ cup all-purpose flour (optional, helps with structure)
Raspberry Swirl:
- ¾ cup raspberry preserves or fresh raspberry puree
- 1 tsp lemon juice
- Optional: 1 tsp cornstarch (if using puree, to thicken)
Preparation:
Step 1: Prepare the Crust
In a medium bowl, combine the graham cracker crumbs, sugar, and melted butter. Mix well until all the crumbs are evenly moistened and the mixture resembles wet sand.
Press the mixture firmly and evenly into the bottom of a 9-inch springform pan. You can use the bottom of a measuring cup or your fingers to create a smooth, compact crust.
Bake the crust in a preheated oven at 325°F (160°C) for 10 minutes. This will help the crust set and prevent it from becoming soggy.
Remove the crust from the oven and let it cool slightly while you prepare the cheesecake filling.
Step 2: Prepare the Raspberry Swirl
If using raspberry preserves, simply mix the preserves with the lemon juice in a small bowl until smooth. The lemon juice will help to brighten the flavor of the preserves.
If using fresh raspberry puree, combine the puree with the lemon juice and cornstarch (if using) in a small saucepan. Simmer over medium heat, stirring constantly, until the mixture has slightly thickened. This will help prevent the raspberry swirl from sinking into the cheesecake during baking.
Remove the raspberry swirl from the heat and set aside to cool.
Step 3: Make the Cheesecake Filling
In a large bowl, beat the softened cream cheese with an electric mixer until smooth and creamy. This is a crucial step to ensure a lump-free cheesecake. Make sure your cream cheese is properly softened before you begin.
Gradually add the sugar and vanilla extract, and continue to beat until the mixture is light and fluffy. Scrape down the sides of the bowl as needed to ensure everything is evenly incorporated.
Add the eggs, one at a time, beating well after each addition. Be careful not to overbeat the batter at this stage, as this can incorporate too much air and cause the cheesecake to crack during baking.
Mix in the sour cream until just combined. Sour cream adds moisture and tanginess to the cheesecake, creating a richer flavor and texture.
Gently fold in the melted white chocolate until it is evenly distributed throughout the batter. Make sure the white chocolate is slightly cooled before adding it to the batter, as hot chocolate can cook the eggs.
If using flour, add it to the batter and fold until just combined. The flour helps to stabilize the cheesecake and prevent it from cracking. However, it is optional, and you can omit it if you prefer a more delicate texture.
Step 4: Assemble the Cheesecake
Pour half of the cheesecake batter into the prepared crust, spreading it evenly.
Spoon half of the raspberry sauce in small dollops over the batter.
Use a toothpick or skewer to gently swirl the raspberry sauce into the batter. Be careful not to over-swirl, as this can muddy the colors and create a less defined swirl.
Repeat with the remaining cheesecake batter and raspberry sauce.
Step 5: Bake the Cheesecake
Bake the cheesecake in a water bath to ensure even cooking and prevent cracking. To create a water bath, wrap the bottom of the springform pan tightly with heavy-duty aluminum foil to prevent water from seeping in. Place the wrapped pan in a larger roasting pan and add hot water to the roasting pan until it reaches about halfway up the sides of the springform pan.
Alternatively, you can place a pan of hot water on the rack below the cheesecake during baking. This will create a similar effect by adding moisture to the oven.
Bake the cheesecake in the preheated oven for about 60 minutes, or until the edges are set and the center is slightly jiggly. The cheesecake should be firm but not completely solid.
Turn off the oven and crack the oven door slightly. Let the cheesecake cool in the oven for 1 hour. This will help to prevent the cheesecake from cracking as it cools.
Remove the cheesecake from the oven and let it cool completely at room temperature.
Refrigerate the cheesecake for at least 6 hours, or preferably overnight. This will allow the cheesecake to fully set and develop its flavors.
Why You Will Love This Recipe
This White Chocolate Raspberry Cheesecake is a showstopper for several reasons. First, the combination of creamy white chocolate and tangy raspberries is simply irresistible. The textures are also delightful, with the smooth, rich cheesecake contrasting beautifully with the crisp graham cracker crust and the burst of flavor from the raspberry swirl. Secondly, the presentation is stunning. The vibrant raspberry swirl makes it a feast for the eyes as well as the palate. Finally, while it looks impressive, the recipe is straightforward and achievable for home bakers of all levels. It’s a guaranteed crowd-pleaser that will have everyone asking for seconds.
Serving Suggestions:
- Serve chilled, straight from the refrigerator.
- Garnish with whipped cream, fresh raspberries, and white chocolate shavings for an extra touch of elegance.
- A drizzle of raspberry sauce or a dusting of powdered sugar also makes a lovely presentation.
- Pair with a glass of dessert wine or a cup of coffee or tea.
- For a more casual presentation, cut into smaller squares and serve as part of a dessert buffet.
Tips:
- Make sure your cream cheese is fully softened before you begin mixing the filling. This will help to prevent lumps and ensure a smooth, creamy texture.
- Don’t overbeat the cheesecake batter, as this can incorporate too much air and cause the cheesecake to crack during baking.
- Use a water bath to bake the cheesecake. This will help to prevent cracking and ensure even cooking.
- Cool the cheesecake slowly in the oven before refrigerating it. This will also help to prevent cracking.
- Refrigerate the cheesecake for at least 6 hours, or preferably overnight, before serving. This will allow the cheesecake to fully set and develop its flavors.
- If using fresh raspberries for the swirl, be sure to simmer them with cornstarch to thicken the puree. This will prevent the swirl from sinking into the cheesecake.
- For a chocolate twist, use Oreo crumbs instead of graham cracker crumbs for the crust.
Prep Time: 30 minutes
Cook Time: 1 hour
Total Time: 6 hours 30 minutes (including chilling time)
Nutritional Information: (Approximate, per serving)
Calories: 450-550
Protein: 8-10g
Sodium: 200-250mg
Conclusion
This White Chocolate Raspberry Cheesecake is a truly special dessert that is perfect for any occasion. The combination of creamy white chocolate, tangy raspberries, and a buttery graham cracker crust is simply irresistible. While it requires a bit of time and patience, the end result is well worth the effort. With its beautiful presentation and delicious flavor, this cheesecake is sure to impress your family and friends. So, gather your ingredients, follow the steps, and get ready to create a dessert masterpiece that will be remembered long after the last bite.
5 Questions and Answers about this Recipe
Q1: Can I use a different type of crust for this cheesecake?
A: Absolutely! While the graham cracker crust is a classic choice, you can easily substitute it with a different type of crust. Oreo crumbs (as mentioned in the ingredients) provide a delicious chocolate twist. You could also use vanilla wafer crumbs, shortbread cookie crumbs, or even a pecan crust for a nutty flavor. Just be sure to adjust the amount of butter accordingly to ensure the crust holds together well.
Q2: What can I do if my cheesecake cracks while baking?
A: Cracking can be a common issue with cheesecakes, but there are several things you can do to minimize the risk. First, make sure your cream cheese is fully softened and that you don’t overbeat the batter. A water bath is highly recommended as it provides gentle, even heat. Also, cooling the cheesecake slowly in the oven with the door cracked open helps to prevent drastic temperature changes that can lead to cracking. If your cheesecake does crack, don’t worry! It won’t affect the taste. You can easily cover it with whipped cream, fresh fruit, or chocolate shavings to hide any imperfections.
Q3: Can I make this cheesecake ahead of time?
A: Yes, in fact, it’s highly recommended! Cheesecakes actually taste better after they’ve had time to chill in the refrigerator for at least 6 hours, or preferably overnight. This allows the flavors to meld together and the texture to fully set. You can make the cheesecake 1-2 days ahead of time and store it covered in the refrigerator. Just be sure to add any toppings, such as whipped cream or fresh fruit, right before serving.
Q4: Can I freeze this cheesecake?
A: Yes, you can freeze this cheesecake for longer storage. To freeze, wrap the cooled cheesecake tightly in plastic wrap, then in a layer of aluminum foil. Freeze for up to 2-3 months. When ready to serve, thaw the cheesecake in the refrigerator overnight. Be aware that freezing may slightly alter the texture of the cheesecake, but it will still be delicious.
Q5: What if I don’t have a springform pan?
A: While a springform pan is ideal for making cheesecakes, you can still make this recipe without one. If you don’t have a springform pan, you can use a regular cake pan, but you’ll need to line it with parchment paper, leaving an overhang that you can use to lift the cheesecake out of the pan after it has chilled. Be sure to grease the parchment paper well to prevent sticking. However, removing the cheesecake from a regular cake pan can be tricky, so a springform pan is definitely recommended if you plan to make cheesecakes often.