Description of this recipe
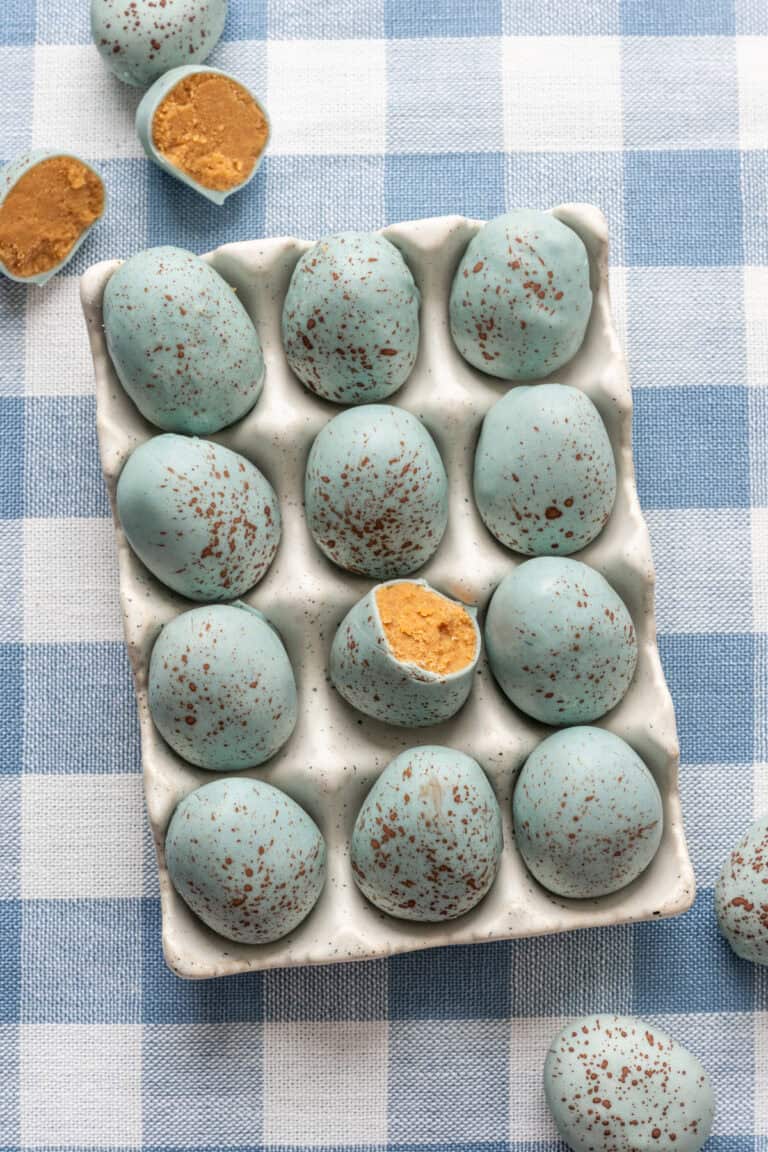
Peanut Butter Easter Eggs are a delightful homemade version of a classic candy favorite, inspired by the iconic chocolate peanut butter treats everyone knows and loves. These beautiful, speckled eggs feature a creamy, naturally sweetened peanut butter filling coated in smooth, pastel-colored white chocolate. What makes this recipe truly special is its use of wholesome ingredients like maple syrup and almond flour, along with natural coloring from spirulina and matcha to create that signature robin’s egg look. The result is a treat that is not only visually stunning but also rich, satisfying, and perfect for Easter celebrations.
Why you will love this recipe
You will love this recipe because it combines indulgence with simplicity and a touch of creativity. The filling is rich and creamy without being overly sweet, while the white chocolate coating adds a satisfying snap. The natural food coloring makes these eggs unique and appealing without artificial dyes. They are also fun to make—especially the speckling step, which adds a playful, artistic touch. Whether you’re making them as gifts, for an Easter dessert table, or just to enjoy at home, these eggs are guaranteed to impress both visually and in flavor.
Ingredients:
For the peanut butter egg filling:
- 1 1/4 cups natural, runny peanut butter (no sugar added)
- 1/4 cup maple syrup
- 1/4 cup powdered sugar
- 1/3 cup almond flour
- 1/2 teaspoon vanilla extract
- Pinch of salt
For the white chocolate coating:
- 8 ounces white chocolate melting wafers
- 2 teaspoons coconut oil
- 1/2 teaspoon blue spirulina
- 1/4 teaspoon matcha powder (or substitute with food coloring)
For the speckles:
- 1 teaspoon cocoa powder
- 1 tablespoon water
Preparation:
Step 1
In a mixing bowl, combine the peanut butter, maple syrup, powdered sugar, almond flour, vanilla extract, and a pinch of salt. Mix thoroughly until the filling is smooth, thick, and well combined. The texture should be soft but firm enough to hold its shape when formed.
Step 2:
Scoop out approximately 2 tablespoons of the mixture for each egg. Roll into a ball using your hands, then gently shape into an oval to resemble an egg. Place each shaped piece onto a parchment-lined baking sheet. Once all eggs are formed, transfer the tray to the freezer and allow them to firm up while preparing the coating.
Step 3:
In a small bowl, whisk together the cocoa powder and water to create a thin mixture for the speckles. Set this aside. In another microwave-safe bowl, combine the white chocolate and coconut oil. Heat in 15–20 second intervals, stirring between each, until completely melted and smooth.
Step 4:
Stir the spirulina and matcha powder into the melted white chocolate until you achieve a soft, pale blue-green color reminiscent of robin’s eggs. Adjust the color gradually to your preference. Pour the mixture into a narrow glass or container to make dipping easier.
Step 5:
Remove the peanut butter eggs from the freezer—they should be firm but not completely frozen. Insert a toothpick into the base of each egg and dip it into the melted chocolate, ensuring it is fully coated. Allow excess chocolate to drip off, then place the egg back onto the parchment paper. Remove the toothpick carefully before the coating fully sets to avoid cracking.
Step 6:
To create the speckled effect, dip a pastry brush into the cocoa mixture and flick it gently over the eggs from a height of about 8 inches. This will create natural-looking speckles. Be prepared for a bit of mess—this step is fun but can splatter!
Step 7:
Place the coated and speckled eggs in the refrigerator for about 10 minutes, or until the chocolate is fully set. Once firm, they are ready to serve.
Serving Suggestions:
Arrange these Peanut Butter Easter Eggs in a decorative basket or on a pastel-themed dessert platter for a festive presentation. They make wonderful edible gifts when packaged in small boxes or cellophane bags. Serve them alongside other Easter treats like cookies or cakes, or enjoy them with coffee or tea for a sweet afternoon indulgence.
Tips:
Use natural, runny peanut butter for the best texture—thicker peanut butter may require slight adjustments. If the filling feels too soft, add a bit more almond flour. Keep the eggs semi-frozen during dipping to ensure the chocolate sets quickly and evenly. Work quickly when coating to prevent melting. For cleaner results, use a fork instead of a toothpick for dipping if preferred. Always allow the chocolate to set fully before handling.
Prep Time:
25 minutes
Cook Time:
0 minutes
Total Time:
25 minutes (plus chilling time)
Nutritional Information:
Calories: 180 per egg
Protein: 4g
Sodium: 85mg
Conclusion
Peanut Butter Easter Eggs are a beautiful and delicious homemade treat that perfectly captures the spirit of the season. With their creamy filling, smooth chocolate coating, and charming speckled finish, they are as delightful to make as they are to eat. This recipe offers a healthier twist on a classic candy while maintaining all the indulgence you crave. Whether shared with loved ones or enjoyed as a personal treat, these eggs are sure to become a cherished Easter tradition.
Questions and Answers:
- Can I use regular peanut butter instead of natural peanut butter?
Yes, but natural peanut butter is recommended for a smoother, less sweet filling. If using regular peanut butter, you may need to adjust the sweetness. - What can I use instead of almond flour?
You can substitute with oat flour or crushed graham crackers, though the texture and flavor will vary slightly. - How do I store these eggs?
Store them in an airtight container in the refrigerator for up to one week. - Can I use regular food coloring instead of spirulina and matcha?
Absolutely. Gel or liquid food coloring works well if you prefer a more traditional approach. - Why do my chocolate coatings crack?
This can happen if the eggs are too cold or if the toothpick is removed too late. Let the coating set slightly before removing the toothpick to avoid cracking.