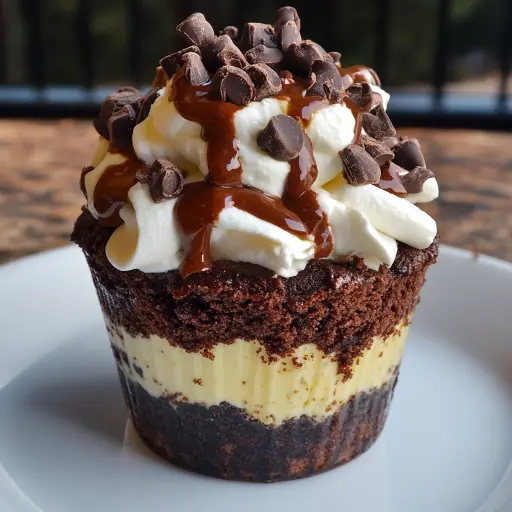
Description: Indulge in the ultimate dessert experience with these Loaded Brownie Cheesecake Cups! Combining the rich, fudgy goodness of homemade brownies with the creamy tang of cheesecake, all layered with decadent chocolate ganache and luscious caramel sauce. These individual desserts are perfect for parties, potlucks, or simply satisfying your sweet cravings. Each bite is a symphony of textures and flavors that will leave you wanting more. Forget choosing between brownies and cheesecake – now you can have both in one delightful cup!
Ingredients:
Brownie Layer:
- Fudgy brownies, homemade or store-bought (about 2 cups, crumbled). For a truly exceptional treat, I highly recommend using a homemade brownie recipe that you love. Whether it’s a boxed mix doctored up or a decadent from-scratch creation, the quality of the brownies will significantly impact the overall flavor of the cups. Aim for a fudgy, slightly underbaked texture; these brownies will provide the perfect moist base for the creamy cheesecake layer. If you’re short on time, a good quality store-bought brownie is perfectly acceptable.
Cheesecake Filling:
- 1 1/2 cups (12 ounces) cream cheese, softened to room temperature. The key to a smooth and creamy cheesecake filling is using cream cheese that is completely softened. Allow the cream cheese to sit at room temperature for at least an hour, or even longer depending on the temperature of your kitchen. This will ensure that it blends easily with the other ingredients, preventing any lumps or grainy texture. I prefer using full-fat cream cheese for the richest flavor and texture, but you can substitute with a reduced-fat version if desired. Just be aware that the final texture may be slightly less creamy.
- 1/2 cup powdered sugar, sifted. Powdered sugar is used to sweeten the cheesecake filling and also helps to create a smooth, velvety texture. Sifting the powdered sugar before adding it to the cream cheese is crucial to prevent any lumps. I use confectioners’ sugar for this recipe.
- 1 teaspoon pure vanilla extract. Vanilla extract is a quintessential ingredient in cheesecake, adding a warm and aromatic depth of flavor. Be sure to use pure vanilla extract, not imitation vanilla flavoring, for the best results. The quality of the vanilla extract can make a noticeable difference in the overall taste of the cheesecake filling.
- 1 cup heavy whipping cream, chilled and whipped to stiff peaks. The whipped cream is what makes the cheesecake filling light and airy. Make sure your heavy whipping cream is well-chilled before whipping it. Using a stand mixer or hand mixer, whip the cream until stiff peaks form. This means that when you lift the beaters, the peaks of whipped cream should hold their shape without drooping. Be careful not to overwhip the cream, as it can turn grainy.
Toppings:
- Chocolate ganache: equal parts melted chocolate and heavy cream. For a simple ganache, melt semi-sweet chocolate chips with warmed heavy cream.
- Caramel sauce: store-bought or homemade. A drizzle of caramel adds a beautiful sweetness and richness that perfectly complements the chocolate and cheesecake. You can use store-bought caramel sauce for convenience, or make your own homemade caramel sauce for an extra touch of indulgence. A salted caramel sauce would also be a delicious option!
- Extra brownie crumbs: for topping and layering. Reserve some of the crumbled brownies to sprinkle on top of the cheesecake cups for added texture and flavor.
Preparation:
Step 1: Prepare the Brownies
If you’re making your own brownies, bake them according to your favorite recipe. Let them cool completely before crumbling. You can also use store-bought brownies. Break the cooled brownies into small, bite-sized pieces. I prefer a mix of larger and smaller crumbs for textural interest. Set aside the crumbled brownies. Reserve some to use as topping.
Step 2: Make the Cheesecake Filling
In a large bowl, beat the softened cream cheese, powdered sugar, and vanilla extract together with an electric mixer until smooth and creamy. Start on low speed to prevent the powdered sugar from flying everywhere, then increase the speed to medium. Scrape down the sides of the bowl as needed to ensure that all the ingredients are fully incorporated. The mixture should be light and fluffy.
Step 3: Fold in the Whipped Cream
Gently fold the whipped cream into the cream cheese mixture until just combined. Be careful not to overmix, as this will deflate the whipped cream and result in a less airy filling. Use a rubber spatula to fold the whipped cream in, using a gentle upward motion. The mixture should be smooth and homogenous.
Step 4: Assemble the Cups
Choose your serving cups or glasses. Small mason jars, parfait glasses, or even disposable cups work well. Begin by layering crumbled brownies at the bottom of each cup. This will create a delicious and fudgy base for the cheesecake filling. You can pack the brownies down slightly to create a more compact layer.
Step 5: Layering Time!
Next, pipe or spoon the cheesecake filling over the brownie layer. For a neat presentation, use a piping bag fitted with a large round tip. If you don’t have a piping bag, you can simply use a spoon to dollop the filling into the cups. Drizzle with chocolate ganache and caramel sauce. Repeat the layers of brownies, cheesecake filling, ganache, and caramel until the cup is filled.
Step 6: Top It Off
Finish by topping the cheesecake cups with extra brownie crumbs, a final drizzle of chocolate ganache, and a generous swirl of caramel sauce. Get creative with your toppings! You can also add chopped nuts, sprinkles, or other candies.
Step 7: Chill and Serve
Refrigerate the Loaded Brownie Cheesecake Cups for at least 1 hour before serving. This will allow the cheesecake filling to set up and the flavors to meld together. Chilling also makes the cups easier to handle and prevents the toppings from melting.
Why You Will Love This Recipe:
These Loaded Brownie Cheesecake Cups are incredibly versatile and customizable. You can easily adapt the recipe to suit your preferences and dietary needs. For example, you can use gluten-free brownies, dairy-free cream cheese, or sugar-free sweeteners. These are individual, no-bake, and easy to put together.
COOKING Rating:
- Easy: 1/5
Serving Suggestions:
Serve these decadent dessert cups chilled as an after-dinner treat, at parties, potlucks, or any special occasion. They are also perfect for individual desserts or as a fun and interactive dessert bar where guests can customize their own cups. The richness of the cheesecake and brownies pairs wonderfully with a cup of freshly brewed coffee or a glass of cold milk.
Tips:
- Make sure your cream cheese is fully softened for the smoothest cheesecake filling.
- Don’t overmix the whipped cream into the cream cheese mixture to avoid a deflated filling.
- Chill the cups for at least an hour before serving for optimal flavor and texture.
- Get creative with your toppings! Add chopped nuts, sprinkles, or other candies.
- For a gluten-free option, use gluten-free brownies.
- For a dairy-free option, use dairy-free cream cheese and whipped cream.
Prep Time: 20 minutes Cook Time: (if making brownies) 30-40 minutes Total Time: 1 hour 50 minutes (includes chilling time)
Nutritional Information: (approximate, per cup, varies based on ingredients)
- Calories: 450-600
- Protein: 8-12g
- Sodium: 150-250mg
Conclusion:
These Loaded Brownie Cheesecake Cups are a guaranteed crowd-pleaser. The combination of fudgy brownies, creamy cheesecake, rich chocolate ganache, and sweet caramel sauce is simply irresistible. They are easy to make, customizable, and perfect for any occasion. So go ahead and indulge in this decadent dessert – you deserve it!
Questions and Answers:
Q1: Can I make these ahead of time? A: Absolutely! These cheesecake cups are perfect for making ahead of time. In fact, I recommend chilling them for at least an hour before serving to allow the flavors to meld together. You can prepare them up to 2-3 days in advance and store them in the refrigerator. Just be sure to cover them tightly to prevent them from drying out or absorbing any odors from the fridge.
Q2: Can I use a different type of brownie? A: Of course! Feel free to experiment with different types of brownies to customize your cheesecake cups. Blondies, peanut butter brownies, or even red velvet brownies would all be delicious alternatives. Just make sure the brownies are cooled completely before crumbling them for the layers.
Q3: Can I make these without whipped cream? A: While the whipped cream adds a light and airy texture to the cheesecake filling, you can substitute it with a stabilized whipped topping if you prefer. This will still provide a creamy texture but will be slightly denser than using whipped cream. Be sure to gently fold in the whipped topping to avoid deflating the filling. However, the consistency will differ.
Q4: What’s the best way to melt the chocolate for the ganache? A: There are several ways to melt chocolate for the ganache. You can use a double boiler, a microwave, or even a saucepan. If using a double boiler, place a heat-proof bowl over a pot of simmering water, making sure the bottom of the bowl doesn’t touch the water. Add the chocolate to the bowl and stir until melted and smooth. If using a microwave, heat the chocolate in 30-second intervals, stirring in between, until melted. If using a saucepan, heat the chocolate over low heat, stirring constantly, until melted. Be careful not to burn the chocolate! If you are using a pan use a non-stick pan to ensure it does not burn.
Q5: Can I freeze these? A: While these cheesecake cups are best enjoyed fresh, you can freeze them for up to 1-2 months. Wrap each cup tightly in plastic wrap and then place them in a freezer-safe container. When ready to serve, thaw them in the refrigerator overnight. Keep in mind that the texture of the cheesecake filling may change slightly after freezing, becoming a bit more dense. The toppings might also lose some of their visual appeal.