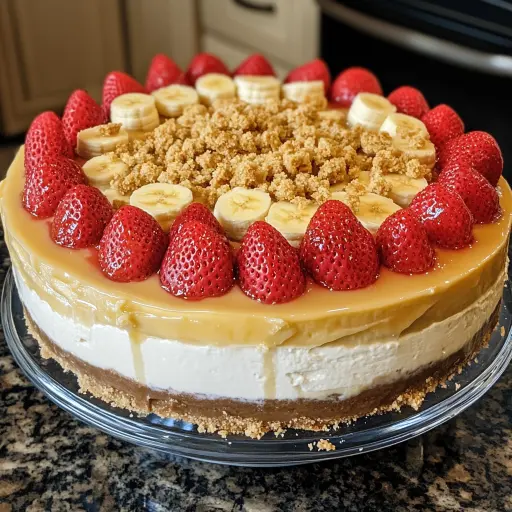
Description: Indulge in the ultimate dessert mashup with this show-stopping Strawberry Crunch Cheesecake and Banana Pudding Cheesecake! This decadent creation combines the creamy richness of a classic cheesecake with the nostalgic flavors of strawberry crunch and comforting banana pudding. Half strawberry bliss, half banana heaven, it’s a dessert that caters to every craving and is guaranteed to be the star of any occasion. The buttery, crumbly crust provides the perfect foundation for the tangy cheesecake, while the strawberry crunch layer adds a delightful textural contrast and burst of fruity sweetness. On the other side, the creamy banana pudding, studded with slices of ripe banana, offers a comforting and familiar flavor profile. Topped with fresh fruit, extra syrup, and a sprinkle of crushed cookies, this cheesecake is a feast for the eyes and the palate.
Ingredients:
For the Crust:
- 2 cups crushed vanilla wafers or graham crackers
- ½ cup (1 stick) melted unsalted butter
- ¼ cup granulated sugar
For the Cheesecake Base:
- 16 oz (2 packages) cream cheese, softened to room temperature
- ¾ cup granulated sugar
- 2 large eggs
- 1 tsp vanilla extract
- ½ cup sour cream
For the Strawberry Crunch Layer:
- 1 cup crushed golden Oreos (about 12 cookies)
- 2 tbsp melted unsalted butter
- ½ cup fresh strawberries, finely chopped
- ½ cup strawberry glaze or preserves (store-bought or homemade)
For the Banana Pudding Layer:
- 1 cup banana pudding (store-bought or homemade – vanilla pudding is also a good substitute if you’re adding banana extract)
- 1 medium banana, sliced into thin rounds
- ½ cup whipped cream (store-bought or homemade)
For the Toppings:
- Fresh strawberries, sliced
- Sliced bananas
- Strawberry syrup
- Crushed vanilla wafers or golden Oreos (for extra crunch)
Preparation:
Step 1: Prepare the Crust: Preheat your oven to 350°F (175°C). In a medium bowl, combine the crushed vanilla wafers (or graham crackers), melted butter, and sugar. Mix well until the mixture resembles wet sand. Press the mixture firmly into the bottom of a 9-inch springform pan or a foil pan, creating an even layer. For a crisper crust, bake the crust for 10 minutes. Remove from the oven and let cool completely before adding the cheesecake filling. Cooling it fully is crucial to prevent the crust from becoming soggy from the moisture in the cheesecake batter. This is the foundation of the whole dessert so pay close attention.
Step 2: Make the Cheesecake Base: In a large mixing bowl, using an electric mixer (either a stand mixer or a hand mixer), beat the softened cream cheese and granulated sugar together until smooth and creamy. This process should take about 3-5 minutes. Ensure that the cream cheese is thoroughly softened; otherwise, you may end up with a lumpy cheesecake. The goal is a perfectly smooth, lump-free base. Scrape down the sides of the bowl occasionally to ensure everything is incorporated.
Step 3: Add Eggs and Flavorings: Add the eggs one at a time, beating well after each addition. Be careful not to overmix at this stage, as overmixing can incorporate too much air into the batter, which can cause the cheesecake to crack during baking. Mix in the vanilla extract and sour cream until just combined. Sour cream adds moisture and tanginess to the cheesecake, contributing to its overall flavor and texture. The vanilla extract enhances the sweetness and creates a more well-rounded flavour profile.
Step 4: Pour and Bake the Cheesecake: Gently pour the cheesecake batter over the cooled crust, spreading it evenly. Bake in the preheated oven for 35-40 minutes, or until the edges are set and the center is just slightly jiggly. The jiggle is important; it means the cheesecake is not overbaked, and it will continue to set as it cools. Overbaking will result in a dry, cracked cheesecake. Keep a close eye on it during the last 10 minutes of baking.
Step 5: Cool Completely: Turn off the oven and crack the oven door slightly. Allow the cheesecake to cool in the oven for about an hour. This gradual cooling process helps prevent cracking. After an hour, remove the cheesecake from the oven and let it cool completely at room temperature. Once it has cooled to room temperature, cover it with plastic wrap and refrigerate for at least 4 hours, or preferably overnight. This chilling time is essential for the cheesecake to fully set and develop its flavor.
Step 6: Prepare the Strawberry Crunch Layer: While the cheesecake is chilling, prepare the strawberry crunch topping. In a medium bowl, combine the crushed golden Oreos and melted butter. Mix well until the crumbs are evenly coated with butter. In another small bowl, combine the chopped fresh strawberries and strawberry glaze or preserves.
Step 7: Assemble the Layers: Once the cheesecake has cooled completely and set, it’s time to assemble the layers. Divide the cheesecake visually in half down the middle.
- For the Strawberry Side: Carefully sprinkle the crushed golden Oreo mixture evenly over one half of the cheesecake. Gently press the crumbs into the surface of the cheesecake. Then, spoon the strawberry-glaze mixture over the crushed Oreo layer, spreading it evenly.
- For the Banana Side: Spread the banana pudding evenly over the remaining half of the cheesecake. Arrange the sliced bananas on top of the banana pudding in a decorative pattern.
Step 8: Add the Final Touches: Top the strawberry side with fresh strawberry slices. Top the banana side with a generous dollop of whipped cream. Drizzle the entire cheesecake with strawberry syrup and sprinkle crushed vanilla wafers or golden Oreos over the top for added crunch and visual appeal.
Step 9: Chill and Serve: Refrigerate the assembled cheesecake for at least 30 minutes to allow the flavors to meld together. Before serving, cut into slices and enjoy the delicious combination of strawberry crunch and banana pudding!
Why you will love this recipe
This Strawberry Crunch Cheesecake and Banana Pudding Cheesecake is more than just a dessert; it’s an experience! Here’s why you’ll fall in love with it:
- The Best of Both Worlds: Can’t decide between strawberry crunch and banana pudding? Now you don’t have to! This recipe gives you the ultimate combination of two beloved flavors in one stunning dessert.
- A Textural Symphony: From the crisp, buttery crust to the creamy cheesecake filling, the crunchy strawberry topping, and the smooth banana pudding, this cheesecake offers a delightful contrast of textures that will keep your taste buds excited.
- Visually Stunning: The vibrant colors of the fresh strawberries and bananas, along with the contrasting textures of the toppings, make this cheesecake a showstopper that will impress your guests.
- Customizable: Feel free to adjust the flavors and toppings to suit your preferences. Use different types of cookies for the crust or crunch topping, or try adding other fruits or flavors to the cheesecake filling.
- Nostalgia and Comfort: Both strawberry crunch and banana pudding evoke feelings of nostalgia and comfort, making this cheesecake a perfect treat for any occasion.
Cooking Rating
Intermediate
Serving Suggestions:
- Serve chilled.
- Pair with a scoop of vanilla ice cream for an extra indulgent treat.
- Serve with a glass of cold milk or a cup of coffee.
- Garnish with extra fresh fruit and a drizzle of chocolate sauce for a special occasion.
Tips:
- Make sure your cream cheese is completely softened to avoid lumps in the cheesecake filling.
- Don’t overbake the cheesecake; it should still be slightly jiggly in the center when you take it out of the oven.
- Allow the cheesecake to cool gradually to prevent cracking.
- Refrigerate the cheesecake for at least 4 hours, or preferably overnight, to allow it to fully set and develop its flavor.
- Store leftover cheesecake in the refrigerator for up to 3 days.
- For a smoother topping use a kitchen torch to melt the top slightly
Prep Time:
30 minutes
Cook Time:
35-40 minutes
Total Time:
At least 5 hours (including chilling time)
Nutritional Information:
(Note: Nutritional information is an estimate and may vary based on specific ingredients used.)
- Calories: Approximately 500-600 per serving
- Protein: 8-10 grams per serving
- Sodium: 200-300 mg per serving
Conclusion
This Strawberry Crunch Cheesecake and Banana Pudding Cheesecake is a true masterpiece that combines the best of both worlds. It’s a decadent, flavorful, and visually stunning dessert that is sure to impress your friends and family. While it may require a bit of time and effort, the end result is well worth it. So, gather your ingredients, put on your apron, and get ready to create a dessert that will be the talk of the town!
Question and Answers about this recipe
Q1: Can I make this cheesecake ahead of time? A: Absolutely! In fact, I highly recommend making it at least a day ahead of time. The cheesecake needs ample time to chill in the refrigerator, which allows the flavors to meld together and the texture to set properly. This ensures a firmer, more flavorful cheesecake. You can prepare the entire cheesecake, including the layers, up to 24 hours in advance. Just be sure to cover it tightly with plastic wrap to prevent it from drying out or absorbing any unwanted flavors from the refrigerator.
Q2: I don’t have a springform pan. Can I use a regular baking pan? A: While a springform pan is ideal for easy removal of the cheesecake, you can definitely use a regular baking pan as well. However, you’ll need to take a few extra steps to ensure you can get the cheesecake out without damaging it. Line the baking pan with parchment paper, leaving an overhang on all sides. This will create “handles” that you can use to lift the cheesecake out of the pan once it has cooled and set. After chilling, gently lift the cheesecake out of the pan using the parchment paper overhang.
Q3: Can I substitute the strawberry glaze with something else? A: Certainly! If you don’t have strawberry glaze on hand, or if you prefer a different flavor, you can easily substitute it with other options. Raspberry preserves, strawberry jam, or even a homemade berry compote would work beautifully. You could also use a chocolate ganache for a richer, more decadent twist. Feel free to experiment with your favorite flavors to create a cheesecake that suits your taste preferences.
Q4: Is it necessary to cool the cheesecake in the oven with the door ajar? A: Cooling the cheesecake gradually in the oven with the door ajar is a crucial step in preventing cracks. The sudden temperature change from the hot oven to room temperature can cause the cheesecake to contract rapidly, leading to unsightly cracks on the surface. By allowing it to cool slowly in the oven, you minimize the temperature shock and give the cheesecake time to adjust gradually, resulting in a smoother, more even surface. While it’s not absolutely mandatory, it significantly increases your chances of achieving a crack-free cheesecake.
Q5: Can I freeze this cheesecake? A: Yes, you can freeze this cheesecake, although the texture of the toppings may change slightly upon thawing. To freeze, wrap the entire cheesecake tightly in plastic wrap, followed by a layer of aluminum foil. This will help protect it from freezer burn. Freeze for up to 2-3 months. When ready to serve, thaw the cheesecake in the refrigerator overnight. Keep in mind that the whipped cream may lose some of its structure and the fruit may become slightly softer after freezing and thawing. For best results, consider adding the fresh toppings just before serving if you plan to freeze the cheesecake.